Feeds:
Posts
Comments

Archive for the ‘Uncategorized’ Category

IMG_0299.JPG

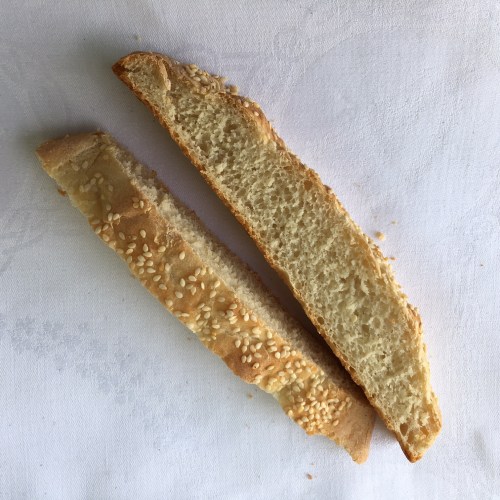
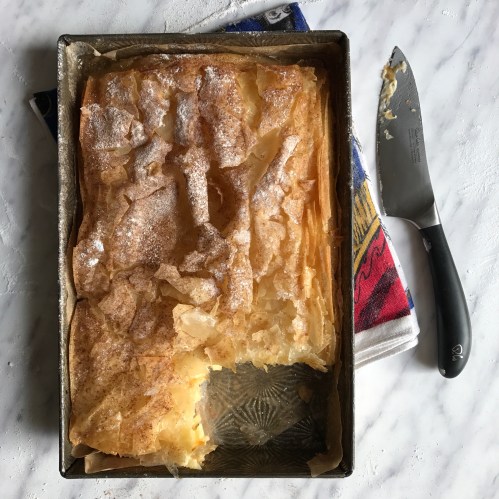
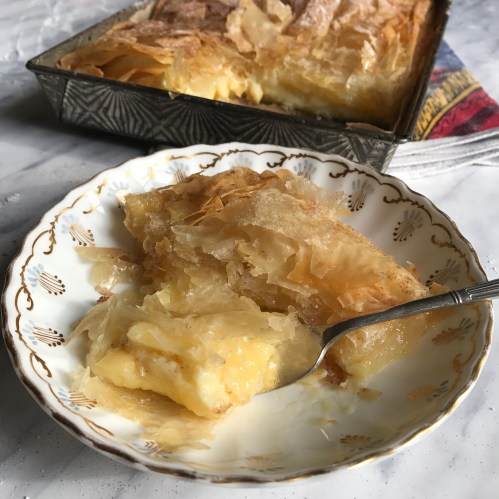
Galaktoboureko / Γαλακτομπούρεκο translated means milk pie.  A bit of a mouthful of a name, it takes a little practice before it rolls off the tongue, unlike the pie which should melt in the mouth.   A traditional Greek pastry that has an egg-rich, silky, creamy custard that is put to bed amongst crispy whisper-thin sheets of golden filo pastry.  This is all coated and infused with a sweet, citrus scented syrup laced with heavenly notes of cinnamon.  In the mouth, the crisp buttery pastry dissolves, allowing the delicate custard to flood the mouth like a soft gentle kiss on the forehead.  I may sound rather lyrical about this dessert but it truly is a dessert fit for a Greek God.  The name might be tricky but the recipe isn’t.

The best Galaktoboureko I have eaten was baked at my aunt’s home. Served warm, with the custard still light and wobbly and the filo pastry at the crisp melt in the mouth stage.  I sat under the shade of a tree in her garden overlooking the azure crystal clear waters of the Mediterranean sea, a Greek coffee resting on my lap and the only thought in my head being  whether could I manage a second slice.

Galaktoboureko is probably the first Greek dessert that comes to mind after Baklava and I know it isn’t always to everyone’s taste.  The custard, traditionally made with semolina, can be grainy and rubbery often sitting between what can only be described as paper thin cardboard soaked in an syrup sweet enough to rot your fillings.  I have eaten many versions of these and try to avoid them.  Galaktoboureko does not really like to sit around for days on end.  It is best enjoyed on the day.  This recipe replaces the semolina used to thicken the milk with cornflour, getting rid of any grainy heavy texture that can occur.  The cornflour also gives a much lighter delicate custard.

Galaktoboureko is usually made in catering sized trays which is more than I can ever eat so I have made a smaller version which has been adapted from the recipe of Stelios Parliaros.  It can be baked either in a baking tray or in a spring form cake tin.  I prefer spring form as makes it easier to portion up.

The only thing to remember is that the true secret to this recipe is creating the perfect alchemy in the syrupRosewater, lemon rind, orange rind and a cinnamon stick can be added to the sugar and water to create the thick sticky syrup but I prefer the simple flavours of lemon and cinnamon. The amounts and strength of flavour can be easily altered to suit but it can be equally delicious just coated in a plain sugar and water syrup.

Galaktoboureko 6-8 portions

Ingredients

350ml full fat milk

150ml double cream

seeds from 1 vanilla pod

40g cornflour

80g caster sugar

3 egg yolks

1 whole egg

100g butter (for brushing filo)

180g approx filo pastry (sheets)

syrup

250g sugar

150ml water

cinnamon stick

Strip of lemon zest

Oven 160C –  Tray 27cms x 18cms or 21cm spring form cake tin

method

Place the milk and double cream into a pan.  Add the vanilla seeds and little of the caster sugar – this will help to prevent the milk from catching on the bottom of the pan and burning.  Gently bring the milk to the boil, stirring from time to time.

Combine the sugar and cornflour together in a bowl. Add the beaten eggs and with a whisk combine making sure that there are no lumps and the mixture is smooth and creamy.

Stir a little of the heated milk into the cornflour and eggs mixture and stir to combine, add a little more and stir then pour all of this mixture into the pan with the rest of the milk. Making sure there are no lumps and the mixture is smooth and creamy.

Replace the pan back on a low heat and continue to stir until the mixture has thickened.  Remove and set aside.

Melt the butter.

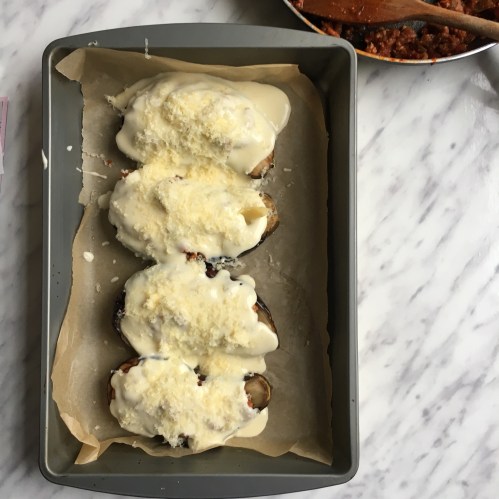
Brush the cake tin all over with the melted butter and line with one sheet of filo, half in the tin and half outside. Carry on doing this, making sure to generously coat each sheet of filo with the melted butter.

Pour the custard into the tin and fold the filo sheets over the custard again brushing each with the melted butter.

Finally take a sheet of filo and brush with butter, fold in half and lay on top, repeat with a second sheet, tucking in any extra filo.  This is to create a little extra height of filo layers. Give filo a final brush of butter and put into an oven for one hour.


Whilst the Galaktoboureko is in the oven make the syrup.

Put the sugar and water into a pan and heat until the sugar has dissolved.  Best results are achieved by not stirring the syrup but by agitating the pan to stop the sugar sticking. Once melted add lemon rind and cinnamon stick and bring to a boil.  Continue to boil for 10 minutes.  Remove from heat and leave to cool.  Swirling the pan every now and then making sure the syrup does not solidify.

The Galaktoboureko is done when the filo sheets are golden brown.  Remove from the oven and little by little pour over the cooled syrup.  Leave to cool.  The syrup will be taken up by the Galaktoboureko as it cools.  Best to leave for around an hour.  The Galaktoboureko will still be warm.

Dust with icing sugar and ground cinnamon.  Slice and serve maybe with a little ice cream.

IMG_0286

Read Full Post »

IMG_5588_sRGB

I wondered whether to leave the title as just Chocolate & Almond Cake but with a recipe by Elizabeth David it is Mrs David’s name that has the biggest impact. Her books continue to sell and any self respecting cook will have a copy of at least one, if not all, of them.  She is a cookery writer that British homes have truly taken to their hearts.  When first published her recipes took the post-war home cook (who was used to a limited and sparse cuisine) away to warmer climates and a different world.  Elizabeth David wrote in detail what she found on her travels through Europe, describing the foods she saw and ate, and sharing her whole culinary experience.   Today her books still give inspiration and ideas to her readers.  Her recipes are written in a simplistic form giving the reader food for thought (I make no excuse for puns).  The recipes are written for those who already know the basics of cookery but allowing room for the cook’s own personality in the making of her recipes.

When I started to write up this recipe I browsed a well known online bookshop for French Provincial Cooking (1960) – from where this recipe has been taken.  I was shocked and saddened to see a reviewer write that they didn’t care for the book as they didn’t like the recipe layout nor the fact that there were no pictures. This was how cookery books of their time were written.

My mother’s recipe collection had many words and very few pictures, tidied away into fat folders and in no particular order. Finding a recipe amongst the chaos was like a game of Pelmanism, remembering the sequence of recipes and memorizing where you last saw it in the pile was the name of the game.  The folders contained cuttings from newspaper columns, pages torn from doctors surgery magazines (much to my horror) and many many hand written recipes from friends.  The hand written ones are the most fragile, war torn from years of use with traces of sticky fingers with smudged ink and missing words where the steam from the kitchen has penetrated the paper.  Many of them are written in Greek or Italian, with some of the handwriting hardly legible. The ones that leap out at me and I love are those that are written on the back of a restaurant receipt, no doubt where my mother charmed the chef into giving her the recipe.

Elizabeth David’s instructions can at times be sparse leaving the cook to make her own decisions but in this recipe the instructions are clear – bitter dark chocolate and almond meal.  It wasn’t until I didn’t have any ground almonds and was left to use whole skinned almonds that a different view of the recipe started to form.

I did some digging around and, even though this cake appears in French Provincial Cooking, there was a very similar cake that had become popular in Capri and the coast of Amalfi around the 1950s called Caprese Torta.  I know that Elizabeth David’s mentor Norman Douglas lived in Capri and that she visited him often.  I can’t help but wonder if the idea of this cake came from Mrs David enjoying the very popular Caprese Torta with Norman Douglas?   Which, thinking about it, would make sense in that whole skinned  and roasted almonds is what Elizabeth David means as almond meal. I found that using whole nuts gives the cake a different texture than when using ground almonds. The biggest thrill is that is also gives a completely different taste, with a superior nutty flavour as the almonds are ground to a coarse sandy texture which give off little hits of the roasted almond flavour with each mouthful of cake.

As I sat at the kitchen table and started the process of skinning the almonds I started to think back to my mother’s cooking.  We would often receive neatly packaged parcels from Greece and Italy printed with foreign writing and tightly  wrapped.  As we broke their seal with a knife the nuts would spill out all over the kitchen table. Any precious nuts hitting the floor and rolling under cupboards would be collected up and added to the heap.  My job would be to steep them in boiling water and skin them one by one.  Later I was promoted to the roasting section, where I would stand over a large frying pan watching the almonds toast.  It only takes a second for them to go from golden blonde to burnt black. I can still remember the cries of my mother when I had allowed this to happen. Those almonds were a rare commodity.  The knack I learnt was to keep the pan moving all the time it is on the flame, and even off the flame the pan is still hot enough to burn them.

I have used ground almonds for years as an easy option. I knew that something was missing but didn’t really think enough about it.  It wasn’t until I started making this cake the old way with whole almonds that I realised what I was missing – the true smell and taste of almonds.  Opening the oven door during roasting the most heavenly aroma hit me, transporting me straight back to my first kitchen job. Something shop-bought ground almonds has never done!

FullSizeRender(2)

To skin and roast the almonds 

Place almonds in a bowl and cover them with boiling water.  Leave until the nuts are able to be handled without burning your fingers.  The almonds should just pop out when the skin is given a little pressure. Place them on a plate lined with kitchen paper to dry.  As the water chills, the skins become a little harder to remove.  Drain and replenish with boiling water again then wait until they are able to be handled and this should encourage the skins to release their nut.

Place on a baking tray and pop into an oven for 10 minutes – remove and shake the tray giving the almonds a chance to colour all over.  Pop back into the oven and repeat until the almonds have taken on a honey blonde colour.

Allow to cool.  Place into a food processor and chop until the almonds represent the consistency of coarse sand.

Elizabeth David’s Chocolate & Almond Cake

Ingredients

115g / 4oz bitter dark chocolate

85g / 3 oz caster sugar

85g / 3 oz butter

85g / 3 oz almond meal (ground almonds or whole almonds skinned and chopped, see above)

3 eggs separated (both egg yolks and egg whites beaten separately)

1 tbs rum or brandy

1 tbs black coffee (espresso)

Method

Gas mark 1/140C – Yes it is a very low oven temperature.

Break the chocolate up into a bowl and add the rum and coffee and melt either by microwave or in a double boiler.  Add the butter, stirring it into the chocolate mixture until it has melted.  Add the sugar, almonds and mix till combined.  Set aside. When it is cool add the beaten egg yolks.

In a separate bowl whisk the egg whites until stiff. These are then folded gently into the chocolate mixture. Pour the mixture into a well buttered 20cm removable base cake tin.  Bake for around 45 minutes or when the cake has a crust

Leave to cool, then carefully remove as it is a very fragile cake.   Sprinkle with icing sugar or leave plain.  This cake lends itself to being served with a little whipped cream or my preference clotted cream.

IMG_5589_sRGB

Read Full Post »

img_5237

This recipe comes from the Ducksoup Cookery Book written by Tom Hill and Clare Lattin who also run the tiny Ducksoup restaurant in Soho. I have to be honest and say I would not have even glanced at the book if it hadn’t been featured in one of Waterstones monthly cookery book evenings.  Clare and Tom were invited to talk about their book and offered us a couple of samples of their style of food.  There are so many cookbooks around at the moment each promising something new, something fast, something different.  I was prepared to be disappointed as I am quite hard to please these days but, even a small bite size sample of Tom Hill’s food had me sitting up and paying attention.  So much so, that the next day I acquired their book.

Glancing through the book the recipe that jumped out at me was the Orzo Pasta with Spicy Tomato Sauce and Feta dish. The three ingredients that I was instantly attracted to – tomatoes, feta and orzo which  is used in many delicious Greek recipes, but it can be very bland on its own, strong flavours are needed to bring the best out in it.  The spices in this recipe do just that.

The original recipe calls for fresh large tomatoes such as Pink Bull’s Heart but as we are now in the depths of winter any chance of finding a fresh tomato with any flavour is pretty slim. So, I have replaced them with tinned plum tomatoes. I have tried expensive brands and cheap ones and find the whole affair quite hit and miss – I then discovered Mutti and tend to use them as, for the moment, they seem a cut above the rest.

The spices give a real depth to the dish and the tanginess of the feta lifts the orzo and tomatoes to another level. This dish for me is best served with a hunk of bread on the side and maybe it’s the Greek in me but also an extra slice of feta to complete this dish.

This is a very simple and quick recipe and one that I will repeat again and again, mainly because other than the fresh oregano leaves I generally always have all the ingredients in my cupboard and fridge. If I couldn’t get fresh oregano leaves I would still use dried oregano because they do add an important note to this dish.

Note on the Orzo – it does need a stir whilst it is cooking and if you decided to save on washing up by adding it straight to the tomato’s it will take a lot longer to cook than the instructions on the packet plus there is a danger of over cooking the tomatoes – the pleasure of this simple recipe is that there is still a little bite in the tomatoes as they haven’t been allowed to stew.

Orzo Pasta with Spicy Tomato Sauce and Feta

Ingredients

400g tin tomatoes (Mutti)

50ml olive oil plus extra to dress at the end

1 tsp cumin seeds

1 tsp nigella seeds

1 small onion chopped finely

1 garlic glove crushed

1 tsp dried chilli flakes

1 bay leaf

1 tsp paprika

120g orzo pasta

100g feta or more

Sprig of fresh oregano leaves

Salt and pepper to season

Method

Place a frying pan over a low heat and add the olive oil. Add to this the nigella and cumin seeds and cook for a minute.

Add the onion and continue to cook on low heat until soft. Add the garlic and chilli flakes, bay leaf, and paprika and continue to cook for a further 2 minutes.

Add the tomatoes to the pan, roughly breaking them with the back of a wooden spoon and leave to simmer gently for ten minutes.

Season with salt and pepper.

In a pan bring some salted water to the boil and add the orzo pasta. Stir.  Cook for eight minutes or as instructed on the packet.  When cooked drain well and add to the tomato sauce.

Allow to cook for a further couple of minutes and serve. Crumble feta cheese over the top and a few of the oregano leaves. The final touch is to add a drizzle of olive oil.

Read Full Post »

_mg_6365

Gigantes – Baked Giant Butter Beans/Γίγαντες Πλακί

My mother always had a large white ceramic baking dish on hand at anytime of the day or night containing Gigantes.  When they were good I loved them.  Creamy soft butter beans coated in a garlicky tomato sauce with a kick of herbs. The trouble was, my mother would never quite repeat the recipe the same way twice and so they were not always good. Battles would follow if the recipe veered too far and I would be quite determined in rejecting the week’s offering if they didn’t quite taste as I liked them.  Other members of the family would eat them whatever was done to the recipe. I am still of the impression that they had no taste buds.

This is a simple dish and everyone likes it their way.  It’s basically a dish of baked beans. The beans in question being butter beans, soaked overnight and cooked in the oven with tomatoes, olive oil, celery, onion and their crowing glory; garlic, dill and parsley.

The sticking point in my mother’s Gigantes was that some weeks the ratio of garlic to beans was completely off the scale –  handy if there were any vampires in the area, or if the  dill had been overplayed.  Some weeks the butter beans themselves were a little al dente and other weeks the Gigantes were just perfect. On the perfect days they would be eaten with bread and a generous slice of feta.

Like a lot of recipes I post you can alter and add to this recipe depending what you have in your fridge or cupboard or just to make it your own with the balance of garlic and herbs.  Carrots are put into the dish by lots of cooks but I prefer it without.  Some omit the dill, where I feel it is what makes the dish.  The only thing I will say is that the beans do need to be soaked overnight and cooked until very tender. This can take anything from 45mins to 1 hour and 20 minutes.  Even if the flavours are right, there is nothing worse than biting into an al dente bean.  Trust me, I have had plenty of those over the years!

img_99151

Gigantes Plaki

Ingredients

500g gigantes /butter beans

olive oil for frying and serving at the end

1 large onion chopped finely

1 stick celery chopped finely

2 large cloves of garlic minced/crushed

400g tin of tomatoes

1 tsp sugar

2 tbs tomato purée

flat leaf parsley roughly chopped (1-2 tablespoons or more)

dill roughly chopped (1-2 tablespoons)

salt and pepper

Method

Soak the beans in water overnight.

Rinse the beans and place the beans in a pan and bring to a gentle boil, turn them down and simmer for anything between 50-100mins.  The beans are cooked when then are soft. Take one out and squeeze between your fingers.

Drain, rinse and set aside.

In a frying pan, add some olive oil and fry the chopped onion and celery.  Cook until the onion is starting to become translucent, add the garlic and cook for a few minutes more. Then add the tomatoes, adding half a tin of water to the pan along with the tomato purée. Add the teaspoon of sugar.  Season and stir.  Leave to simmer for 20 mins. Checking from time to time, if the mixture becomes dry add a little water.

Into an oven proof dish add the beans and the onion, celery, tomato and garlic. At this point also add the chopped parsley and dill.  Mix well and place in an oven at 180C for 40-45 minutes.

Serve with adding some olive oil over the top and a slice of feta.

Sausages also go very well with this dish.

These can be eaten hot, lukewarm or even cold.

Note:  I buy the Greek  3alpha Gigantes white beans (butter beans) from The Athenian Grocery in Moscow road, London W2 4BT, they also do a mail order service.  I am not connected with them in any way except I have been going to their shop since a small child.

Read Full Post »

img_1893

Papoutsakia -Little Shoes

img_1893

Papoutsakia in Greek means little shoes – the name alone endears me to this recipe but I also know that they are particularly tasty too. Little shoes are aubergines sliced in half and filled with minced meat that has been cooked in wine, herbs, cinnamon and tomatoes, then covered with a rich velvety cheesy bechamel sauce. These are then baked in the oven until golden brown.

Aubergines are plentiful in Greece.  A traditional home cooked dish baked in vast numbers and packed into large baking trays enough to feed an army.  It doesn’t matter that not everyone is sitting down to eat at the same time as they can be eaten hot, warm or cold (preferably with a salad and a hunk of bread).

Everytime I smell the aromatic waft that is released from the oven I am transported back to Greece. They are a true taste of home.  Even without the sun ripened aubergines and mediterrean tomatoes that are sometimes hard to find in England, this dish can still be made over here and taste just as good.  The secret is in the slow cooking of the meat, wine and herbs. Ingredient x  in this recipe is the cinnamon which is what really lifts the whole dish giving it a strong heart.

It could be said that this is a poor man’s moussaka as it has similar flavours and ingredients but it is a lot quicker to prepare and a lot lighter.

The recipe below is how I like to cook Papoutsakia, but like most recipes there is plenty of scope to make it your own.  I use lamb mince, but there is no reason why beef, pork or veal mince cannot be used, or even lentils.  I use tinned finely chopped tomatoes but if I had fresh tomatoes I would use those, again it is down to what is at hand.  I use a cinnamon stick placed into the meat while it is cooking but ground cinnamon is as good.

The cheesy bechamel sauce can be made to suit what you have in the fridge.  Ideally I would use Kefalotyri but I don’t always have it and so I sometimes use Pecorino or Romano cheese and if I feel I have some Cheddar to use up, I will add that instead.  The important ingredient in the bechamel is the egg, as it is this that creates the light velvety fluffy texture to the topping.  The scattering of further grated cheese on the top is to help create the golden brown effect that looks so inviting.

I have written the recipe for medium sized aubergines as that is what I am finding in the market at the moment.  Make sure to pick shiny plump aubergines which are at their peak. I also sprinkle the aubergines when halved with salt as I feel this draws out the bitterness in the aubergine, it’s a personal choice as I hear so many others tell me they don’t bother as aubergines are not bitter any more. I know that the larger aubergines can be a little bitter and that there are two types of aubergine male and female, the female being the sweeter of the two!!

I have baked the aubergines before filling, other recipes suggest frying.  I have found that aubergines love olive oil and tend to absorb a lot of oil in the pan which does add to the flavour but I prefer to bake them.  Firstly, I am saving on the olive oil and secondly there is less splashing and spitting, so much cleaner and easier.

Please note the photos below are using only 2 aubergines.

Papoutsakia – Little Shoes

Serves 4

Ingredients

4 medium aubergines

Salt

Olive oil

1 medium onion chopped finely (red or white)

1-2 cloves of garlic minced

400g  lamb mince (pork, beef or veal)

1 glass of red wine (optional) or water

400g tin of chopped tomatoes

1 tsp sugar

1 tbs oregano (or a little more!)

Bechamel Sauce

40gms butter

40gms flour

400ml milk (full fat)

Kefalotyri cheese or Percorino/Romano cheese or even another hard cheese such as a Cheddar

1 egg beaten

salt and pepper

Method

Slice the aubergines in half lengthwise.   With a knife carefully, without piercing the, make criss cross cuts into the creamy flesh.  Sprinkle with salt and leave, skin up, in a dish for 30-50mins.  This is to draw out any bitterness in the aubergines.  Rinse under cold water and dry.

img_0078

Brush the aubergines with olive oil inside and out and place skin side up in a baking sheet lined with parchment paper.  Place in an oven 180C for 15 minutes and then turn them over for another 15mins.  The aubergines should be slightly soft to the touch.

Remove from the oven and, with a spoon, carefully remove the central flesh from the aubergine leaving a scooped out shell.  Finely chop the scooped out flesh and put to one side.

Meat Sauce

Put a little olive oil in a pan and fry the chopped onion until translucent, then add the minced garlic, fry a little more but do not brown the garlic.

Add the mince to the pan with the garlic and onion and fry until brown, breaking up any lumps.

Add the glass of red wine to the pan and stir for a couple of minutes.

Add the tin of chopped tomatoes and a teaspoon of sugar, along with the oregano, salt and pepper.  Stir and allow to simmer for 20 minutes.  If the pan dries out too much add a little water.

Turn the oven onto 180C.

After 20 minutes add the chopped aubergine to the pan, stir and cook for a further 10 minutes or until all the liquid as been absorbed.

Set aside.

Bechamel sauce

In a pan melt the butter and add the flour. Stir the flour and butter well, and cook until a thick paste forms.  Slowly add the milk stiring continuously. Stir until the sauce comes to a gentle boil, keep stirring and remove from the heat when the sauce has thickened.

Add the grated cheese and stir.

Leave the bechamel to cool a little then add a tablespoon of the mixture to the beaten egg. Beat, then slowly add the egg to the belchamel sauce whisking as you add it.  If the bechamel is too hot and the egg added too quickly it will cook the egg and create a curdled appearance.

Assembly

img_0086img_0079

Remove the cinnamon stick if used and spoon the meat mixture into the aubergine shells.  Then cover with the bechamel sauce. Top with grated cheese and place in an oven at 180C for 30 mins or until the belchamel sauce has started to brown.

Serve with a Greek Salad or just a hunk of bread and a glass of Greek wine.

img_1894

Read Full Post »

img_8484

The kitchen garden is surrendering it last offerings and my hedge row foraging is coming to an end. This year the blackberries have been the best ever, fat, juicy and plentiful.  My secret location of blackberry bushes hasn’t failed me, and I have picked and picked. My clothing  having been caught and torn from blackberry thorns and hands and fingers stained from the dark purple blackberry juice not to mention the scratches on both my arms and legs. With jars full of blackberry jelly and the freezer drawers jammed with frozen berries to be used later in wines and pies I still can’t resist a final look to see if there are any berries left to be picked.  I noticed that there are still a small number that are in easy reach and would do very nicely for this recipe.

If there was a prize for a recipe for the simplest of cakes – then this recipe wins. All the ingredients apart from the blackberries are literally tossed into a mixing bowl and beaten for a few minutes until light and fluffy. The soft sweet mixture is then split into two. The first half placed in a lined loaf tin and evenly spread and then layered with blackberries. The remaining half mixture covers these and is smoothed over. The cake is then adorned with a generous scattering of flaked almonds and put into a low oven to cook.

The result, is a soft golden flaked almond toasted cake. The smell is heavenly, it hangs in the air, the almonds giving off a luxurious heavy scent with a note of sweetness from the blackberries.    It is best to wait until the cake cools completely before cutting into it, allowing the fruit to cool, but I have to warn you its hard going.  I tend to hover over it. prodding, willing it to cool quicker.  Whilst I wait the odd toasted almond is peeled from the top of the cake, if only to reassure me of what is to come and that patience will pay off.

Once cooled the cake is easy to slice into, the almonds not only make for a moist cake they give it some stability. The blackberries add colour, texture and a soft fruity taste. I have added around 150g of blackberries but more or less can be added.  The basic almond cake itself is good enough to stand on its own so if you only had a handful of blackberries this recipe would still work.  I added a few more as I didn’t want to waste them. I always wash the blackberries in cold water and then pick over them for any bits of vegetation. After which I leave them to drain and dry.  You need to have them completely dry before adding to the cake mixture.

Blackberry Studded Almond Cake

Ingredients

150g self raising flour

100g ground almonds

175g butter softened

150g caster sugar

2  eggs beaten

A few drops almond essence

4 tbs milk

25g flaked almonds (to decorate)

2lb loaf tin

Method

Turn the oven on to gas mark 3/160C

Grease with butter and line a 2lb loaf tin with grease proof paper.

In a bowl place the flour, butter, sugar, eggs, almond essence, milk and ground almonds.

Beat for a few minutes until the mixture is completely combined and has become light and fluffy.

Carefully spoon half the mixture into the tin and with the back of a spoon, smooth out so that the mixture is level and even.  Sprinkle on the blackberries.  Cover with the remaining cake mixture.

With a skewer or knife swirl the mixture around, this will dislodge the blackberries slightly so that they are spread around a little. Smooth again with the back of a spoon.

Scatter the flaked almonds and place in the middle of the oven for 1hour 15minutes or there about, depending on your oven.

The top of the cake should be firm to the touch when done and a beautiful golden colour.

Leave to cool in the tin for about 20 minutes. Then transfer to a wire rack and leave until completely cold.

Store in an airtight container. Will last a couple of days.


Read Full Post »

img_8016

Blueberry Muffins

Muffins.  What can I say about them, except – carefully peel away their paper cases to reveal the soft fluffy sponge of the muffin, and eat, let the sponge melt in the mouth and enjoy the sensation of juicy fruity hits of blueberries.  To me that is just about the right balance for the perfect muffin.  Homemade muffins are a world, an entire world, away from ones bought in supermarkets.

Muffins are not something I have ever had a yearning to bake.  I have only eaten them from coffee shops or when I have been tempted at the supermarket, only to regret it as soon as they have been packed into my shopping bag.  I have found them to be a heavy, dense sponge, unsubtly flavoured with either fruit, chocolate or cheese.

Until I had a small crop of homegrown blueberries to use I hadn’t given the muffin any thought.  This year my kitchen garden list was extended to include a few of what I call exotics.  One of these being blueberry bushes.  I followed the growing instructions to the letter, mixing up a cocktail of soils and making sure they were comfortably bedded and watered.  I had visions of endless crops of  super little blue berries and concerns of what I was going to do with this endless supply.

As the months passed, I would wander up the garden to check on them.  Eventually, I saw progress with the appearance of tiny little buds of promise.  I realise now that I wasn’t the only one who had noticed this, and like me were waiting with excitement for their ripening.

Early one morning as I looked down the garden while standing at the kitchen sink, I could see in the far distance that my blueberries where ready to eat. How?  because someone else was busy helping themselves, gobbling down those ripe blue berries as fast as they could. I flew out of the door and down the garden.  The blackbirds who have been keen to keep an eye on my garden had realised that the berries were now ripe for the picking.

They had been busy in my garden all summer helping out by getting rid of anything fruity and edible, but this time they were not going to get their beaks on my berries, not this time.  They had already stripped me of the redcurrants and the strawberries, not to mention the figs.

It upsets me to say that they  feasted on not only on a couple of my figs but a whole tree full (not a single one was left). To add insult to injury the number of figs was too great for my resident two, so they felt the need to invite a cloud of friends to help finish off the fruit.  At times the tree would shake and tremble as they fought over a particularly juicy fig. Whilst all the while all I could do was watch from the kitchen sink, vowing that next year the tree would be netted.

I wasn’t letting them have the blueberries.  A netted structure was set up. I watched from the kitchen sink as they bounced up and down on my netted enclosure,  whilst holding on tight to the netting with their beaks trying as hard as they could to free a small hole, but nothing budged. Those remaining blueberries were mine, all mine.  Admittedly, my reward was only a small crop of 150g of blueberries not counting the amount the blackbirds had already had, but it was enough for something.

As I looked through my cookery books for a recipe worthy of my little haul I kept finding that I was constantly just coming up short on the quantity that was needed.  Eventually I reluctantly resolved that the only answer would be blueberry muffins.  I consoled myself that it would be better a muffin than wasting my little crop.  Thanks to the blackbirds I am now a huge fan of muffins.

Notes on the recipe

Muffin cases are not essential when making these, you can grease and flour a muffin/cupcake tray but it does make life so much easier.

I have added to the recipe demerara sugar but haven’t given any quantities, this is because you can either leave it out completely or put as much as you like over the tops before baking.  It’s down to personal choice.  I love the crunchy texture it creates and I feel the muffins get an added dimension.

img_63161

Blueberry Muffins (makes 12 large muffins)

12 paper muffin cases

115g butter

200g granulated sugar

2 large eggs

1 tsp vanilla extract

2 tsp baking powder

1/4 tsp salt

260g plain flour

120ml milk

150g blueberries (give or take)

Topping (Optional)

Demerara sugar

Method

Turn oven on to gas mark 5/190/375.

Line a 12 hole muffin tin with paper muffin cases.

Put into a mixing bowl the butter and sugar, beat until light and fluffy.

Next add a whole egg and beat until it is well blended into the mixture. Then repeat with the second egg.

Add the vanilla extract, salt and baking powder.

Fold in half of the flour and then half of the milk and repeat.

Gently fold in blueberries.

Spoon the mixture into muffin cases and sprinkle over the top the demerara sugar if liked, the quantity is up to you.

Bake in the centre of the oven for about 20-25 mins, it might take a little longer depending on your oven.  They are ready when they have reached a beautiful golden colour.Cool completely and then store in an airtight container.

 img_8019

Read Full Post »

IMG_9316
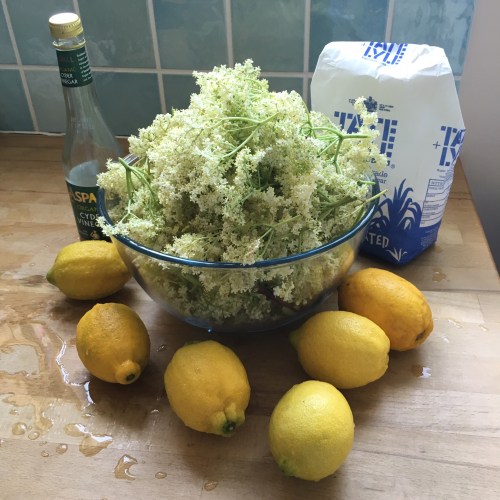
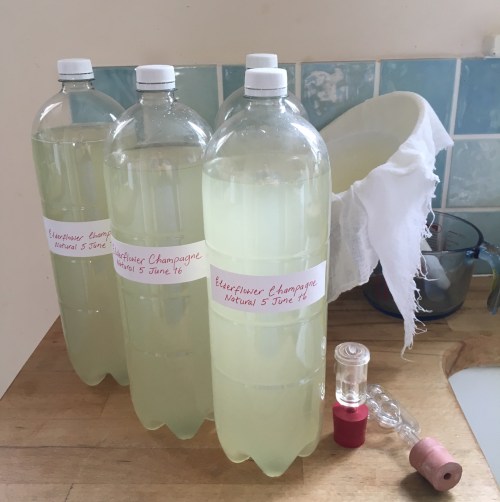
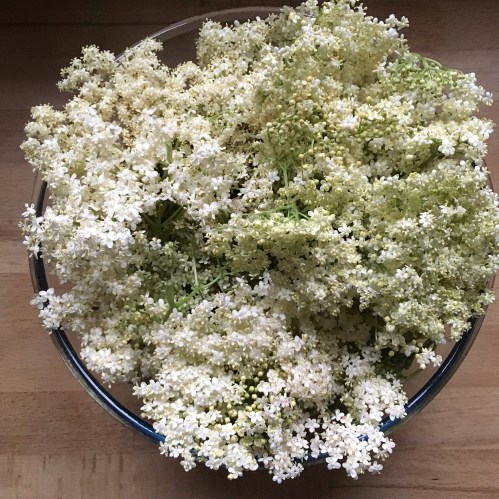
Usually in the middle of May, shortly after the May tree flowers, the elder tree will start to appear with large heads of creamy white froth. A signal that summer is nearly here. This year the weather has been awful and the seasons a little muddled. The elderflowers have been late. I have had to take several extra walks to check on progress. Then over a few days of sunshine small white buds started to appear and not long afterwards froths of flowers could be seen.

Walk anywhere in the English countryside and it won’t be long before you walk past a tree full of the creamy frothy flower heads with the most heavenly fragrance. These flower heads can lend themselves to many recipes, dripped and fried as fritters, made into a cordial, mixed into cakes but the most luxurious thing has to be Elderflower Champagne. What ever is made with the flowers the house will be filled with a sweet summery scent.

As tempting as it is to strip the first tree of all its reachable flower heads it is better to take a few of the best heads and move onto another tree. This allows for berries to mature later in the year, not only for further recipes but also for the birds.

Elderflower champagne is easy to make and uses very few ingredients. The taste is floral but in a subtle way. Please do read the notes below the recipe, as they are quite important if you are thinking of making this. I don’t want to come across as off putting in making this but, I learned new respect for its powers, when my brother managed to blow the fridge door off many years ago! Luckily I wasn’t living with him so was unavailable for any clearing up duty but he wasn’t allowed to make any more.

IMG_9406

Elderflower Champagne

Makes 12 litres

40-45 Elderflower heads

5 Tablespoons cider vinegar

6 Unwaxed lemons

8 Pints boiling water

16 Pints cold water

1.5 kgs granulated sugar

6 x 2 litre plastic fizz bottles (cheap lemonade bottles are good)

A large bucket

Method

Pick the elderflowers when they are dry, preferably on a sunny afternoon when the dew has been dried off. Look for the newly opened flowers, not any that are brown or petal dropping.

Remove the stalks, any brown flowers and any small bugs. Set to one side.

Put boiled water in a bucket (a fermenting bucket is well worth the investment), add the sugar to this and stir until dissolved. Add the cold water, stir. Allow to cool to no hotter than blood temperature.

Whilst the water is cooling prepare the lemons. Remove the zest and extract the juice. The pith is unwanted as it can cause the elderflower to have a bitter taste.

When the water has cooled add the lemon juice, the lemon zest and the vinegar. Stir well. Add the elderflowers and stir gently making sure they are fully immersed in the liquid. Cover and leave for 5 days. If using a fermenting bucket, make sure the lid is not completely sealed down as you need to allow for any gases to escape. If no lid is available a tea towel or towel can be used.

After 5 days there should be some evidence of activity. This is in the form of bubbles and or foamy mould sitting on the top. Lack of either of these does not necessarily mean that no fermentation has taken place. To double-check this, I strain the liquid through a muslin cloth into 4 demijohns fitted with an air lock (just over half filling them to allow for any excess activity). After thirty minutes the air locks started to bubble indicating fermentation was under way.

IMG_5985

Allow to settle. Siphon the liquid into bottles leaving a generous gap at the top. Seal and leave to ferment further.

During this time the gas will build up in the bottles and this gas will occasionally need to be released to prevent excess pressure. The sugar is being used up in the fermentation process and so the champagne will decrease in sweetest and become drier but also more alcoholic. Please read further notes below.

The champagne should be ready to drink after about 7 days in the bottle. As time goes on the fermentation process continues until all the sugar gets used up and it becomes unpleasant and past its best. To slow the process down put the bottles somewhere dark and cool.

IMG_9498

The bottles are designed so that when too much pressure builds up the indentations at the bottom of the bottle will pop out and make the bottle tip over, this is the signal to release some of the pressure by opening the cap to allow some of the gas to escape.

NOTES

Picking

Elderflowers are best picked on a dry day, preferably a sunny afternoon. Do not pick from the side of a road because the passing cars will have affected the flowers. Also try not to pick any flowers at dog height!

Bottles

I have used plastic fizz bottles for one very good reason; they are manufactured to withstand high pressure. As the elderflower champagne ferments in the bottles there is a build up of gas. By squeezing the bottles the amount of gas can be judged easily.   At this stage excess gas can be released when needed by twisting the cap part way until a hiss is heard. Lastly if any of the above signs of pressure build up are missed the design of the bottom of the bottle will pop out making them topple over and warn you before they explode.

Glass bottles with swing lids are temptingly attractive but come with hidden dangers. There are several clips on Youtube of the force that these can explode from pressure. The aftermath of clearing up broken glass and sticky liquid is no fun. The other problem with the swing lid is that it doesn’t allow for easy opening and closing releasing excess pressure – its all or nothing rather than controlled.

Natural Yeast

The idea behind this recipe is to use natural yeast found on the elderflower heads. Natural yeast is unpredictable; sometimes there will be none present. It’s strength is also unpredictable. If fermentation does not occur naturally then a sachet of sparkling wine yeast can be added to get it started. To do this, mix the sachet with 100ml warm water to which 2 teaspoons of sugar have been added. When it becomes frothy add to the elderflower liquid.

Blackening

Some recipes call for you to add boiling water to the elderflowers. In my experience this always causes them to discolour and go black immediately – and this ruins the batch. I have found that the answer is firstly to allow the water to cool sufficiently and secondly to acidify the water (with the lemon juice and vinegar) before adding the elderflowers.

IMG_6052

This is what happens if you add boiling water to the elderflowers or elderflowers to boiling water.

Fermentation.

The process involved is a natural and ancient one. Yeast reacts with sugar to produce alcohol and carbon dioxide (and a small amount of sediment). The carbon dioxide gas is released to the air in the initial stages of fermentation. After the liquid has been bottled the fermentation process continues but this time the gas is trapped in the bottle. The gas exists partially dissolved in the liquid and partly in the space at the top of the bottle. On releasing the pressure the gas escapes from the liquid, which causes the bubble effect but can cause a volcanic reaction if too high a pressure is allowed to build up. The fermentation process will come to an end either when all the available sugar has been used up or if the alcohol level reaches higher than the yeast can tolerate (commercial yeasts are selected to withstand a higher alcohol limit).

Champagne

True Champagne comes only from the Champagne region of France. My elderflower “champagne” is not true Champagne (obviously) but is still great for a summer celebration!

Read Full Post »

Rhubarb Cordial

IMG_5589

Rhubarb is such a versatile ingredient, it can be eaten as a sweet or with meat or fish. It has a tart acidic taste. Adding sugar changes its taste completely.

Growing up, I think ours was the only garden not to have rhubarb growing in it. Our elderly neighbour more than made up for it, giving up a good fifth of her garden to one huge rhubarb bed.

I can remember being invited round for supper one evening and there on the back of her cooker was a pan of simmering rhubarb pieces (I think from the colour they had been there a couple of days). I had never eaten rhubarb before so didn’t know what to expect. When they did eventually make it into my pudding bowl they had taken on a unappetising grey/green colour. The taste was like nothing I had ever eaten before, sharp with no texture; in fact they dissolved instantly in my mouth leaving an unpleasant after taste. My mind was made up I was steering clear of rhubarb. In future I avoided the stuff like the plague.

Not until I grew up and started to grow my own vegetables did I relax my hatred of the plant. Rhubarb was easy to grow and didn’t need any real expertise. It also doubled up as a good ground cover so stopped weeds growing. I let it flourish in my garden for several years without actually using it. To me, it just looked good.

When we moved house a neighbour offered me a small rhubarb crown, telling me it was from an old house that was being demolished and that it was a very special type of rhubarb. She said it was a pink champagne variety – I have looked this up and haven’t found it. I have since grown other champagne varieties but nothing compares to this mystery one. I planted it and forgot about it. Then the following year the most amazing deep scarlety pink stems started to shoot up. I was intrigued.

We cut a few stems and gently poached them. They cooked too quickly and fell apart, but the taste was a revelation. I tried again a second time, slowly bringing the water to the boil and then turning the heat off. I drained the rhubarb and with the small amount of remaining water added sugar and bought it back to the boil creating sweet syrup. The flavour and taste is delicate but distinctive. We now love rhubarb. In fact if we had to choose one plant only to grow in the kitchen garden it would be rhubarb.

Rhubarb cordial is a wonderful way to use up any excess stems. If you are careful you can keep it until the following year. The recipe below will make around 860-900ml. That is enough for one bottle, which I put away, and a small amount to drink now.

The cordial can be made with any variety of rhubarb but for the very best taste I would try to use the sweetest rhubarb you can. Champagne or Victoria are good ones, the pinker the stems the stronger the final colour.

_MG_6126

Rhubarb Cordial

Ingredients

1 kg of rhubarb

100g water

450g sugar.

Juice of half a lemon

A sterilised bottle with screw top or swing cap. (see below for sterilising method)

Method

Cut the rhubarb into small pieces.

Place in a pan with the water. Don’t worry that the water barely covers them.

Start with a low heat and slowly bring them up to the boil.

Place a lid on the pan and leave to gently simmer for 40 mins. Remove from the heat and allow to cool.

Strain the contents of the pan through a sieve lined with muslin, or a jelly bag. Leave overnight. If in a hurry, 5 hours should be enough. Do not squeeze the pulp as this will cloud the cordial.

Put the strained liquid into a clean pan and add the sugar. Again gently heat and stir until all the sugar has dissolved. Remove from heat.

Allow to cool slightly before adding the lemon juice.

Pour into sterilised bottle/s.

I use a funnel to pour the cordial into the bottles lined with a layer of muslin just to remove any scum etc.

Label and store in a cool, dark dry place. It should keep for a year but once opened must be kept in the fridge.

If you don’t like the idea of keeping it in a bottle you can freeze it. Pouring it into an ice cube tray and then once frozen decanting into a sealed bag. This way you can just use what you want when you want.

To sterilise your bottle/s.

Wash in soapy water and use a bottlebrush to clean the inside. Rinse well and drain as much as the water as you can. Turn your oven to Gas mark 2/150F/300C and place the bottle/s inside. Laying them on their sides is fine. Leave for about 15 mins and remove. The bottle/s are now sterilised and ready for use.

N.B: There are countless recipes for rhubarb cordial. The sugar you add is up to you, but the amount I have used I feel is about right. I suggest you taste some of the cordial before bottling and if it is not sweet enough there is nothing to say that you cannot add another 100g or more, until it is right for you. If you do add more sugar remember to return it to the heat so that it is fully dissolved before bottling.

If you forget to watch the cordial after adding the sugar and it starts to boil don’t worry this will make a slightly thicker liquid or a very thin jam (which is lovely as a sauce over ice cream).


Read Full Post »

IMG_4147

Just as lamb on the spit is a symbol of the Greek Easter Sunday so Laganes is a symbol of the start of the Greek Orthodox 40 days of Lent.

Lent for the Greek Orthodox is 40 days of no meat, fish with backbones or dairy. Some will even forgo olive oil and maybe replace it with vegetable oil. I consider this a step too far for me. I am happy to give meat up but diary and olive oil I find tough.

The first day is known as Clean Monday – Kathari Deftera. So big is this day in the Greek calendar that it is deemed a Bank Holiday. Most families take the opportunity to go out on picnics and fly kites. It also seen as the beginning of spring. As with most celebrations a lot of the work falls to the person in charge of the kitchen, as part of Clean Monday is also the day the family kitchen is cleaned to an inch of its life. With everything being taken out of cupboards and washed.

Laganes is eaten nearly in every Greek house today. It is an unleavened bread which has had a vital ingredient added, Yeast, thus no longer making it unleavened. Previously it was made without yeast but now yeast is added. The bread itself is flat looking, with a heavy sprinkling of sesame seeds, which sits on a slightly crusty top. Inside the bread is soft and springy and perfect when sliced into thin fingers. These fingers can then be used to scoop up various dips or eaten with olives. My preference is to use them to mop up any juices from my meal. Today we will be eating Briam and I can’t think of a better mopper upper than Laganes.

This bread is not complicated to make. I prefer to use fresh yeast – it could be just personal choice but I believe it gives the bread a slightly better flavour.

If you want to use dry yeast just use 15g and follow the instructions on the packet. This is sticky dough. I use my Kenwood mixer to start things off and then once the dough has form into one I turn it out onto a floured board and finish kneading it myself.

It may be only eaten once a year in Greece but it tastes so good it’s a crime!

IMG_4156
Laganes /Λαγάνες

Makes 2 loaves

Ingredients

30g fresh yeast
300ml lukewarm water
1 ½ tablespoons honey
500g strong flour
7g salt
10 ml olive oil

Sesame seeds to decorate (If you can get hold of black sesame seeds and mix the two, it will add to the flavour).

A little olive oil to grease baking sheet

Gas 6/400F/200C

Method

In a large mixing bowl place the flour and salt. Mix the salt well into the flour. If salt comes in direct contact with the yeast it can kill it off.

Put the fresh yeast in a bowl and add the honey. Stir to combine the yeast. Add the lukewarm water and the olive oil.

Add the fresh yeast and other ingredients to the flour.

Knead for about 10 minutes. This job is much easier if using a dough hook and mixer. The dough should be tacky but not sticky. In other words it should not stick to your hand.

Place in a clean bowl, cover and leave to rise.

Once doubled in size, remove. Knock back by kneading the dough a couple of times and then split the dough into two balls.

Generously grease a non stick-baking tray and place one of the balls on it. Flatten and spread the ball out with your hands. Repeat with the other ball. Leave both to rise – they will not rise greatly just about double their height if that. This should take about 40 mins.

When risen, brush the tops with water and then using two fingers push into the dough but avoid breaking through the bottom. The idea is to create dimples. Sprinkle the entire top liberally with sesame seeds and place in the oven for about 15 to 20 minutes. The bread is done when it has taken on a golden brown colour.

Remove and transfer to a wire rack to cool slightly.

Serve warm.

Read Full Post »

Older Posts »