Feeds:
Posts
Comments

Posts Tagged ‘vegetarian’

img_5237

This recipe comes from the Ducksoup Cookery Book written by Tom Hill and Clare Lattin who also run the tiny Ducksoup restaurant in Soho. I have to be honest and say I would not have even glanced at the book if it hadn’t been featured in one of Waterstones monthly cookery book evenings.  Clare and Tom were invited to talk about their book and offered us a couple of samples of their style of food.  There are so many cookbooks around at the moment each promising something new, something fast, something different.  I was prepared to be disappointed as I am quite hard to please these days but, even a small bite size sample of Tom Hill’s food had me sitting up and paying attention.  So much so, that the next day I acquired their book.

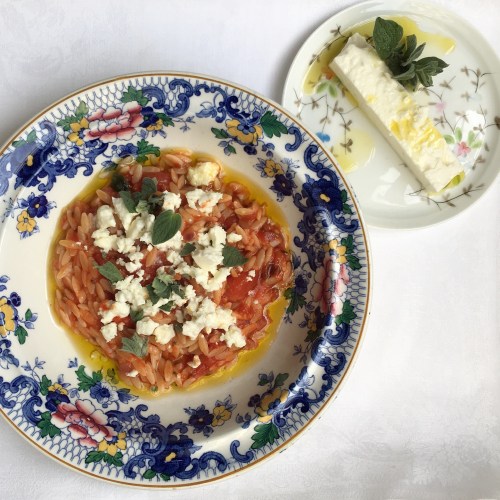
Glancing through the book the recipe that jumped out at me was the Orzo Pasta with Spicy Tomato Sauce and Feta dish. The three ingredients that I was instantly attracted to – tomatoes, feta and orzo which  is used in many delicious Greek recipes, but it can be very bland on its own, strong flavours are needed to bring the best out in it.  The spices in this recipe do just that.

The original recipe calls for fresh large tomatoes such as Pink Bull’s Heart but as we are now in the depths of winter any chance of finding a fresh tomato with any flavour is pretty slim. So, I have replaced them with tinned plum tomatoes. I have tried expensive brands and cheap ones and find the whole affair quite hit and miss – I then discovered Mutti and tend to use them as, for the moment, they seem a cut above the rest.

The spices give a real depth to the dish and the tanginess of the feta lifts the orzo and tomatoes to another level. This dish for me is best served with a hunk of bread on the side and maybe it’s the Greek in me but also an extra slice of feta to complete this dish.

This is a very simple and quick recipe and one that I will repeat again and again, mainly because other than the fresh oregano leaves I generally always have all the ingredients in my cupboard and fridge. If I couldn’t get fresh oregano leaves I would still use dried oregano because they do add an important note to this dish.

Note on the Orzo – it does need a stir whilst it is cooking and if you decided to save on washing up by adding it straight to the tomato’s it will take a lot longer to cook than the instructions on the packet plus there is a danger of over cooking the tomatoes – the pleasure of this simple recipe is that there is still a little bite in the tomatoes as they haven’t been allowed to stew.

Orzo Pasta with Spicy Tomato Sauce and Feta

Ingredients

400g tin tomatoes (Mutti)

50ml olive oil plus extra to dress at the end

1 tsp cumin seeds

1 tsp nigella seeds

1 small onion chopped finely

1 garlic glove crushed

1 tsp dried chilli flakes

1 bay leaf

1 tsp paprika

120g orzo pasta

100g feta or more

Sprig of fresh oregano leaves

Salt and pepper to season

Method

Place a frying pan over a low heat and add the olive oil. Add to this the nigella and cumin seeds and cook for a minute.

Add the onion and continue to cook on low heat until soft. Add the garlic and chilli flakes, bay leaf, and paprika and continue to cook for a further 2 minutes.

Add the tomatoes to the pan, roughly breaking them with the back of a wooden spoon and leave to simmer gently for ten minutes.

Season with salt and pepper.

In a pan bring some salted water to the boil and add the orzo pasta. Stir.  Cook for eight minutes or as instructed on the packet.  When cooked drain well and add to the tomato sauce.

Allow to cook for a further couple of minutes and serve. Crumble feta cheese over the top and a few of the oregano leaves. The final touch is to add a drizzle of olive oil.

Advertisement

Read Full Post »

_mg_6365

Gigantes – Baked Giant Butter Beans/Γίγαντες Πλακί

My mother always had a large white ceramic baking dish on hand at anytime of the day or night containing Gigantes.  When they were good I loved them.  Creamy soft butter beans coated in a garlicky tomato sauce with a kick of herbs. The trouble was, my mother would never quite repeat the recipe the same way twice and so they were not always good. Battles would follow if the recipe veered too far and I would be quite determined in rejecting the week’s offering if they didn’t quite taste as I liked them.  Other members of the family would eat them whatever was done to the recipe. I am still of the impression that they had no taste buds.

This is a simple dish and everyone likes it their way.  It’s basically a dish of baked beans. The beans in question being butter beans, soaked overnight and cooked in the oven with tomatoes, olive oil, celery, onion and their crowing glory; garlic, dill and parsley.

The sticking point in my mother’s Gigantes was that some weeks the ratio of garlic to beans was completely off the scale –  handy if there were any vampires in the area, or if the  dill had been overplayed.  Some weeks the butter beans themselves were a little al dente and other weeks the Gigantes were just perfect. On the perfect days they would be eaten with bread and a generous slice of feta.

Like a lot of recipes I post you can alter and add to this recipe depending what you have in your fridge or cupboard or just to make it your own with the balance of garlic and herbs.  Carrots are put into the dish by lots of cooks but I prefer it without.  Some omit the dill, where I feel it is what makes the dish.  The only thing I will say is that the beans do need to be soaked overnight and cooked until very tender. This can take anything from 45mins to 1 hour and 20 minutes.  Even if the flavours are right, there is nothing worse than biting into an al dente bean.  Trust me, I have had plenty of those over the years!

img_99151

Gigantes Plaki

Ingredients

500g gigantes /butter beans

olive oil for frying and serving at the end

1 large onion chopped finely

1 stick celery chopped finely

2 large cloves of garlic minced/crushed

400g tin of tomatoes

1 tsp sugar

2 tbs tomato purée

flat leaf parsley roughly chopped (1-2 tablespoons or more)

dill roughly chopped (1-2 tablespoons)

salt and pepper

Method

Soak the beans in water overnight.

Rinse the beans and place the beans in a pan and bring to a gentle boil, turn them down and simmer for anything between 50-100mins.  The beans are cooked when then are soft. Take one out and squeeze between your fingers.

Drain, rinse and set aside.

In a frying pan, add some olive oil and fry the chopped onion and celery.  Cook until the onion is starting to become translucent, add the garlic and cook for a few minutes more. Then add the tomatoes, adding half a tin of water to the pan along with the tomato purée. Add the teaspoon of sugar.  Season and stir.  Leave to simmer for 20 mins. Checking from time to time, if the mixture becomes dry add a little water.

Into an oven proof dish add the beans and the onion, celery, tomato and garlic. At this point also add the chopped parsley and dill.  Mix well and place in an oven at 180C for 40-45 minutes.

Serve with adding some olive oil over the top and a slice of feta.

Sausages also go very well with this dish.

These can be eaten hot, lukewarm or even cold.

Note:  I buy the Greek  3alpha Gigantes white beans (butter beans) from The Athenian Grocery in Moscow road, London W2 4BT, they also do a mail order service.  I am not connected with them in any way except I have been going to their shop since a small child.

Read Full Post »

IMG_9637(1)

Half way down our long garden is a greenhouse and to the right a fig tree and beyond that lies our kitchen garden.  It’s a very simple set up of two large beds enclosed with a low box hedge and a wide grass path up the centre. Directly behind the greenhouse is a gravel area where herb-filled pots sit, out of reach from pets.  With each year that passes we learn something new.  We learn what doesn’t grow and what does, but the garden never lets us get complacent. Just as we become confident in a crop it will play up and not produce anything.  This year our courgettes were a triumph.  At times it was hard to keep up with production but courgette fritters are a wonderful way of using up any overload or any courgettes lurking in the back of the fridge.

As soon as the seeds are sown I find myself trotting down the garden looking for the first signs of life.  Courgettes grow quickly and as the first leaves unfold and stretch out I increase my visits down there.  It’s not long before their bright trumpet shaped flowers dotted amongst their large leaves appear, filling me with expectation.  The visits become more frequent and I more impatient for my first courgette of the season.  It doesn’t matter how many times I have grown and harvested courgettes I cannot help but get excited at the thought of a baby courgette. As the season progresses the leaves of the courgettes start to spread and grow larger, shielding their offspring.  At this point I have to bend and gently part the leafs without snapping off a stem to look for the little green courgettes. This is when I discover the courgettes past their prime, the ones that I have missed.  These might not be good enough for an omelette but they are just perfect for courgette fritters!

No courgette has grown in vain in my garden!  After a quick wash to rid them of any soil, they are grated, salted and left to release their water.  The older and larger the courgette the more water it will hold.  After an hour I squeeze the living daylights out of them, adding bread crumbs, crumbled feta, eggs, flour, chopped dill and seasoning.  Depending on what I have in the fridge denotes the actual quantities – if the mixture is too loose I might add some more flour or breadcrumbs, a little less if I only have one egg.  This is a recipe that over time can be altered and played with.  A lot of Greek recipes include grated onion.  I feel that the strong flavour of the onion is a bit of a bully and overpowers the courgette so I leave it out. Feta can be substituted with grated parmesan or percorino and the dill can be replaced with other herbs such as mint, fennel or parsley.  It all depends what you have and what flavours you like.  Finally the frying.  I prefer to use olive oil as it gives a nicer flavour but sunflower oil does produce a slightly crisper fritter.

A small note.  I have grated the courgette and left it covered in the fridge over night and it has been fine but even with a strong squeeze the courgette has more water to give so don’t make the full mixture up to use later as you will find it has become watery and won’t hold together so well.

Courgette Fritters/Κολοκυθοκεφτέδες

800g-1kg courgettes

2 eggs beaten

60g plain flour

60g bread crumbs

100g Feta crumbled

3 tbs fresh dill  (fennel, mint or parsley could also be used instead or as well)

Salt and pepper

Oil for frying (olive or sunflower).

Method

Wash courgettes, trim each end and grate with skin on into a large bowl.  Sprinkle with salt and cover.  Leave for about an hour to allow the courgettes to shed their water.

IMG_6873

Squeeze the grated courgette hard to release as much moisture as possible and place into a clean bowl.  Add the feta, eggs, flour, breadcrumbs, dill and seasoning. (Beware not to add too much salt as the Feta has a salty taste and the courgettes will retain some of the salt used earlier).  Mix thoroughly.

In a frying pan add a generous amount of oil.  Using two tablespoons make a rough ball of the courgette mixture, if it is too wet add a little more flour or breadcrumbs to dry it out a little. Drop the courgette balls into the hot oil and gently fry.  Allow to brown on one side before turning the fritter over  – this stops the chances of the fritter breaking. When both sides are golden brown transfer to a plate lined with kitchen paper.

IMG_9601

These can be eaten hot or cold.  We eat them hot and any left over get put in the fridge for the following day.  We enjoy them with crab apple chilli jelly but they can also be eaten with tzatziki.

Read Full Post »

Simply Gnocchi

GnoochiMDLiving in Central London is a privilege, but it also comes with a few drawbacks. One of them is sourcing fresh ingredients.  Taking the car anywhere during the day for me is a fraught affair, and even if I actually manage to get to my destination, finding a parking space is like trying to find a hen’s teeth.  So I resort to either catching a bus or walking.

My quest for ingredients takes me all over London. The Athenian in Moscow Road for Greek, Green Valley in Upper Berkeley Street for Lebanese, Church Street Market off Edgware Road for fruit and vegetables, not to mention an array of little shops dotted all over the metropolis.

Today I wanted Italian, so I took the twenty-minute walk up to Little Italy in Clerkenwell, cutting through the busy Leather Lane market – giving the sole surviving vegetable stall a quick glance as I strolled past.   The market mainly caters for lunch time office workers who want fast food and cheap clothes.    Right at the end of the market on the opposite side of the road stands Terroni & Son – the oldest deli in London that has been going since 1878.  I have been visiting them now for nearly twenty years.  As the years have gone by the shop has changed beyond recognition.  I know change is good but I hanker after the old days. When the deli was packed to the rafters with produce and there was always a noisy background of Sicilian banter.

The shop has been opened up, allowing the light to flood in.  The islands of shelves that were once tightly packed with every imaginable Italian produce now gone, replaced with long sleek modern tables and chairs.  Terroni’s now serves coffee, lunches and snacks and very good ones at that.

There is still a trace of the old shop in the two large glass counters that sit at the back of the shop showcasing an array of charcuterie, cheeses, Italian sausages and a fine selection of Italian sweets and cakes.  I tend to stand at the charcuterie side to give my order so as not to be tempted by the cakes.  I can resist as long as I don’t catch sight of the sfogliatelle – then all is lost.

Today I had a bigger problem to deal with – they no longer appear to sell pasta flour.  I haven’t visited them all summer and so it came as a bit of a shock to find the eating area has expanded and as a result their selection of dry goods has decreased.  This is not good.  It throws out of the window my carefully planned meal of ravioli.  I am not good with change and cannot think what to do.  I buy my cheese and bread and leave.  Succumbing only to the smallest box of sweet delicacies – I need to ponder on this new problem of where to get pasta flour.

As I walk back through Hatton Garden I try and think what I am going to cook for supper.  To add to my misery it starts to rain.  I rack my brains of what is in the cupboard that will make a meal and save me from trekking elsewhere.  All there is in the fridge of any note is a large bag of potatoes. Then it comes to me – Gnocchi!!!  Necessity is the mother of invention.

It’s straight back home, feet up and maybe a small reward from inside the cake box before I put my potatoes on to cook.

Gnocchi is the simplest and most heavenly of recipes.  A few potatoes can be turned into light soft potato dumplings that melt in the mouth.   As my ingredients were limited I went for the simple accompaniment of sage and butter with a generous heap of Pecorino.Gnoochi2MD

Gnocchi

2 –3 servings

Ingredients

500g  floury potatoes (Maris piper, King Edwards or Desiree are good).

Salt

50-75 gm 00 pasta flour

1 egg yolk

Extra flour for rolling out

Method

Put unpeeled potatoes in a pan filled with cold water and bring to the boil.  Cook until tender.  Drain.  Allow to cool slightly and then remove the skins.  Push the potatoes through a ricer.  The potatoes should be cool before adding the egg yolk and some of the flour.  Knead lightly.  If you feel the mixture is too wet add more of the flour.  I start off with 50 gms and add more if needed.

Flatten the dough into a rough flat square and cut into roughly 2cm wide strips.  Take a strip and lightly roll into a sausage shape.  Cut into 2/3 cms pieces.

Take each gnocchi piece and with your thumb gently push it against the tines of an upturned fork which we give you a groove to one side and roll back.  This will make an indentation to the gnocchi.  Place the gnocchi onto a floured tray and repeat.

To cook – bring a large pan of salted water to the boil and then carefully drop them in – be careful as they can splash back which can be a little painful on the hand.  Give the pan a gentle stir and wait for them to start to rise to the surface.  This will take about a minute.  Once they have risen wait ten to twenty seconds and then remove them with a slotted spoon.

Butter and Sage Sauce

Ingredients

2/3 oz butter

6 sage leaves fresh

Salt and pepper

Method

Put the butter in a pan and heat.  Add the sage leaves and seasoning and tilt the pan to turn the sage leaves.  The butter will turn a caramel colour.  Take off the heat and toss the gnocchi in coating them well.

Serve with a generous helping of Pecorino

N.B:

I didn’t have even shaped potatoes so I put in the pan what I had, checking the smaller ones first, and as soon as they were tender taking them out.

Instead of a fork I used a gnocchi ridger which also doubles up to make garganelli pasta (which is similar to penne).

IMG_3855

Read Full Post »

Fava

Fava is a Greek dish made of yellow split peas which when slowly cooked for a period of time break down into a thick creamy mashed potato like consistency.  The velvety purée is then mixed with olive oil, lemon juice and seasoning.  Finally it is adorned with either raw or caramelised thinly sliced red onions and a scattering of capers.  Fava can be served warm or cold,  as a starter or to accompany meat or fish.  In winter it is particularly good with lamb Keftedes.

The crème de la crème of yellow split peas come from the island of Santorini in Greece.  Santorini is what remains of a volcanic crater.  The rich volcanic soil makes for a perfect growing medium for this unique strain of plant.  After over 3,500 years the Santorinians have learnt to perfect the fava pulse, giving us the famous fava with its unique flavour and texture.  Fava is eaten on Santorini as pasta is eaten in Italy.

Many years ago I spent part of my honeymoon on Santorini.   I remember being told two things about Santorini;  first it was like no other Greek island and secondly the prices where as high as the cliffs!  It didn’t disappoint on either point.  The views, exceptional light and the beauty of hundreds of pale blue and white houses perched high up on the cliffs as the ship comes into view of the island are stunning.

It is one of those places you should see just once in your life.   Standing on top of the island, some 300 metres from sea level the vista across to the other remaining islands is really breath taking.  The sunsets are legendary and the most romantic and stunning view is to see it setting from the village of Oia, which clings to the northern tip of the caldera.

Oia, we were told, was not to be missed on any account.  What was omitted from this advice (to me who doesn’t like heights) was the road to get there.  We caught a bus from Fira.  All was fine as I had no idea what was ahead so had sat next to the window.  As the town melted behind us and the road started to get more windy the bus in turn started to build up speed,  only slowing down slightly to swing around the bends.  I could no longer look out of the window as the ground had dropped away beside us and we were skimming along the top of the cliff.   All I could do was close my eyes and hope that the 30 minute journey would soon be over.  I could not wait to arrive in Oia until the thought occurred to me that we would have to return along the same road.   I shall skip over the drama that unfolded when it came time to return.  I can tell you that many buses left Oia without me –  each time it was time to get on I would find some excuse why that bus and that driver were not a safe bet.  Eventually I chose to risk my life with a driver whose impressive collection of religious icons and artifacts were displayed in the windscreen far surpassed the others.  No sooner had we pulled out of Oia did I realise that my intuition was not the wisest choice.  The driver obviously thought he had all angles covered and was untouchable.  The journey back was done in record time.   No doubt the driver went on to to do hundreds if not thousands more – for me as they say, it was the end of the road, never to be repeated.

This recipe can be made with any yellow split peas but Santorini fava is worth trying.  Alternatively, the quantities can also be easily reduced.  The olive oil, lemon juice and seasonings are added to your own taste.

Fava

Fava Santorini Φάβα Σαντορίνης

Ingredients

500 gms yellow split peas

water

salt

30 ml olive oil

2 red onions

1/2 lemon – juice of

Method

Wash yellow split peas well and put into a pot of water that covers them by an inch.  Add to this a peeled onion cut in half.  Bring to the boil, turn the heat down a little and skim off any white froth that rises to the top.

Reduce the heat, adding a little salt.   Place a lid on the pan and leave to gently simmer for about one hour.  Stir Regularly and check that the peas have not dried out.  If they have, add a little more boiling water.

After about an hour the split peas will have lost their shape and resemble porridge.

Remove from the heat and using a stick blender liquidise until smooth.  Put a tea towel over the pan and replace the lid.  Leave to rest.  As the fava cools it will thicken up more.

When ready to serve return to a very low heat for ten minutes and add the oil, lemon juice and any further seasoning.

Transfer onto a dish and add a drizzle of olive oil and either thinly sliced red onion or caramelised red onion and a scattering of capers.

Read Full Post »

 polpette di melanzane

I used to go out food shopping with a list.  This usually turned out to be as useful as a chocolate teapot because either the main ingredient that my whole menu was hinging on was not available or just looked past its best.

I have learnt to shop with an open mind, buying what looks good and plentiful.  This week I was lured by a huge pile of deep purple lush aubergines and as I walked over I glanced down and was dazzled by the low low price (dazzled maybe be a little excessive but my heart rate certainly quickened).  They were cheap, cheaper than I have ever seen them.  Maybe it’s the Greek in me but I find it hard to walk past a bargain.  Experience has taught me that it may be a bargain in the shop but it isn’t necessarily a bargain when I get home and don’t or can’t use it all up.  They were not on my list and I didn’t have a recipe in mind.  I told myself to carry on walking.

When I got home I unpacked and admired the heap of  beautiful shiny plump aubergines.  As I placed them in the fridge I silently congratulated myself on what a bargain and wise choice I had made, ignoring the nagging voice in the back of my mind which kept saying ‘so what are you going to make with them, bad choice, you are going to be wasting a good ingredient’.

The weather is freezing, the wind is ferocious and I don’t fancy going out again.  I am determined to use the aubergines with what I have in the cupboard.

Nothing came to mind.  I opened and shut cupboard doors for inspiration – nothing.  I started to get cross with myself then I realised I was making the huge mistake of trying to think on an empty stomach.  Five minutes later I was sitting comfortably with a slice of buttered date and walnut loaf and a hot cup of tea.  As I relaxed, the prefect recipe floated into my mind – Polpette di Melanzane.  Perfecto!

Perfecto it certainly is.  Polpette di Melanzane roughly translated means aubergine meatballs but this recipe is meatless.  The basic ingredients are aubergines, bread crumbs, pecorino, two egg yokes and herbs, the main ingredient being the aubergine.  The quantity of bread crumbs and perconi can be altered to your taste and what you have to hand.  The egg yolk is to bind the ingredients and the herbs are up to you.  I like the flavour of mint and oregano but these can be replaced with others if you wish.

Polpette di Melanzane

Ingredients

2 large aubergines

2 cloves of garlic crushed

165g bread crumbs

80g grated pecorino

2 egg yolks

2 tsp fresh mint chopped finely

2 tsp oregano

salt and pepper for seasoning

A little oil for frying.

Method

Cook the aubergines.

There are two ways of cooking the aubergines for this recipe.  Either cut the aubergine in half lengthwise and rub with olive oil and season with salt and pepper.  Place onto a baking tray and roast in the oven at Gas 4/180C/350F for about 25 mins.  When the flesh is soft remove from the oven and with a spoon scoop out the aubergine flesh.  Squeezing any excess liquid from the flesh.

or

The other method is to cut up the aubergine into cubes and gentle poach in a pan of simmering water for ten minutes or until soft.  Drain, squeezing any excess liquid from the flesh.  This method uses the whole aubergine whilst baking them wastes the skin (I used this method).

It is important to squeeze out the liquid otherwise the balls will fall apart.

In a bowl add the cooked aubergine, the breadcrumbs, grated pecorino cheese, egg yolks, herbs and seasoning and mix well.  The best way is to use your hands.  The mixture should be firm enough to roll into small balls.

In a frying pan heat a little oil and fry the balls in batches.  Once they are golden brown remove.  Place onto kitchen paper.

Serve.

I prefer to eat mine with pasta and a simple tomato sauce.  When the tomato sauce is ready just add the aubergine balls so they cook for a few minutes and are heated through.

Read Full Post »

Spanacopita MD

Spanakopita is a special dish for me, it takes me right back to Athens, Greece and my wedding.   The week before and the run up to the wedding was chaos, the dress needed last minute altering, communication over the flowers had been misunderstood and everything was unraveling fast.  It was turning into a Greek tragedy with my mother playing the leading role.  Perhaps it might be a little unfair but I am sure on occasions she could be seen from the side lines fanning the flames!

We stayed with Lela and Andreas. I had known them nearly all of my life.  Lela had been my mother’s childhood friend.    Their house had changed dramatically over the years but the garden remained the same.  A little oasis of green that wrapped around the house.  On one side of the garden under the shade of a tree sat a large red swing sofa, trimmed with a thick white fringe, which continued onto the matching canopy.  I can remember in previous years spending many a happy hour in the afternoon heat laying across it shaded by the canopy and swinging back and forth daydreaming.

As the week wore on problems and hitches only seemed to get larger and the hands on the clock seem to move in double time.  I was beginning to wish that I was somewhere else perhaps back daydreaming on the swing sofa.

Andreas sensing all the friction and chaos on the day before the wedding announced that he would cook lunch for all of us.  He would create something we would all love.   He called me into the kitchen as he wanted to show me how he made his Spanakopita.  It was the first time I had seen it made and for the next hour all my problems outside that kitchen melted away.  Andreas pointed out the key factors to me, making sure I was taking it in, and I did, that recipe has served me very well over the years.   I have made his recipe countless times over and each time, I think of him and that morning of when calm entered back into my life.  Needless to say we all loved eating Andrea’s spanakopita  and it remains the only thing I remember eating that entire week.

A&V

Andreas and Valia (my koumera).

Spanakopita

Ingredients

400g/14 oz fresh washed spinach

5 spring onions

200g/7 oz feta cheese

2 large eggs

100g/3-4 oz butter or 1/4 cup of olive oil (I prefer to use butter)

2 tbs parsley chopped (optional)

1 tbs dill chopped (optional)

8 filo pastry sheets

Salt and pepper

Method

Wash the spinach well and drain. Bring a large pan of salted water to the boil and drop in the spinach, leave until the spinach wilts – this will take about a minute or two. If you can’t fit all the spinach in the pan at once, cook it in batches. Drain and allow to cool, you will be surprised how much water will drain out.  Give the spinach a good squeeze to release as much liquid as possible.

In a bowl beat the two eggs, add to this the finely chopped spring onions and crumble in the feta cheese. This can be done by hand, nothing needs to be uniform. Add the dill or parsley, if using, and then the drained spinach along with salt and pepper to taste.  Mix well using your hands.

Spanakopita is traditionally made in large round flat aluminum dishes. I prefer a cast iron dish, it’s all personal choice. Some people use a glass oven proof dish.

Making up the pie

The filo pastry is very thin and so will dry out very quickly. To stop this happening put a damp cloth over the pastry whilst you are not using it.  Also when laying the filo sheets don’t go off and answer the phone or make a cup of coffee. It needs to be done quickly and in one go. The filo pastry needs to be brushed with either olive oil or melted butter.  There is no fixed rule here, its down to purely personal choice but there is a difference in taste, albeit a subtle one but still a difference.

pie1 IMG_1448 IMG_1451

If using butter, it needs to be melted in a pan over low heat or in a microwave being careful not to burn it.

First, brush the baking container liberally with the oil or melted butter, then start to layer the filo, brushing each top side of pastry as you go. Start by laying the first sheet of filo pastry over the bottom of the dish allowing it to overlap the edge of the dish. Now repeat again allowing it to overlap on the opposite side of the dish. Do the same again for the top and bottom of the dish forming a cross.

Add the spinach mixture making sure it is spread evenly over the dish. Now, start to fold the filo back over the spinach mixture making sure to brush the top of the pastry sheet with oil/butter. To add more height brush a new sheet of filo with oil/butter and fold in half and place on top, tucking in any excess pastry. I usually add two to three extra sheets depending on my mood.

Finally brush the top sheet with the melted butter/oil and put into the middle of the oven 350/180 Gas mark 4. After 40/50 mins check to see if the filo is a golden brown – if not leave a little longer. Remove and leave for a minute or two then with a sharp knife cut the pie into portions.

Spanakopita can be served hot or cold. I love it just warm served with a salad. I have also found it can be re-heated in the oven but not in a microwave.  It really needs to be eaten fresh.

Note:  Frozen spinach can be used but for me there is no substitute for the fresh ingredient and now it seems it’s available all year round so there is no excuse.  Perhaps I should put it a little more bluntly –  if I had the choice between frozen spinach or no lunch it would be the no lunch option.

Read Full Post »

%d bloggers like this: