Feeds:
Posts
Comments

Archive for March, 2013

 polpette di melanzane

I used to go out food shopping with a list.  This usually turned out to be as useful as a chocolate teapot because either the main ingredient that my whole menu was hinging on was not available or just looked past its best.

I have learnt to shop with an open mind, buying what looks good and plentiful.  This week I was lured by a huge pile of deep purple lush aubergines and as I walked over I glanced down and was dazzled by the low low price (dazzled maybe be a little excessive but my heart rate certainly quickened).  They were cheap, cheaper than I have ever seen them.  Maybe it’s the Greek in me but I find it hard to walk past a bargain.  Experience has taught me that it may be a bargain in the shop but it isn’t necessarily a bargain when I get home and don’t or can’t use it all up.  They were not on my list and I didn’t have a recipe in mind.  I told myself to carry on walking.

When I got home I unpacked and admired the heap of  beautiful shiny plump aubergines.  As I placed them in the fridge I silently congratulated myself on what a bargain and wise choice I had made, ignoring the nagging voice in the back of my mind which kept saying ‘so what are you going to make with them, bad choice, you are going to be wasting a good ingredient’.

The weather is freezing, the wind is ferocious and I don’t fancy going out again.  I am determined to use the aubergines with what I have in the cupboard.

Nothing came to mind.  I opened and shut cupboard doors for inspiration – nothing.  I started to get cross with myself then I realised I was making the huge mistake of trying to think on an empty stomach.  Five minutes later I was sitting comfortably with a slice of buttered date and walnut loaf and a hot cup of tea.  As I relaxed, the prefect recipe floated into my mind – Polpette di Melanzane.  Perfecto!

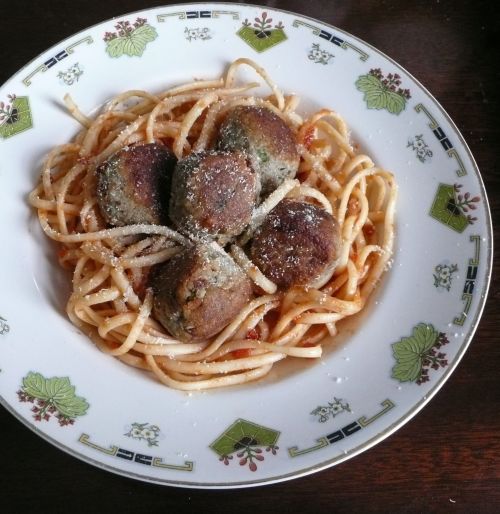
Perfecto it certainly is.  Polpette di Melanzane roughly translated means aubergine meatballs but this recipe is meatless.  The basic ingredients are aubergines, bread crumbs, pecorino, two egg yokes and herbs, the main ingredient being the aubergine.  The quantity of bread crumbs and perconi can be altered to your taste and what you have to hand.  The egg yolk is to bind the ingredients and the herbs are up to you.  I like the flavour of mint and oregano but these can be replaced with others if you wish.

Polpette di Melanzane

Ingredients

2 large aubergines

2 cloves of garlic crushed

165g bread crumbs

80g grated pecorino

2 egg yolks

2 tsp fresh mint chopped finely

2 tsp oregano

salt and pepper for seasoning

A little oil for frying.

Method

Cook the aubergines.

There are two ways of cooking the aubergines for this recipe.  Either cut the aubergine in half lengthwise and rub with olive oil and season with salt and pepper.  Place onto a baking tray and roast in the oven at Gas 4/180C/350F for about 25 mins.  When the flesh is soft remove from the oven and with a spoon scoop out the aubergine flesh.  Squeezing any excess liquid from the flesh.

or

The other method is to cut up the aubergine into cubes and gentle poach in a pan of simmering water for ten minutes or until soft.  Drain, squeezing any excess liquid from the flesh.  This method uses the whole aubergine whilst baking them wastes the skin (I used this method).

It is important to squeeze out the liquid otherwise the balls will fall apart.

In a bowl add the cooked aubergine, the breadcrumbs, grated pecorino cheese, egg yolks, herbs and seasoning and mix well.  The best way is to use your hands.  The mixture should be firm enough to roll into small balls.

In a frying pan heat a little oil and fry the balls in batches.  Once they are golden brown remove.  Place onto kitchen paper.

Serve.

I prefer to eat mine with pasta and a simple tomato sauce.  When the tomato sauce is ready just add the aubergine balls so they cook for a few minutes and are heated through.

Advertisement

Read Full Post »

Date and Walnut Loaf

Date and Walnut Loaf

The temperature today is not only freezing cold outside but inside too.  The quickest way for me to warm up is to turn on the oven and start cooking.

I didn’t know what to bake so I stood in front of my pantry shelves and looked along to see what needed using up. While trying to get some inspiration my eye fell upon a packet of unopened dates  – now I needed a recipe.

Date and walnut loaf came to mind.   Not too much fuss to make and good to eat buttered with a cup of tea.  The slight hitch in this was persuading myself to use my cached supply of walnuts.  In the garden where we live in London is a large walnut tree and back in October I had had to fight off the squirrels and crows who also had their beady eyes on them.  This year the yield was pretty poor due to the bad summer so there were few nuts to go round.

The squirrels made an early start by running off with them before they were even ripe.  This reduced the walnut supply sufficiently for both the crows and us, leaving only the ones at the very top of the tree.  When these started to fall onto the lawn the crows would appear from nowhere, pecking through the shells and leaving walnut debris for us to find.  It didn’t matter how early we got up those birds had got there first.  In the end we decided that the time to strike was in the dead of night when the crows and squirrels were asleep.  At around midnight every night we searched for windfalls by the light of our mobile phones.   After two weeks we had collected a small harvest that we dried out before cracking them open in the New Year.

Our yield of one small jar ended up being a lot of work, but well worth it.  Freshly harvested walnuts do not have that slightly bitter taste shop bought ones have and they are still contain a rich supply of walnut oil making them quite special.

Date and Walnut Loaf

Ingredients

½ pt/300ml milk

3oz/85g black treacle

2oz/55g butter

3 level tsp baking powder

12oz/350g plain flour

½ tsp salt

½ level tsp bicarbonate of soda

3oz/85g soft brown sugar

4oz/115g dates chopped

2oz/55g walnuts chopped

Method

Put the oven on to Gas mark 3/325F/170C

In a saucepan put the milk, black treacle, butter and sugar and gently heat until the butter has melted.  Just when the butter is about to disappear remove from the heat.

In a bowl put the flour, baking powder, salt, bicarbonate of soda, dates and walnuts.  Pour in some of the liquid from the pan and mix.  Keeping adding until all the liquid is used up.  Mix well incorporating all the dried ingredients.

Pour this into a greased and floured 2lb loaf tin and place in the oven for about 1 hour.

After an hour check the loaf with a skewer to see if it is cooked.  If the skewer comes out clean then remove, otherwise give the loaf another 5 minutes and check again.  With my gas oven I found the loaf needed 65 minutes.

Leave to cool and then slice.  I prefer mine buttered and served with a cup of tea.

Tip

As it was so cold the treacle was heavy and stuck to everything and I could hardly coax it out of the measuring bowl into the pan, the quick way to release the treacle is to give it 10 seconds in a microwave.

To chop the dates I put them into a food processor and to stop them clumping together into a mass I added a couple of spoons of flour from the recipe.

Read Full Post »

Biscotti

Biscotti MD

I am rather partial to a biscuit with my tea or coffee.  My problem is that I cannot just stop at one.  The solution is not to buy them and this generally works well.  The only trouble is that I live with someone who is also partial to a biscuit.  Even more partial to a full biscuit barrel but these are rare objects, especially in our house.

Dunking biscuits are my real love, and for me, the biscotti is the Rolls Royce of dunkers.  Best described as a hard, golden, nut-filled biscuit with a crunch, they should not be eaten in their undunked state by those who are teeth-challenged.

If we do have them in the house they won’t last long.  So they are avoided.  Until a few weeks ago when we were both shopping in Terroni of Clerkenwell.  While I was at the counter ordering cheese and salami, Tom disappeared only to reappear with a large bag of biscotti, which I was only too happy to add to the shopping.

When we returned home we indulged in a couple to accompany our coffees.  We were both slightly smug in congratulating each other at how restrained we were in just having two.

My only thought was that when he was out of the way there would be all the more for me.  The next day when I was alone I started to think about those biscottis and how nice they would be with my cup of coffee.  Before I knew it, I was looking for a place to hide the empty packaging.

When Tom returned and made us both coffee I could hear him opening cupboards and drawers – I knew what he was searching for but, instead of owning up, I clung on to the hope that he had forgotten them.  He hadn’t and knew exactly who had had the lot.

So, to make up for my disgraceful greed I have made two batches and, in doing so, I have awakened my addiction for a biscotti with my morning and afternoon coffee.  The shop bought ones were nice but home-made takes them to another level.

Biscotti

Ingredients

90-150g / 3 1/2 oz blanched almonds

(I have put 90-150g of blanched almonds because the recipe can take the lower end of almonds or the upper end its personal choice – plus it depends on the amount of almonds I have, I hate leaving twenty almonds in the bottom of a packet).

250g/9 oz plain flour

1 tsp baking powder

250g/9 oz caster sugar

2 eggs beaten

1 egg yolk

1 tsp vanilla extract

Method

Set oven to 180C/350F/Gas mark 4.  Scatter the blanched almonds onto a baking tray and bake for 10 minutes making sure that they don’t catch or burn.

Remove from the oven, cool for a couple of minutes and then roughly chop.  The almonds being warm from the oven cut very easily so don’t wait for them to cool too much.

Put the chopped almonds, flour, baking powder, caster sugar, eggs, egg yolk and vanilla extract into a bowl.  Mix to form a dough.

Turn out onto a floured board and knead for about 5 minutes, the dough will be very sticky.

When the dough is well combined, form into a 12″ log and place onto a baking sheet lined with parchment paper.

IMG_3304

Bake for 40 minutes.  The dough will have slightly risen and be a beautiful golden colour.

IMG_3312

Put onto a wire rack and allow to cool.

Turn the oven down to 140C/275/Gas mark 1.

With a bread knife carefully slice the log into 1 cm slices.  Place the slices flat side down onto a baking sheet  and return to the oven for 20-25 minutes, turning once during this time.

IMG_3313

Cool on wire rack.

Read Full Post »

Spanacopita MD

Spanakopita is a special dish for me, it takes me right back to Athens, Greece and my wedding.   The week before and the run up to the wedding was chaos, the dress needed last minute altering, communication over the flowers had been misunderstood and everything was unraveling fast.  It was turning into a Greek tragedy with my mother playing the leading role.  Perhaps it might be a little unfair but I am sure on occasions she could be seen from the side lines fanning the flames!

We stayed with Lela and Andreas. I had known them nearly all of my life.  Lela had been my mother’s childhood friend.    Their house had changed dramatically over the years but the garden remained the same.  A little oasis of green that wrapped around the house.  On one side of the garden under the shade of a tree sat a large red swing sofa, trimmed with a thick white fringe, which continued onto the matching canopy.  I can remember in previous years spending many a happy hour in the afternoon heat laying across it shaded by the canopy and swinging back and forth daydreaming.

As the week wore on problems and hitches only seemed to get larger and the hands on the clock seem to move in double time.  I was beginning to wish that I was somewhere else perhaps back daydreaming on the swing sofa.

Andreas sensing all the friction and chaos on the day before the wedding announced that he would cook lunch for all of us.  He would create something we would all love.   He called me into the kitchen as he wanted to show me how he made his Spanakopita.  It was the first time I had seen it made and for the next hour all my problems outside that kitchen melted away.  Andreas pointed out the key factors to me, making sure I was taking it in, and I did, that recipe has served me very well over the years.   I have made his recipe countless times over and each time, I think of him and that morning of when calm entered back into my life.  Needless to say we all loved eating Andrea’s spanakopita  and it remains the only thing I remember eating that entire week.

A&V

Andreas and Valia (my koumera).

Spanakopita

Ingredients

400g/14 oz fresh washed spinach

5 spring onions

200g/7 oz feta cheese

2 large eggs

100g/3-4 oz butter or 1/4 cup of olive oil (I prefer to use butter)

2 tbs parsley chopped (optional)

1 tbs dill chopped (optional)

8 filo pastry sheets

Salt and pepper

Method

Wash the spinach well and drain. Bring a large pan of salted water to the boil and drop in the spinach, leave until the spinach wilts – this will take about a minute or two. If you can’t fit all the spinach in the pan at once, cook it in batches. Drain and allow to cool, you will be surprised how much water will drain out.  Give the spinach a good squeeze to release as much liquid as possible.

In a bowl beat the two eggs, add to this the finely chopped spring onions and crumble in the feta cheese. This can be done by hand, nothing needs to be uniform. Add the dill or parsley, if using, and then the drained spinach along with salt and pepper to taste.  Mix well using your hands.

Spanakopita is traditionally made in large round flat aluminum dishes. I prefer a cast iron dish, it’s all personal choice. Some people use a glass oven proof dish.

Making up the pie

The filo pastry is very thin and so will dry out very quickly. To stop this happening put a damp cloth over the pastry whilst you are not using it.  Also when laying the filo sheets don’t go off and answer the phone or make a cup of coffee. It needs to be done quickly and in one go. The filo pastry needs to be brushed with either olive oil or melted butter.  There is no fixed rule here, its down to purely personal choice but there is a difference in taste, albeit a subtle one but still a difference.

pie1 IMG_1448 IMG_1451

If using butter, it needs to be melted in a pan over low heat or in a microwave being careful not to burn it.

First, brush the baking container liberally with the oil or melted butter, then start to layer the filo, brushing each top side of pastry as you go. Start by laying the first sheet of filo pastry over the bottom of the dish allowing it to overlap the edge of the dish. Now repeat again allowing it to overlap on the opposite side of the dish. Do the same again for the top and bottom of the dish forming a cross.

Add the spinach mixture making sure it is spread evenly over the dish. Now, start to fold the filo back over the spinach mixture making sure to brush the top of the pastry sheet with oil/butter. To add more height brush a new sheet of filo with oil/butter and fold in half and place on top, tucking in any excess pastry. I usually add two to three extra sheets depending on my mood.

Finally brush the top sheet with the melted butter/oil and put into the middle of the oven 350/180 Gas mark 4. After 40/50 mins check to see if the filo is a golden brown – if not leave a little longer. Remove and leave for a minute or two then with a sharp knife cut the pie into portions.

Spanakopita can be served hot or cold. I love it just warm served with a salad. I have also found it can be re-heated in the oven but not in a microwave.  It really needs to be eaten fresh.

Note:  Frozen spinach can be used but for me there is no substitute for the fresh ingredient and now it seems it’s available all year round so there is no excuse.  Perhaps I should put it a little more bluntly –  if I had the choice between frozen spinach or no lunch it would be the no lunch option.

Read Full Post »

%d bloggers like this: