Feeds:
Posts
Comments

Lemon Curd

Lemon curd not only has the most beautiful delicate opaque colour of yellow, its texture is creamy and velvety, dissolving on the tongue with a kick of citrus zing.

Shop bought versions tend to have a metallic aftertaste to them whereas the homemade varieties are again in a league of their own.  Like so many recipes today, homemade cannot be beaten.  The depth of the yellow colour is determined by the brightness of the yolks.

There is not a lot to the recipe and using the microwave makes it much quicker and easier and as delicious as it would be if made in a double boiler.

This recipe also won me first prize in the lemon curd section at the local country summer show.

Lemon curd is so versatile, it can be spread on bread or toast, used to spread on cakes and can be used instead of jam in doughnuts.  Or just eaten by the spoonful.

Lemon curd

Ingredients

100g unsalted butter

350g caster sugar

Zest of 3 unwaxed lemons

150 ml lemon juice strained without pips

150 ml beaten eggs (about 3 large eggs)

Method

Place butter, sugar, lemon zest and lemon juice into a glass jug.  Place in the microwave.  Zap for 3 minutes.  Stir.  The butter should be just about melted and the sugar dissolved.  If not, continue to stir if after a little stirring the butter and sugar have not dissolved put back in the microwave for 30 seconds.

Add the beaten egg to the jug with the butter, sugar and lemon.   Stir well

Put back into the microwave for one minute and remove.   Stir.

Put back into the microwave again for a further 30 secs and stir. Repeat until the mixture is thick enough to coat the back of a spoon.  It takes about two minutes but don’t be tempted to over cook it.  When I know the mixture is starting to thicken I reduce the time to 15 second intervals.

When you are happy with the thickness strain through a sieve into another jug.  This will remove any egg bits and the unwanted lemon zest.  Now pour the strained curd into cooled sterilised jars.  Store in the refrigerator.

How to sterilise your jars is explained here at the bottom section of this earlier post on marmalade.

DuckeggVicSponge MDDuck egg blue is a beautiful colour, one of my favourites.  I think it stems from years ago when on the May Bank holiday my elder brother would take me to the Surrey County Show.  It was always a fantastic day out and there would be something for everyone.  We particular liked seeing the agricultural side of the event, especially the different show tents that featured poultry, rabbits, flowers, crafts and cooking and we would work our way around all of them.

We gave the poultry section special attention.  Looking back I can’t imagine why he would have had any interest in poultry but it was always on the top of our list.  Inside the canvas tent would sit row upon row of uniformly stacked cages in which sat their feathered occupants showing off their beautiful plumage.  We would walk past silently glancing in and choosing our own winner.  What will always stick in my mind was that one year a small boy was allowed to trouble the birds by tapping their cages and shouting at them. When he got no reaction from a large cockerel he stuck his nose right between the bars of the cage and for his troubles he got a sharp peck.  The last we saw of him was fleeing from the tent.  ‘Just desserts’ come to mind.

At the end of the feathered section would be a stretch of tables filled with plates of exhibition eggs.  They were all arranged beautifully with a small accompanying card describing the breed of bird that had laid the eggs. Their different colours and speckly marks fascinated me.  The ones that really sang to me were the Indian Runner duck eggs.  Their size and shade of blue fed my imagination and I would wonder how they would taste, and longed for one to be soft boiled and served with buttered soldiers.  I then silently vowed to myself that when I grew up I would own my own team of Indian Runner ducks.

I am now all grown up and to date have yet to own a single Indian Runner duck but the desire to own one is still very much there.

This week when I went off to the little small-holding where I buy my chicken eggs I noticed a single box marked ‘duck eggs’.  When I opened the box there sat six beautiful blue eggs.  The chap who looks after the animals came over to me, keen to tell me about the ducks; Indian Runners and that the eggs in my hand where ones no one wanted because they were all odd sizes.  I happily handed over my money, I knew exactly what I was going to use them for.

Duck eggs make beautiful cakes; the sponge is lighter and richer in taste.  Using the duck eggs in a Victoria sponge couldn’t be easier either.  The weight of the butter, flour and sugar is determined by the total weight of the combined eggs.  So you could make a one-egg sponge mixture or a four-egg mixture.  Once the total of the egg (weighed in their shells) is determined then you have the mathematical formula.

Duck Egg Victoria Sponge Cake with Vanilla Butter icing

Ingredients

3 duck eggs weighed with their shells 180g

180g butter softened

180g self raising flour

180g caster sugar

Method

Turn oven to Gas mark 4/180C/350F

In a bowl whip the butter and sugar until pale and light and fluffy.

This is an important step.  This is where you will get the air into the sponge.

Lightly beat the eggs with a fork or similar.

Add the eggs a little at a time to the butter and sugar mixing in between.

You want to make sure you have beaten in all the egg mixture before adding more.

At this stage you also don’t want to over beat the eggs or you will be taking out the air you put in with the previous stage.

If the mixture begins to curdle add a couple of tablespoons of the measured flour and beat until smooth.

When the eggs have all been used up fold in the flour carefully.

Divide into two cake tins.  I used 18cm loose based sandwich tin.

Place in the middle top of the oven not touching the sides or each other and bake for 30 minutes.

N.B.  The baking time is completely determined by your oven.  My way of testing if the sponges are nearly done is smell.   When I can smell the sweet aroma of sponge cake I know they are nearly done.  After 30 minutes I check to see if they are done by pressing with my finger the top of the sponge if it bounces back its done.

Leave to cool in the tins for a few minutes and then turn out onto a wire rack.

While they are cooling make the butter icing.

Vanilla butter cream

Ingredients

225g icing sugar

115g softened butter

2 tablespoons milk

1 teaspoon vanilla extract

In a bowl beat the butter until pale and fluffy add the icing sugar a bit at a time beating on low with an electric mixer.

Add the milk and vanilla extract and beat for a couple of minutes until smooth and cream like.

Spread onto one layer of the cake and then sandwich together with the other layer.

To finish off sprinkle some icing sugar over the top.

N.B.  It is always best to sieve your icing sugar, as little lumps don’t always break up leaving a rather gritty texture to the butter cream.

 polpette di melanzane

I used to go out food shopping with a list.  This usually turned out to be as useful as a chocolate teapot because either the main ingredient that my whole menu was hinging on was not available or just looked past its best.

I have learnt to shop with an open mind, buying what looks good and plentiful.  This week I was lured by a huge pile of deep purple lush aubergines and as I walked over I glanced down and was dazzled by the low low price (dazzled maybe be a little excessive but my heart rate certainly quickened).  They were cheap, cheaper than I have ever seen them.  Maybe it’s the Greek in me but I find it hard to walk past a bargain.  Experience has taught me that it may be a bargain in the shop but it isn’t necessarily a bargain when I get home and don’t or can’t use it all up.  They were not on my list and I didn’t have a recipe in mind.  I told myself to carry on walking.

When I got home I unpacked and admired the heap of  beautiful shiny plump aubergines.  As I placed them in the fridge I silently congratulated myself on what a bargain and wise choice I had made, ignoring the nagging voice in the back of my mind which kept saying ‘so what are you going to make with them, bad choice, you are going to be wasting a good ingredient’.

The weather is freezing, the wind is ferocious and I don’t fancy going out again.  I am determined to use the aubergines with what I have in the cupboard.

Nothing came to mind.  I opened and shut cupboard doors for inspiration – nothing.  I started to get cross with myself then I realised I was making the huge mistake of trying to think on an empty stomach.  Five minutes later I was sitting comfortably with a slice of buttered date and walnut loaf and a hot cup of tea.  As I relaxed, the prefect recipe floated into my mind – Polpette di Melanzane.  Perfecto!

Perfecto it certainly is.  Polpette di Melanzane roughly translated means aubergine meatballs but this recipe is meatless.  The basic ingredients are aubergines, bread crumbs, pecorino, two egg yokes and herbs, the main ingredient being the aubergine.  The quantity of bread crumbs and perconi can be altered to your taste and what you have to hand.  The egg yolk is to bind the ingredients and the herbs are up to you.  I like the flavour of mint and oregano but these can be replaced with others if you wish.

Polpette di Melanzane

Ingredients

2 large aubergines

2 cloves of garlic crushed

165g bread crumbs

80g grated pecorino

2 egg yolks

2 tsp fresh mint chopped finely

2 tsp oregano

salt and pepper for seasoning

A little oil for frying.

Method

Cook the aubergines.

There are two ways of cooking the aubergines for this recipe.  Either cut the aubergine in half lengthwise and rub with olive oil and season with salt and pepper.  Place onto a baking tray and roast in the oven at Gas 4/180C/350F for about 25 mins.  When the flesh is soft remove from the oven and with a spoon scoop out the aubergine flesh.  Squeezing any excess liquid from the flesh.

or

The other method is to cut up the aubergine into cubes and gentle poach in a pan of simmering water for ten minutes or until soft.  Drain, squeezing any excess liquid from the flesh.  This method uses the whole aubergine whilst baking them wastes the skin (I used this method).

It is important to squeeze out the liquid otherwise the balls will fall apart.

In a bowl add the cooked aubergine, the breadcrumbs, grated pecorino cheese, egg yolks, herbs and seasoning and mix well.  The best way is to use your hands.  The mixture should be firm enough to roll into small balls.

In a frying pan heat a little oil and fry the balls in batches.  Once they are golden brown remove.  Place onto kitchen paper.

Serve.

I prefer to eat mine with pasta and a simple tomato sauce.  When the tomato sauce is ready just add the aubergine balls so they cook for a few minutes and are heated through.

Date and Walnut Loaf

The temperature today is not only freezing cold outside but inside too.  The quickest way for me to warm up is to turn on the oven and start cooking.

I didn’t know what to bake so I stood in front of my pantry shelves and looked along to see what needed using up. While trying to get some inspiration my eye fell upon a packet of unopened dates  – now I needed a recipe.

Date and walnut loaf came to mind.   Not too much fuss to make and good to eat buttered with a cup of tea.  The slight hitch in this was persuading myself to use my cached supply of walnuts.  In the garden where we live in London is a large walnut tree and back in October I had had to fight off the squirrels and crows who also had their beady eyes on them.  This year the yield was pretty poor due to the bad summer so there were few nuts to go round.

The squirrels made an early start by running off with them before they were even ripe.  This reduced the walnut supply sufficiently for both the crows and us, leaving only the ones at the very top of the tree.  When these started to fall onto the lawn the crows would appear from nowhere, pecking through the shells and leaving walnut debris for us to find.  It didn’t matter how early we got up those birds had got there first.  In the end we decided that the time to strike was in the dead of night when the crows and squirrels were asleep.  At around midnight every night we searched for windfalls by the light of our mobile phones.   After two weeks we had collected a small harvest that we dried out before cracking them open in the New Year.

Our yield of one small jar ended up being a lot of work, but well worth it.  Freshly harvested walnuts do not have that slightly bitter taste shop bought ones have and they are still contain a rich supply of walnut oil making them quite special.

Date and Walnut Loaf

Ingredients

½ pt/300ml milk

3oz/85g black treacle

2oz/55g butter

3 level tsp baking powder

12oz/350g plain flour

½ tsp salt

½ level tsp bicarbonate of soda

3oz/85g soft brown sugar

4oz/115g dates chopped

2oz/55g walnuts chopped

Method

Put the oven on to Gas mark 3/325F/170C

In a saucepan put the milk, black treacle, butter and sugar and gently heat until the butter has melted.  Just when the butter is about to disappear remove from the heat.

In a bowl put the flour, baking powder, salt, bicarbonate of soda, dates and walnuts.  Pour in some of the liquid from the pan and mix.  Keeping adding until all the liquid is used up.  Mix well incorporating all the dried ingredients.

Pour this into a greased and floured 2lb loaf tin and place in the oven for about 1 hour.

After an hour check the loaf with a skewer to see if it is cooked.  If the skewer comes out clean then remove, otherwise give the loaf another 5 minutes and check again.  With my gas oven I found the loaf needed 65 minutes.

Leave to cool and then slice.  I prefer mine buttered and served with a cup of tea.

Tip

As it was so cold the treacle was heavy and stuck to everything and I could hardly coax it out of the measuring bowl into the pan, the quick way to release the treacle is to give it 10 seconds in a microwave.

To chop the dates I put them into a food processor and to stop them clumping together into a mass I added a couple of spoons of flour from the recipe.

Biscotti

Biscotti MD

I am rather partial to a biscuit with my tea or coffee.  My problem is that I cannot just stop at one.  The solution is not to buy them and this generally works well.  The only trouble is that I live with someone who is also partial to a biscuit.  Even more partial to a full biscuit barrel but these are rare objects, especially in our house.

Dunking biscuits are my real love, and for me, the biscotti is the Rolls Royce of dunkers.  Best described as a hard, golden, nut-filled biscuit with a crunch, they should not be eaten in their undunked state by those who are teeth-challenged.

If we do have them in the house they won’t last long.  So they are avoided.  Until a few weeks ago when we were both shopping in Terroni of Clerkenwell.  While I was at the counter ordering cheese and salami, Tom disappeared only to reappear with a large bag of biscotti, which I was only too happy to add to the shopping.

When we returned home we indulged in a couple to accompany our coffees.  We were both slightly smug in congratulating each other at how restrained we were in just having two.

My only thought was that when he was out of the way there would be all the more for me.  The next day when I was alone I started to think about those biscottis and how nice they would be with my cup of coffee.  Before I knew it, I was looking for a place to hide the empty packaging.

When Tom returned and made us both coffee I could hear him opening cupboards and drawers – I knew what he was searching for but, instead of owning up, I clung on to the hope that he had forgotten them.  He hadn’t and knew exactly who had had the lot.

So, to make up for my disgraceful greed I have made two batches and, in doing so, I have awakened my addiction for a biscotti with my morning and afternoon coffee.  The shop bought ones were nice but home-made takes them to another level.

Biscotti

Ingredients

90-150g / 3 1/2 oz blanched almonds

(I have put 90-150g of blanched almonds because the recipe can take the lower end of almonds or the upper end its personal choice – plus it depends on the amount of almonds I have, I hate leaving twenty almonds in the bottom of a packet).

250g/9 oz plain flour

1 tsp baking powder

250g/9 oz caster sugar

2 eggs beaten

1 egg yolk

1 tsp vanilla extract

Method

Set oven to 180C/350F/Gas mark 4.  Scatter the blanched almonds onto a baking tray and bake for 10 minutes making sure that they don’t catch or burn.

Remove from the oven, cool for a couple of minutes and then roughly chop.  The almonds being warm from the oven cut very easily so don’t wait for them to cool too much.

Put the chopped almonds, flour, baking powder, caster sugar, eggs, egg yolk and vanilla extract into a bowl.  Mix to form a dough.

Turn out onto a floured board and knead for about 5 minutes, the dough will be very sticky.

When the dough is well combined, form into a 12″ log and place onto a baking sheet lined with parchment paper.

IMG_3304

Bake for 40 minutes.  The dough will have slightly risen and be a beautiful golden colour.

IMG_3312

Put onto a wire rack and allow to cool.

Turn the oven down to 140C/275/Gas mark 1.

With a bread knife carefully slice the log into 1 cm slices.  Place the slices flat side down onto a baking sheet  and return to the oven for 20-25 minutes, turning once during this time.

IMG_3313

Cool on wire rack.

Spanacopita MD

Spanakopita is a special dish for me, it takes me right back to Athens, Greece and my wedding.   The week before and the run up to the wedding was chaos, the dress needed last minute altering, communication over the flowers had been misunderstood and everything was unraveling fast.  It was turning into a Greek tragedy with my mother playing the leading role.  Perhaps it might be a little unfair but I am sure on occasions she could be seen from the side lines fanning the flames!

We stayed with Lela and Andreas. I had known them nearly all of my life.  Lela had been my mother’s childhood friend.    Their house had changed dramatically over the years but the garden remained the same.  A little oasis of green that wrapped around the house.  On one side of the garden under the shade of a tree sat a large red swing sofa, trimmed with a thick white fringe, which continued onto the matching canopy.  I can remember in previous years spending many a happy hour in the afternoon heat laying across it shaded by the canopy and swinging back and forth daydreaming.

As the week wore on problems and hitches only seemed to get larger and the hands on the clock seem to move in double time.  I was beginning to wish that I was somewhere else perhaps back daydreaming on the swing sofa.

Andreas sensing all the friction and chaos on the day before the wedding announced that he would cook lunch for all of us.  He would create something we would all love.   He called me into the kitchen as he wanted to show me how he made his Spanakopita.  It was the first time I had seen it made and for the next hour all my problems outside that kitchen melted away.  Andreas pointed out the key factors to me, making sure I was taking it in, and I did, that recipe has served me very well over the years.   I have made his recipe countless times over and each time, I think of him and that morning of when calm entered back into my life.  Needless to say we all loved eating Andrea’s spanakopita  and it remains the only thing I remember eating that entire week.

A&V

Andreas and Valia (my koumera).

Spanakopita

Ingredients

400g/14 oz fresh washed spinach

5 spring onions

200g/7 oz feta cheese

2 large eggs

100g/3-4 oz butter or 1/4 cup of olive oil (I prefer to use butter)

2 tbs parsley chopped (optional)

1 tbs dill chopped (optional)

8 filo pastry sheets

Salt and pepper

Method

Wash the spinach well and drain. Bring a large pan of salted water to the boil and drop in the spinach, leave until the spinach wilts – this will take about a minute or two. If you can’t fit all the spinach in the pan at once, cook it in batches. Drain and allow to cool, you will be surprised how much water will drain out.  Give the spinach a good squeeze to release as much liquid as possible.

In a bowl beat the two eggs, add to this the finely chopped spring onions and crumble in the feta cheese. This can be done by hand, nothing needs to be uniform. Add the dill or parsley, if using, and then the drained spinach along with salt and pepper to taste.  Mix well using your hands.

Spanakopita is traditionally made in large round flat aluminum dishes. I prefer a cast iron dish, it’s all personal choice. Some people use a glass oven proof dish.

Making up the pie

The filo pastry is very thin and so will dry out very quickly. To stop this happening put a damp cloth over the pastry whilst you are not using it.  Also when laying the filo sheets don’t go off and answer the phone or make a cup of coffee. It needs to be done quickly and in one go. The filo pastry needs to be brushed with either olive oil or melted butter.  There is no fixed rule here, its down to purely personal choice but there is a difference in taste, albeit a subtle one but still a difference.

pie1 IMG_1448 IMG_1451

If using butter, it needs to be melted in a pan over low heat or in a microwave being careful not to burn it.

First, brush the baking container liberally with the oil or melted butter, then start to layer the filo, brushing each top side of pastry as you go. Start by laying the first sheet of filo pastry over the bottom of the dish allowing it to overlap the edge of the dish. Now repeat again allowing it to overlap on the opposite side of the dish. Do the same again for the top and bottom of the dish forming a cross.

Add the spinach mixture making sure it is spread evenly over the dish. Now, start to fold the filo back over the spinach mixture making sure to brush the top of the pastry sheet with oil/butter. To add more height brush a new sheet of filo with oil/butter and fold in half and place on top, tucking in any excess pastry. I usually add two to three extra sheets depending on my mood.

Finally brush the top sheet with the melted butter/oil and put into the middle of the oven 350/180 Gas mark 4. After 40/50 mins check to see if the filo is a golden brown – if not leave a little longer. Remove and leave for a minute or two then with a sharp knife cut the pie into portions.

Spanakopita can be served hot or cold. I love it just warm served with a salad. I have also found it can be re-heated in the oven but not in a microwave.  It really needs to be eaten fresh.

Note:  Frozen spinach can be used but for me there is no substitute for the fresh ingredient and now it seems it’s available all year round so there is no excuse.  Perhaps I should put it a little more bluntly –  if I had the choice between frozen spinach or no lunch it would be the no lunch option.

IMG_3208

Youvarlakia is a Greek soup dish made of  lamb and rice balls in an egg and lemon broth.  This is one of my favourites.  For me, it is true comfort food.  Not the most attractive of dishes but as they say, never judge a book by its cover.  What it lacks in plate appeal it certainly makes up for in taste.  The avgolemono broth has a combination of lemon which gives it an acidity with the eggs softening this by creating a creamy richness.  These go together beautifully with the lamb and rice meatballs.  Many Greeks add potatoes and carrots to cook with the broth, but I prefer mine plain or with some wilted spinach.

I can still see my mother at the kitchen table pushing meat and onion through the mincer clamped to the table.  The minced ingredients would then be placed into a large mixing bowl where she would  knead them with her hands for all she was worth.  I am sure looking back that this was a way to get out all her frustrations – and early form of de-stressing.  I now realise that I spent an awful lot of time sitting at the kitchen table watching her cook, learning to judge when to interject with offers of help and when to just keep quiet.  When it came to the task of mincing, I was always desperate to turn the handle, but the occasions that I was honored with this task were few and far between.  When my chance came my fear that if I turned the handle too quickly there might be a nasty accident meant that the turning was painfully slow.  After a couple of minutes my mothers patience ran out and I was relieved of the task for being too slow and sent back to my perch on the kitchen stool!

When I make this dish I am reminded so strongly of my brother.  We knew those little meatballs as hedgehogs because of the spikes of rice that stick out of them.  We both loved them and would always ask my mother to cook them.

Later in life when we returned home for visits there was always the  prior discussions with my mother on what we wanted her to cook for us.  Youvarlakia and Lahanodolmades (the same meat mixture but wrapped in cabbage leaves) were the two favourites that I remembered asking  for – the usual reply back was that they were a lot of work but instead she would cook me something else much nicer.

Except, that was, when I went home and my brother was there.  Then we would get Youvarlakia or Lahanodolmades.  They were his favourite and obviously the importance of pleasing the eldest son was a very big factor for my mother.  When I complained at the table that she never made these for just me, my brother would laugh resting his hand on my arm to demonstrate he meant no malice but silently saying ‘well what do you expect’.  I soon made sure that any future visits coincided with his!

Some recipes call for a little oil or an egg to be added to the meatball ingredients, supposedly to lighten them and perhaps bind the mixture.  I find this makes the broth a little greasy and I feel do not add to the dish.

Youvarlakia Γιουβαρλάκια

450g/1 lb minced lamb

1 onion grated or very finely chopped

35g/2oz long grain rice

1 tbs mint dried

2 tbs parsley finely chopped

salt and pepper to taste

flour for coating (to make this gluten free, leave the flour out)

stock (either a stock cube or homemade)

3 large eggs

3 tbs lemon juice

Mix together the meat, onion, rice, mint, parsley and season with the salt and pepper.  I find that it’s best to use your hands.  Knead until very well combined.

Now take a slightly larger tablespoon of the mixture and roll into a ball.  Roll in the flour to coat.

Put the stock in a pan and bring to a  gentle boil.  Gently drop the floured balls into the stock, cover and lower the heat.  The liquid should just cover all the balls.  Gently simmer for 45 minutes.

Remove from the heat and pour a little of the stock into a cup.  This will be used for the sauce.

Avgolemono broth

Separate the eggs.  Whip the egg whites with a little salt until soft peaks are reached.  Continue whipping while adding the yolks, continue to whip, add the lemon juice and then the saved cup of  the now cooled stock a little at a time – the stock needs to have cooled and added a little at a time as you don’t want to curdle the eggs.  I tend to add a little more stock from the pan to the egg and lemon mixture before adding this to the pan with the meatballs.  Once added give the pan a good shake to incorporate the avgolemono broth.   You could use a wooden spoon to mix but the meatballs are prone to breaking.

Place the balls into a soup dish and spoon over the broth, serving with some extra lemon.

The downside of the avgolemono broth is once made it doesn’t like to be reheated.  The way to get round this is to make the meatballs and remove them from the stock.  The meatballs can be refrigerated separately.  If you are planning on making the meatballs last two meals then it is best to reheat half the meatballs with half the stock, making fresh avgolemono broth each time.

Brioche

Brioche MD (1)

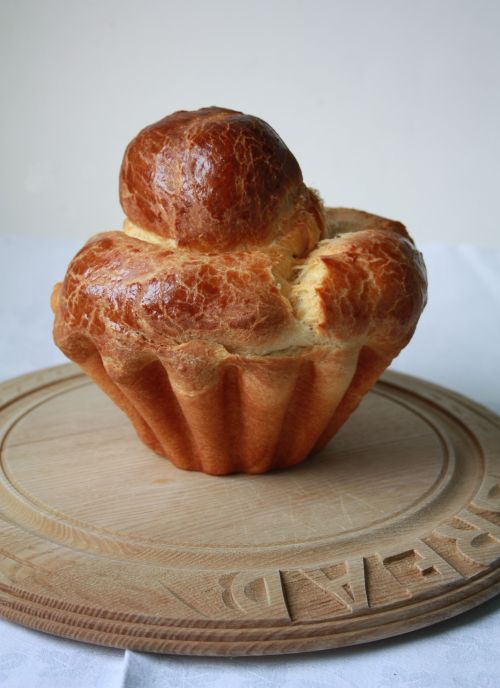
Brioche has to be the Queen of  all the breads, mainly because she has such a light sweet buttery taste,  with two sides – half cake, half bread – and she can be a little difficult to handle when making.   All the same the brioche is worth the effort and hard work and its not just me the holds the brioche in such high regard.   The dog can sniff a brioche coming out of the oven from the bottom of the garden.  It must be the buttery smell because it drives him mad.  It seems he will do anything for a small piece.  He takes his nagging and begging to new levels to secure a few crumbs.    I am shall be testing his strong need and desire for brioche when we next visit the vet by having a small piece in my pocket.  Hopefully we can avoid the usual practice of his command performance of high drama and an unwillingness to even cross the threshold.  It will be interesting to see just how much he really does love his brioche!

photo(117)

It took me several attempts to master the brioche recipe because the dough is so much stickier and more fluid than other yeast breads.  On my first attempt I made one large brioche, what I didn’t quite realise was that the brioche rises quite a bit in the oven.  So when I opened the oven door towards the end of the cooking time I was horrified to see that the brioche had not only hit the roof of the oven but having no where else to go started to expand alarmingly in a sideways direction, and not in a good way.

I have also tried different flours.   At the beginning I used a strong white flour which for my taste didn’t quite give that soft cakey texture.  I then switched to plain flour which gave a much better taste and texture but it was the 00 plain flour which worked best for me.  I also had a little guilt over the six eggs and 350 grams of butter which seemed on the extravagant side but once tasted I don’t think I would want to change the recipe.  The rich buttery taste and luxurious yellow crumb can only come from the eggs and butter.  The brioche takes time to make so why cut corners?

Like a lot of fresh yeast breads the brioche only seems to be at its best for a very short period, maybe two days but that isn’t a problem because it freezes very well.  I tend to bake two at a time, one to be eaten straight away and the other to be sliced and frozen and used later in a bead and butter pudding or toasted with some jam.

The brioche is also different in that it needs three rises the second rise being overnight in the fridge or a very cool place.  The three rises mean that there is less yeast in the recipe and so the proving may take a little longer but this only helps to improve the flavour and create an even texture.  Leaving the dough in the fridge or a very cool place helps to make it much more manageable to handle and shape.

I have read many recipes for brioche and often they differ in oven temperatures and time.  For my oven I have found that I get the best results from using two 16cm tins rather the one 22cm tin.   I set the oven high for the beginning of the bake and then turn it down to finish the baking.  Again, you cannot  judge whether it is done just by looking, as the egg wash browns and gives the impression that it is cooked when it is not.  The only answer is the skewer test – if it comes out clean then its done.

Brioche

Ingredients

15g fresh yeast

70 ml lukewarm milk – the warm milk will start to activate the yeast

500g plain 00 flour or strong white flour if you prefer

15g salt

6 eggs beaten lightly

30g caster sugar

350g butter softened

30g caster sugar

1 egg yolk for brushing mixed with a little milk

Method

Heat the milk very briefly in the microwave, test to make sure it is only lukewarm.  Add the yeast and stir to dissolve.

Put the flour, salt and eggs in a mixing bowl using a dough hook.  Add the yeast and milk mixture.

On minimum speed mix the ingredients until they are well combined.

Turn the speed up and knead for approx 10 minutes,  stopping the machine every now and then to scrape down any loose bits.  By the end of the 10 minutes the dough will have become firmer and you will notice it become elastic against the sides of the bowl.  The dough is still very sticky and difficult to handle.  Do not be tempted to add any more flour.

Add together the sugar with some of the softened butter.  With the mixer on slow start to add small spoonfuls of the butter and sugar mixture, wait until combined before added the next.  Continue with the remaining butter.  When all the butter has been used up turn the mixer onto a medium speed and knead for another 10 minutes.  The dough will become beautifully silky and shiny.  You will also notice the dough will make a slapping noise against the side of the mixer bowl.

Remove dough hook, cover dough with clingfilm and leave to rise to double in size.  This will take 2-3 hours, don’t be alarmed if after the first hour there isn’t a lot of progress.  As there is less yeast it will take longer.

When the dough has doubled in size it needs knocking back  – at this stage I use my hands to turn it over a couple of times, knocking out the air.

Cover the dough again and place in a very cool place or the fridge for 6-8 hours.  I usually make the dough up in the evening and return to it in the morning.

When you turn the dough out you will find it quite stiff and very easy to use.  The dough now needs to be divided into two balls.  One ball of 2/3rds and the other of the remaining 1/3rd.

I like to melt a little butter in the microwave and brush the brioche tin thoroughly before putting the larger of the balls into it.  Once in, create a hole in the centre with your fingers.  With the smaller ball roll it into a tear shape.  With the larger end at the top push the smaller ball into the centre of the hole and with your fingers make sure you press it well into the large ball.

Brush lightly with the egg wash, being carefully not to let any wash collect around the join of the small ball on the top or around the edge of the fluted tin as this will hamper the dough rising in the oven.

Leave it to rise in a warm place until it has reached nearly the top of the tin.

Preheat your oven to 200C/400F/Gas mark 6.

Before putting in the oven, gently brush the brioche again with the egg wash.  You can at this stage use a pair of scissors or sharp knife to cut 6 diagonal slashes into the main ball, leaving the top ball intact.  Dipping the scissors or knife into cold water between slashes helps them not to stick to the dough.

Place in the oven, allowing space for the brioche to rise taking into account the top ball.

Bake for 15 minutes and then turn down the oven to 170C/325F/Gas mark 3 for a further 30/40 minutes.

The only way to really test whether the brioche is cooked is to insert a skewer into the centre.  If it comes out clean then its cooked otherwise leave in the oven for another 5 minutes and test again.

Once cooked take out of the oven and leave in its tin to cool for 10/20 minutes then turn out onto a wire rack.

Pumpkin Risotto

risotto

Risotto is definitely a dish that has to be made with love and care.  For me it is comfort food.  Last time I made risotto it was for Sophia my daughter.  We both stood and chatted taking it in turns to stir, only slowing or stopping when talk got a little more interesting than making the risotto.  I also had a small problem of mid way through cooking that two more places at the table were added so to eek out the risotto I served it with rocket and a little balsamic vinegar.

I don’t know why, but I go through phases with risotto – it’s a fantastic way to use up the last little bits of the roast chicken, using the chicken carcass for the stock.  I rely on a risotto to help with the glut of courgettes from the garden, or as in this case a large pumpkin that needed eating.

I am also prone to being a little fussy with my risotto and there are certain types I really like.  Riso Superfino Carnaroli is one of them.  I am a bit of a sucker for nice packaging and Riso Superfino Carnaroli certainly ticks that box with its white cotton sack and bright red writing.  The downside is I can never bring myself to throw those little bags away after I have used up all the rice.  I have a little growing collection of them in my kitchen drawer.  I am getting to the point that I need to find a use for them otherwise they are going to have to go because space is getting very tight.

Getoilyrice

Risotto is easy to make, but it doesn’t like being reheated as the rice goes stodgy and is unpleasant.  If all the ingredients are prepared before hand it makes the standing and stirring a rather relaxing experience.  I tend to let my mind wander to what I am going to cook tomorrow or looking out of the window to see if the dog has disappeared into the vegetable garden which he knows is an out of bounds area.

There are no hard and fast rules with what you add to the risotto except it is best cooked and eaten straight away.  Risotto rice is different from other rices – so if you haven’t got a risotto rice in the cupboard leave it until you do.  Finally, as you add the stock remember to keep it simmering as you don’t want to slow down the cooking of the rice.

There are two methods of cooking the pumpkin for this recipe either on the top of the stove in a pan with foil or roasted in the oven.  I find the top of the stove the quickest.

Pumpkin MD

Pumpkin Risotto  (feeds 2 as a main)

Ingredients

1 small/medium onion chopped finely

Slice of pumpkin –  cut into bite-sized cubes

1 wine glass of white wine

2/3 tbs oil

570ml/1 pint vegetable stock/or chicken stock

200g/7 oz risotto rice

small piece of butter (optional)

Parmesan cheese grated

Method

Put the stock in a pan and leave on a slow simmer.  You need to keep the stock at roughly the same temperature as the risotto – I sometimes put the stock in a jug and keep heating it in the microwave as I need it.

Heat the oil in a large pan then add the onion, turn down the heat so that the onion gently cooks and becomes translucent without browning.

While the onion is slowly cooking put the pumpkin in a pan with a knob of butter or oil and some silver foil over the top to act as a loose-fitting lid, this will help the pumpkin to steam and retain its moisture.  It cooks fairly quickly, about 10mins – you know when its cooked as you can just put a knife into it.  When it is cooked, save some of the pumpkin putting the rest in a blender to puree.  Set aside, it will be added later to the risotto.  Or roast in the oven with garlic and a little olive oil drizzled over.  I find a pan on top of the stove the quickest.

When the onion is cooked, add the rice and turn the heat up, keep stirring so all the rice is coated in the oil.   The rice should very quickly start to change colour slightly. Now add the white wine, stir slowly until all the wine is absorbed then start to add the stock, a cup at a time.  Once added the risotto needs to be stirred.  There is no need for frantic stirring, just enough so that the rice doesn’t catch or start to stick to the bottom of the pan.  As the rice absorbs all the liquid add some more stock and keep going until the rice is cooked.  If you run out of stock and the rice still needs further cooking just add some boiled water.  There is not exact timing for risotto – you need to taste as you go along, you will know when it’s cooked because it will taste as you would like to eat it, some like it al dente and others a little softer.  Just before the risotto is cooked add the pumpkin chunks and puree, and any further seasoning.

As you take the risotto off the heat add a knob of butter and the grated parmesan cheese.  Stir, leave for a couple of minutes to stand and then serve.

Yorkshire Teacakes

Brioche MD (2)

In most tea shops around England toasted Yorkshire teacakes can be found on the menu.  There is a big difference between hand made ones and mass produced.  A little like processed bread the mass produced teacake once toasted and spread with butter  becomes a doughy nothingness, whereas the hand made version is more robust with a much better flavour and texture.  These large 6” sweet bread buns are studded with currants and are delicious split and toasted with butter.  Traditionally accompanied by a cup of tea.  I prefer to replace the currants with sultanas but any dried fruit can be used.  Someone from Yorkshire might have a problem with that, as they are quite protective of their regional recipe but I am a great believer in cooking what you like and how you like.

Fresh yeast is difficult enough to find locally let alone in the centre of London.  I would have a better chance of obtaining class A drugs than finding an ounce of fresh yeast on my local high street.  Supermarkets used to offer fresh yeast for free from their bakery section but this seems to have stopped.  I have on many occasions in the past bought fresh yeast from my local baker – what always amused me was when I asked for it the shop assistant would have to go into the actual bakery to get it and when she returned the baker himself would appear to give me the once over!  I don’t know whether he was in fear that I might be setting up a rival bakery or the notion that a customer had dared to actually have a go at yeast bakery themselves.  Alas this source has also now dried up.   Which forced me to search on the internet.  I found I could buy fresh yeast online from suppliers of flour but the minimum order premium just didn’t make ordering 100 grams of yeast viable.  The answer in the end turned out to be Ebay.  Which is where I found Paul of Online-bakery.  He offers a brilliant service – order it on a weekday and it arrives through the door the next day.  For me fresh yeast gives a better flavour and is always worth the effort of sourcing.

As soon as the yeast came through my letterbox this weekend, it was straight into the kitchen where I started on the list of yeast recipes I have been itching to make.  Starting with Yorkshire teacakes.

This recipe will make six large teacakes.  It is not compulsory to eat them all in one sitting as they freeze very well.  The best way is to split them and then freeze them.  This way they defrost all the quicker and are ready to pop under the grill for whenever there is a yearning for a toasted teacake and a cup of tea.

Yorkshire Teacakes

Ingredients

1 lb/ 450g strong white flour

1 level tsp salt

1 oz/ 30g butter

1 oz/ 30g caster sugar

½ oz /15g fresh yeast

½ pint/285ml lukewarm milk

2 oz/60g currants or sultanas

Extra milk for brushing the tops

Method

Place flour and salt into a bowl and rub in the butter.  Being lazy I use a small food processor.  I put a small quantity of the flour in with the butter, whiz to create a breadcrumb effect and then add to the rest of the flour in the bowl.

Add the sugar and sultanas (or currants).

Stir the yeast with the warm milk until blended, add to the flour mixture.

Mix to a firm dough and knead for about 10 minutes.  The dough should be smooth and elastic.

Cover and leave to rise until double in size in a warm place.

Lightly flour the work surface, knead again and divide into 6 equal sized pieces. I weigh the entire dough and then divide the number by six.

Roll into balls, flatten with the palm of your hand and put onto greased baking trays.  I find I need two trays – three Yorkshire teacakes to each.

Brush tops with milk.  Cover and leave to rise until almost double in size.

Bake in centre of the oven at 400F/Gas Mark 6 for 20 mins

The teacakes should be golden brown when ready.  If the Yorkshire teacakes don’t slide off straight away leave on the baking tray for five minutes and then remove, the extra time tends to help them to unstick.