Feeds:
Posts
Comments

IMG_2168

It’s been too long since my last post but, I have not stopped cooking.  Life has enveloped me tightly and carried me in a huge wave out to sea.  I am not in calmer waters and have the time to settle back into my previous life.  Well, for the moment.
After so long I would have never have guessed the recipe that would bring me back to writing would be a recipe based on a simple Madeira cake.
I know I am not alone when I tell you I have shelves full of cookery books. Mine have been collected over the decades. A bookcase was built for me that stretches across the entire wall in the sitting room and in return I promised that I would only keep books that fitted on the shelves, with the rule that if a new book came into the house then one had to go. The one in one out rule hasn’t worked, but what has appeared is little mountains of books directly in front of the bookcase.
I am not completely selfish; I do feel pangs of guilt when I add another book to the mountain. My antidote to this guilt has been to take a book each week and use a recipe. This way I felt I was demonstrating how useful all these books could be! I have been experimenting, eating new things, and trying different flavours.
I decided to try a baking book (I am naming no names here) in which the photographs were beautiful, the cakes look delicious, and they tempted me in. I wanted to try the recipes. Note the ‘s’ on recipes. I decided on a hat-trick of baked wonderfulness. All three cakes were very similar, in that they were loaf cakes. I started to make a shopping list of ingredients. That was when the first doubt crept into my head. Did I really need all these different ingredients? I brushed the doubt aside.
As I started to weigh out the ingredients for the first cake it dawned on me that a quarter of the ingredients were unnecessary as the quantities were so small. I ploughed on, making sure I followed the recipe to a tee. When the time was up in the oven and I went to check the cake, I didn’t need to use a skewer to see it was not cooked. Was it me? I went online and did some research – I was not alone with my cake results.
I am disappointed in the recipes and in the book. I feel a little duped. All too often I see recipes that have a fancy name when in fact they are another traditional recipe but instead of actually improving the technique or adding something that would change the recipe for the good, a whole long list of meaningless ingredients have been added just so the writer can claim it as theirs.
My disappointment wasn’t all negative I did take from the cake is that I liked the orange zest flavour and, that the ground almonds gave it a heavier more moist texture. It also made me think about how I could improve it and pushed me to research and create my own recipe, which I wouldn’t have done had it been a good cake. My new recipe is based on a Madeira cake. The orange zest can easily be swapped for lemon zest if you wanted.

N.B:  When making cakes soften butter makes all the difference.

IMG_2160(1)

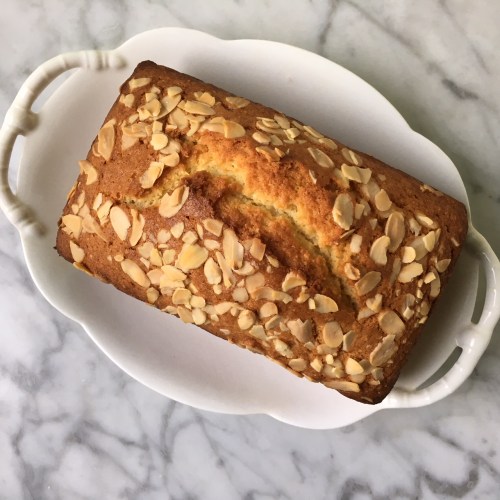
Orange and Almond Loaf Cake
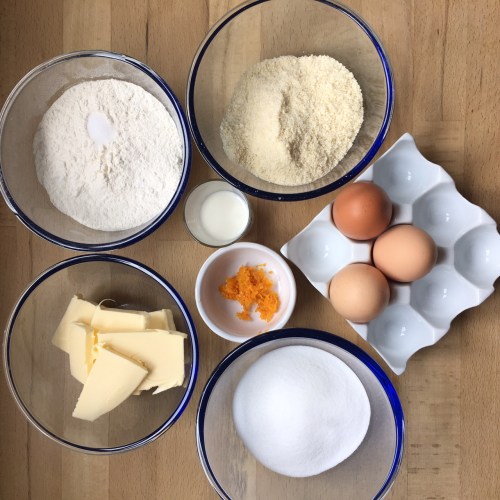
Ingredients

160g self raising flour

70g ground almonds

pinch of salt

zest from 1 orange

140g butter (soften)

140g caster sugar

3 large eggs

25g milk

15g flaked almonds for decoration

Method

Turn oven on to Gas mark 4/ 350F/180C
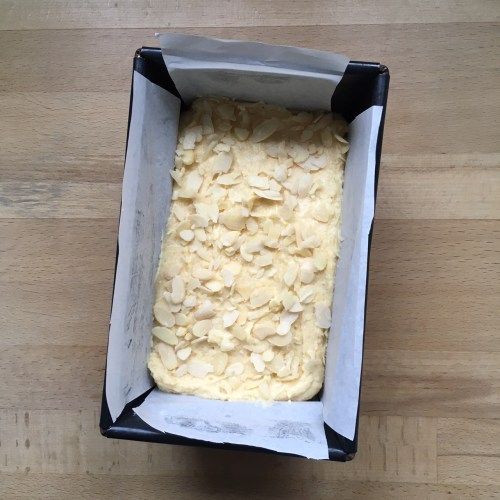
Grease and line with baking paper a 3 ½ inch x 7 inch loaf tin.
In a bowl beat with an electric mixer the butter, orange zest and caster sugar.
Beat in each egg separately until well combined.
Add the ground almonds, self raising flour and salt. Using a large spoon fold the dry ingredients in until combined.
Add the milk and mix until combined.
Pour the batter into the prepared tin. Sprinkle the top with the flaked almonds.
Place in the middle of the oven and bake for about 1 ¼ hours. The cake is baked when a skewer inserted into the middle of the loaf comes out clean. If it doesn’t, just give it another five minutes and check again.
Allow to cool on a wire rack in the tin. When cold enough to handle, turn the cake out onto the rack and leave to cool completely.
This cake is best eaten on the day, but will keep for up to 3 days in an airtight container.

IMG_2161


Advertisement

IMG_9637(1)

Half way down our long garden is a greenhouse and to the right a fig tree and beyond that lies our kitchen garden.  It’s a very simple set up of two large beds enclosed with a low box hedge and a wide grass path up the centre. Directly behind the greenhouse is a gravel area where herb-filled pots sit, out of reach from pets.  With each year that passes we learn something new.  We learn what doesn’t grow and what does, but the garden never lets us get complacent. Just as we become confident in a crop it will play up and not produce anything.  This year our courgettes were a triumph.  At times it was hard to keep up with production but courgette fritters are a wonderful way of using up any overload or any courgettes lurking in the back of the fridge.

As soon as the seeds are sown I find myself trotting down the garden looking for the first signs of life.  Courgettes grow quickly and as the first leaves unfold and stretch out I increase my visits down there.  It’s not long before their bright trumpet shaped flowers dotted amongst their large leaves appear, filling me with expectation.  The visits become more frequent and I more impatient for my first courgette of the season.  It doesn’t matter how many times I have grown and harvested courgettes I cannot help but get excited at the thought of a baby courgette. As the season progresses the leaves of the courgettes start to spread and grow larger, shielding their offspring.  At this point I have to bend and gently part the leafs without snapping off a stem to look for the little green courgettes. This is when I discover the courgettes past their prime, the ones that I have missed.  These might not be good enough for an omelette but they are just perfect for courgette fritters!

No courgette has grown in vain in my garden!  After a quick wash to rid them of any soil, they are grated, salted and left to release their water.  The older and larger the courgette the more water it will hold.  After an hour I squeeze the living daylights out of them, adding bread crumbs, crumbled feta, eggs, flour, chopped dill and seasoning.  Depending on what I have in the fridge denotes the actual quantities – if the mixture is too loose I might add some more flour or breadcrumbs, a little less if I only have one egg.  This is a recipe that over time can be altered and played with.  A lot of Greek recipes include grated onion.  I feel that the strong flavour of the onion is a bit of a bully and overpowers the courgette so I leave it out. Feta can be substituted with grated parmesan or percorino and the dill can be replaced with other herbs such as mint, fennel or parsley.  It all depends what you have and what flavours you like.  Finally the frying.  I prefer to use olive oil as it gives a nicer flavour but sunflower oil does produce a slightly crisper fritter.

A small note.  I have grated the courgette and left it covered in the fridge over night and it has been fine but even with a strong squeeze the courgette has more water to give so don’t make the full mixture up to use later as you will find it has become watery and won’t hold together so well.

Courgette Fritters/Κολοκυθοκεφτέδες

800g-1kg courgettes

2 eggs beaten

60g plain flour

60g bread crumbs

100g Feta crumbled

3 tbs fresh dill  (fennel, mint or parsley could also be used instead or as well)

Salt and pepper

Oil for frying (olive or sunflower).

Method

Wash courgettes, trim each end and grate with skin on into a large bowl.  Sprinkle with salt and cover.  Leave for about an hour to allow the courgettes to shed their water.

IMG_6873

Squeeze the grated courgette hard to release as much moisture as possible and place into a clean bowl.  Add the feta, eggs, flour, breadcrumbs, dill and seasoning. (Beware not to add too much salt as the Feta has a salty taste and the courgettes will retain some of the salt used earlier).  Mix thoroughly.

In a frying pan add a generous amount of oil.  Using two tablespoons make a rough ball of the courgette mixture, if it is too wet add a little more flour or breadcrumbs to dry it out a little. Drop the courgette balls into the hot oil and gently fry.  Allow to brown on one side before turning the fritter over  – this stops the chances of the fritter breaking. When both sides are golden brown transfer to a plate lined with kitchen paper.

IMG_9601

These can be eaten hot or cold.  We eat them hot and any left over get put in the fridge for the following day.  We enjoy them with crab apple chilli jelly but they can also be eaten with tzatziki.

Cherry Clafoutis

IMG_1748

Cherry Clafoutis

It’s been a while since I posted and there has been a little guilt. Don’t worry I haven’t stopped eating I have just been very slow to write about it. I promise to do better.

I also have to confess to being given a little prod by EvieSaffronStrands who asked for my cherry clafoutis recipe.

August is one of the most productive months of the year for fruit and vegetables and one of the busiest in my kitchen. I try and preserve all I can for the coming winter months by turning whatever is in season into jams, jellies and chutneys.

The fruit grown in the garden is usually eaten before we have reached the kitchen door. So excited and amazed are we, that anything so wonderful could be grown just a few feet away. I also secretly think that it is just too good to be used for preserving and best eaten and enjoyed straight away.

There are a few farms that I buy from direct. Each farm is favoured for a particular fruit or vegetable. One on my list is a farm that supplies the most wonderful cherries and plums. This year their cherries have been delicious and we have arrived home with an empty basket because we couldn’t resist eating them en route.

On the last two visits I have been spoilt for choice on the cherry variety front. This time the cherry season was coming to a close for this particular farm and Valentine cherries were the last to be had. Not only the last variety but the last bag. It didn’t take a moment to decide that I would make one last clafoutis before the season ended. To make sure they actually got home without being tampered with they went straight into the boot, out of reach.

Many clafoutis recipes call for the stones to be left in, suggesting that it gives the cherries a more almond flavour. I feel that any benefit that this may give (and I don’t think it does) is far outweighed by the chance of a broken tooth. I don’t have a cherry stoner so use a small sharp knife to slit each cherry, giving me enough room to prise the stone out, thus keeping the cherries nearly whole.

Just in case I have robbed the dish of an almond presence, I soak them for a couple of hours in Amaretto, which is a rich nutty almond flavoured Italian wine. It adds flavour to the cherries without overpowering them – but you can certainly taste it.

The texture of the batter is very much like that for bread and butter pudding.

IMG_1736
Clafoutis

Ingredients

500 gms fresh cherries or enough cherries to fill your tin in one layer
3 eggs
210 ml full fat milk
60 ml double cream
50 gms plain flour
75 gms caster sugar
20 gms melted butter (cooled)
pinch of salt.

3 tablespoons of Amaretto (optional)

Butter to grease the tin and a couple of teaspoons of caster sugar to coat the tin.

Method

Wash the cherries and remove the stones, place in a bowl. Add 3 tablespoons of Amaretto. Leave to soak for 2 hours.

Turn on oven to 350F/180C/Gas mark 4.

Grease a 9 inch/23cm pie tin with butter and sprinkle with caster sugar.

In a bowl add the 3 eggs, flour, sugar, salt and melted butter along with the milk and cream.  Beat well or use a blender until a smooth batter is achieved. Cover and leave to stand for at least 30 minutes to rest.

Drain the cherries and place in the pie tin to create a single layer.

Give the egg batter a stir and then strain through a sieve onto the cherries.

Place in the upper middle of the oven. Check after 35 minutes – the clafoutis is cooked when the batter has risen up and turned a deep golden brown. I have found in my gas oven the clafoutis takes 45 minutes maybe a little more maybe a little less. After 35 minutes the batter should have set which allows me to turn the clafoutis around so as to create an even browning.

Remove from the oven slightly cool and serve.

Dust with icing sugar for more eye appeal and eat on its own or with double cream.

Revani

Easter for me is the true beginning of Spring.  Like our winter clothes, the foods in the kitchen start to change. The heavier dishes of casseroles, soups and steamed puddings begin to be replaced with a wider range of seasonal vegetables, salads and fruits. What better recipe to show this than Ravani – the lightest of sponge cake, laced with a light sweet syrup with a hint of lemon.  The coconut works so well with this recipe as it adds a wonderful texture to the sponge and goes beautifully with the lightly flavoured citrus syrup.

Every home in Greece must have it’s own recipe. I couldn’t guess how many variations there are of this recipe.  Ravani is a typical Greek traditional semolina cake that is baked for festive occasions.  No doubt with the Greek Orthodox Easter celebrations coming up this weekend there will be an array of Ravani cakes being made.

I can remember Panayota, my aunt’s cook, making this.  No doubt a recipe handed down to my aunt from her mother (my great grandmother) and then perfected to my aunt’s taste over the years.  She was a very exacting lady and would hover over poor Panayota making sure no mistakes were made.  I can remember sitting in her beautiful light and airy Salonee on a large sofa that was, like every piece of furniture in the room, covered in its custom made fitted linen cover.  I had to fight the strong urge of jumping up and lifting up these covers to discover what lay underneath. My aunt is no longer with us and I never ever found out what those covers hid. It will remain one of those mysteries.

I was always very respectful and would sit politely until a small plate would be presented to me. On it would sit a piece of their ravani cake and a linen serviette, just in case.  My aunt would sit across from me with Panayota proudly standing behind her, waiting for my reaction.  Hollywood has never called, but at least my aunt was convinced that I loved it.  Trouble was, I was never too keen on their version!  It was heavier and sweeter than this recipe and it definitely didn’t contain coconut, to which I am rather partial.

I think I can now say that I have found my own version of the recipe which I hope will continue down the family line.  I know I won’t be getting any commanding performances, as my family are quite happy to tell me if they don’t like it.  The sun may be a little shy this weekend in London but the Ravani will certainly be shining out over our Easter celebrations.

Ravani/Ραβανί

Ingredients

6 eggs separated (large)

140g caster sugar

50g desiccated coconut

70g plain flour

140g fine semolina

For the syrup

300g caster sugar

300 g water

1 unwaxed lemon cut in half.

Decoration

1 tbs desiccated coconut

Method

Turn the oven to 170C/325F/Gas Mark 3

Grease and flour a 22 cm cake tin.

Beat the egg yolks with 100gms (not all) of the caster sugar until thick, creamy and very pale.  In a clean bowl, beat the egg whites with the remaining 40g of caster sugar until stiff.

In a bowl mix together the flour, semolina and desiccated coconut.

Add one third of the egg whites to the egg yolks and fold in gently.  Sprinkle the dry ingredients over the egg mixture and combine.  Fold in the rest of the egg whites.

Turn mixture into a 22cm cake tin.

Place in the oven and leave for 20-25 minutes.  Test with a knife after 20 minutes to see if it is cooked (knife will come out clean if cooked).  If not, leave for a further 5 mins and test again.

When cooked remove from the oven and leave to cool in the tin.

To make the syrup.

Add to a saucepan 300ml water and 300g caster sugar. Add the whole lemon, cut in two.  Bring to a boil.  The syrup should then be allowed to boil for exactly 3 minutes.  Remove from the heat.

The cake should be cool when the hot syrup is added.  Pour over the cake which is still in its tin.  Cover with cling film well, and turn the tin upside allowing the syrup to distribute.  After a few minutes flip the tin over – this helps to stop the syrup from collecting at the sides and bottom of the tin.  This can be repeated a couple of times until the syrup has cooled.  Unwrap and sprinkle a tablespoon of desiccated coconut over the top.  Serve.

N.B  The ravani in the picture was baked in a 8″ cake tin as I couldn’t find my original 22 cm cake (now found in another cupboard).  The ravani took longer to cook around 35 mins and proved difficult when pouring the syrup.

IMG_5110This is such a versatile recipe. Eaten hot or cold with vegetables or just sliced on its own – it’s delicious.  What’s even better is that it comes with a couple of short cuts.  The puff pastry can be home made or bought, and the sausage meat can be made either entirely from scratch or from the contents of six sausages.  The caramelized onions can be missed out, as can the mustard or even both.

I don’t know why I have come to making sausage plait so late in life. Maybe it is because my mother refused to buy sausages as she didn’t care for what they were made of.  Perhaps that’s why I have a huge weak spot for anything containing sausage meat. So what else could satisfy the brief of forbidden food from an extremely large sausage roll in the form of a large piece of sausage meat encased in golden layers of puff pasty.

I might have come late to actually baking my very own sausage plait but I was no stranger to eating them or a smaller version in the shape of the sausage roll.  Every Saturday my mother would park in the Catholic church car park – why we were blessed with one of their precious parking spaces I will never know, but we were and this is where my mother and I parted company.  She would go to the fish mongers and her favourite market stall where only they had the best and freshest vegetables and I would go to collect the baked goods. Not from any old bakery, no, ours were from La Boulangerie!  It was the bakery.  Situated at the top of a steep cobbled street. It comprised of a small tight little shop with low dark beams.  There was hardly room for the army of assistants behind the counter who spent their day going back and forth to the bake house in the back, let alone the hordes of customers that flocked to buy their bread and baked fancies.  I would stand at the end of a long queue that would wind itself not just around the shop but out of the door and down the high street.  The moment I arrived in the queue I would start to feel anxious about whether there would be enough baked goods to go around.  I knew my mother’s order was safe but it was the extra item which I desired that had me in a froth.

As soon as I had made it into the dim interior of the shop my eyes fixed upon the ever depleting pile of my heart’s desire. As I edged forward the stock became dangerously low, another batch would be brought in from the back but every now and then my ears would prick up to ‘sorry, we have sold out’.  Finally, it would be my turn.  I would request my mother’s order with a faint squeak of a voice and then add ‘and one sausage roll please’ – ‘large or small’ would chime back.  In those days large was out of my price range so small it was.  As I squeezed my way out of the shop and into the fresh air I would head straight round the corner to a wooden bench where I would enjoy the pleasures of my toil.  I developed a way of eating the sausage roll discreetly in the bag, as eating in the street was frowned upon. This technique would allow golden flakes to drop to the bottom and when I had devoured the roll I could then have the pleasure of shaking all the flakes to one corner of the bag and then tipping the whole lot into my open mouth.  Once that was done I headed back to the car to meet up with my unsuspecting mother.

Sausage Plait with Caramelized Onions and Mustard

Ingredients

450g approx of sausage meat or 6 sausages

1 x 375g packet of all butter puff pastry

4 medium onions

knob of butter

1 tbs oil

balsamic vinegar

1 tsp sugar

2 tbs mustard

1 beaten egg to glaze

Method

Turn the oven on to Gas Mark 6/200C

N.B. The sausage meat when in the oven does tend to release fat so it is best to use a baking tray with a shallow lip.

Peel and cut onions in half and then slice thinly into half rings.  Heat the oil and butter in a pan and add onion slices.  Allow to cook slowly for twenty minutes. Stir from time to time making sure the onions do not stick. If they do start to stick add a tablespoon of water.  When the onions have turned a lovely golden colour, add a few drops of balsamic vinegar and 1 tsp of sugar – continue to cook on a low heat for a further 5-10 minutes.  Allow to cool completely.

If using sausages – split them open with a sharp knife. Remove from the skins. Knead a couple of times to combine and then on a lightly floured board gently roll into a large sausage.

Roll out the pastry into an oblong.  Place the sausage meat in the centre. Spread a layer of mustard along the top. Then a layer of the caramelized onions. DO NOT BE TEMPTED TO PLACE WARM caramelized onions on, as this will melt the pastry and make it impossible to work with.

IMG_5084

Make cuts into the pastry on both sides of the meat and no further. Taking one strip fold over the filling then from the other side take a strip and fold over. Carry on down the pastry, this will form the plait.  Tuck the ends under the strips at the top and bottom. Trim any extra pastry. Transfer to a baking tray and place in the fridge for 30 minutes.

IMG_5088

Brush the pastry plait with the beaten egg.

IMG_5091

Place in the oven and cook for 35-40 minutes or until golden brown.

Remove from oven and allow to stand for 10 minutes. Serve. Delicious hot or cold.

pear,chocolate cake

Pear, chocolate and hazelnut cake a combination that tastes delicious. This isn’t a light delicate spongy type of cake. It has more of a robust crumbly texture and there is no mistaking the three key ingredients as they sing out beautifully together.

This is not a recipe that I have made or even tasted before. I came across it on Instagram and more precisely on Daniel Etherington’s feed. There was no recipe link, nothing, just a photo and description. It caught my eye, and more importantly my taste buds. I Googled it and found only a few links to two slightly different recipes.  I had a free Sunday afternoon and the ingredients so decided to follow my desire for pear, chocolate and hazelnut cake.  I read both recipes and the comments left about the too short cooking time and decided to branch out with my own version.

At the time of making the cake I didn’t think to look on Daniel Etherington’s blog for the recipe!  Which I note is again slightly different to the one below.  I also note his oven time is shorter, I am guessing because his recipe calls for a higher oven temperature.

A couple of notes on this recipe;  Firstly, I left the cake in the oven for 1 hour 15 minutes, the original recipes stated 50mins which is far too little – I am not alone on this statement!  I went with experience and after an hour opened the oven to check on the cake.  I could tell that it wasn’t ready to be tested.  I left it for another 15 minutes until I got a light springy resistance when lightly pressed. I then inserted a skewer to check it was done.  Secondly,  I used an extra pear thinly sliced and laid across the top of the cake in a fan as decoration.  Finally, the apricot jam glaze does make a difference, not only to the overall look –  it also gives a slight sweet note.

IMG_5507

The original recipe states conference pears but I don’t think that matters greatly. It can be eaten warm but I preferred it cold, as it wasn’t as crumbly and much easier to cut. I served it with clotted cream, but ice cream would be just as nice.

Pear, Chocolate and Hazelnut Cake

Ingredients

100g roasted hazelnuts
140g self-raising flour
175g butter cut into small pieces
140g caster sugar
2 eggs (lightly beaten)
1 tsp vanilla extract
2 conference pears (peeled, cored and diced small)
50g dark chocolate (cut into small pieces)
Decoration
1 conference pear (peeled and sliced thinly)
1 tablespoon warmed apricot jam (to glaze)

Method

Turn oven on to Gas mark 3/160C.
Grease and line a 20cm round cake tin with baking paper.
Place hazelnuts in a food processor and chop until fairly fine. Add to this all the flour.
Add butter cubes and pulse until crumbs appear, be careful not to over pulse as the crumbs will turn into clumps. Add to this the sugar, slightly beaten eggs and the vanilla extract. Pulse enough to combine.
Stir in chopped pears and chocolate.
Spoon mixture into the lined cake tin, leveling the top with the back of a spoon. Add the thinly sliced pear in a fan design on the top.  Embed the pear slices into the mixture by gently pushing them in.
Place in the oven and leave for 1 hour 15 minutes. Depending on the ripeness of the pears and differences in ovens check after an hour. The cake should have a lovely golden colour.
Remove and allow to cool in its tin for about 10 minutes. Warm up the apricot jam in the microwave and brush over the top of the cake.
Can be eaten warm or cold. Best eaten with a large spoon of cream. Or in my case a generous spoon of clotted cream.

_MG_5521

Before the apricot glaze is brushed on.


N.B It is really worth roasting the hazelnuts as they give a much deeper nuttier taste to this cake.


_MG_5485Koulourakia are very short buttery biscuits.  They are shaped into coils, twists, rings and are either baked plain or sprinkled with sugar, nuts or sesame seeds.  I think every household in Greece has a never ending supply of them and their own recipe on how to make them.  Even my own grandmother has written down in her book more than twelve different recipes.

My mother was always looking for that perfect recipe, never making the same one twice. Hoping each time to find ‘the’ recipe. I don’t think I can ever remember when there wasn’t a supply of Koulourakia in our house. The good news about them is that they keep.  In fact Stelios Parliaros (a famous Greek cook and whose recipe this is) claims that if kept in an airtight tin they can keep up to a year after making.  I think I can vouch for this, because amongst the dangerously stacked mountain of cake tins my mother kept in her pantry, there would be one that had Koulourakia lurking in it.

Not only did she bake them herself, but supplies would appear in the post from Greece, beautifully packaged and covered in postage stamps. We would peel away the layers of paper to reveal a tightly sealed up-cycled tin.  My feelings on seeing these tins were that I wished that the lovely pictures of some tasty treat on the lids were what was actually in the tin. In other words not Koulourakia! My mother was always thrilled, yet another variety for her to try. Another chance of finding ‘the one’.

These little Greek treats would be dunked and eaten by my mother with her morning coffee, but they were only eaten by me when times were desperate and every cake tin in the hazardous mountain pile was empty and I craved something sweet.

How times have changed.  I now drink coffee and there is nothing nicer than a little Koulouraki sitting on the saucer beside my cup.  Dunking it into the thick dark Greek coffee allowing it to sit in the hot liquid for just long enough before it dissolves and disappears into the black depths of the cup.

Koulourakia are also baked in Greece to celebrate Easter.  What is wonderful about making them is that the whole family can join in to form the twists and shapes.  Most adults remember doing this when they were children with their grandmothers.  In fact this recipe goes back to Egyptian times.  When the early Minoans made them they created the snake twist effect as they worshipped the snake believing that they had the power to heal.

I decided this Easter to try out a new version.  I have to admit I didn’t look far as I am rather partial to Stelios Parliaros’ recipes and his cookery programme.  He is a well known and popular pastry chef in Greece and has his own cooking show, magazine and shop.  Reading through his recipe I wasn’t sure about the oven temperature but decided to go with it.  It works – what more can I say.  I did leave them a little longer than the 25 minutes just to make sure they were all golden brown but other than that I followed his instructions and the result is buttery crumbly slightly sweet biscuits.

Some notes about the recipe.  The dough can be left to ‘rest’ in the fridge for up to a week, so they don’t have to be baked all at once.  They can be baked in small batches daily.

Koulourakia/Κουλουράκια (makes between 40-50)

Ingredients

400g plain flour

200g butter

130g icing sugar

1 egg

40g milk

40g olive oil

1/2 tsp baking powder

1 level tsp cinnamon

Glaze

1 egg yolk mixed with either a little water or milk.

Oven 325F 160C Gas mark 3

Method

Put all the ingredients except the egg yolk used for the glaze into a large bowl and mix.  Preferably with a mixer but your hands are just as good.  Mix until all the ingredients have combined and you are left with a uniform dough.

Put into a clean bowl, cover with cling film and place in the fridge to rest for an hour.  You can leave this in the fridge for up to a week.

Turn oven on.  Remove dough from fridge.

Breaking off a walnut sized piece of dough, roll into a ball on a lightly floured board.

Using the palm of your hands roll into a sausage. Try to use the palms not the fingers as this will cause the dough to be uneven.

When you have a long even sausage bring the two ends together.  Whilst gently holding them, twist the loop end.  Four twists are about the right length.  Cut off any excess dough with a knife.  Place on a baking sheet lined with baking paper. Repeat until you have made the required amount.

Brush with egg glaze and either sprinkle with sesame seeds or with just the plain egg mixture.  Place in the oven.

IMG_5447

Ready to go into the oven.


They are ready after about 25 minutes when golden brown.  You might need to turn them around   towards the end of the cooking time so they don’t catch and burn.

When they come out of the oven they are still soft and will break so treat them carefully.  Transfer them to a wire rack to cool.  When completely cool place in an air tight tin and keep.  I am tempted to say up until a year but I have a feeling they won’t last that long!


The Joy of Lard

_MG_5255

The crème de la crème of lard

Mention the word lard and most people look aghast in horror and they would be right.  The lard that is available on supermarket shelves has been through a bleaching and hydrogenation process and can contain trans fat. I now know the reason I am reluctant to go back to using lard.  None of this makes pleasant reading but pure rendered lard is not going to fur up your arteries nor give you an instant heart attack.

Lard has been much maligned over the decades, mainly by the people who brought us margarine.  In the 1950s every housewife in the country would have used it in pastry making, roasting and frying. It would have been bought at the butchers alongside the Sunday joint.  Lard has been replaced by goose fat.

Yet, to stop and think about it, goose fat/pork fat are both natural products.  Goose fat has 35% saturated fat and 52% mono unsaturated fat and Lard has 40% saturated fat and 48% mono unsaturated fat.  Not much between them except that Lard has a beautiful white colour whereas goose fat is a rather off-putting grubby colour.

Lard is very versatile in the number of ways that you can use it.  It has a high smoke point of about 370F/185C and is able to stay stable at a high heat.  Oils and fats heated past their smoke point will start to break down which will result in an acrid flavour.  This makes lard ideal for frying or roasting and its higher melting point makes for perfect pastry.

Leaf lard, Flead, Flair or Flay as it has been known over the centuries is a layer of soft white fat around the pigs kidneys. This creme de la creme of fat can be easily broken up with the fingers and has a soft pliable texture.

Rendering leaf lard is easy, but it takes time and patience. The reason is that to achieve the beautiful white odourless lard it needs to be heated gently and slowly, so that it doesn’t fry the fat pieces before allowing them to render. If the fat pieces are allowed to overheat they will give a slight flavour to the lard and result in a darker colour.  After the leaf lard has rendered all its fat small amounts of crackling are left. These can be sprinkled with salt and eaten – very much like pork scratchings.

In my quest for the perfect pastry I decided to try and track down a good source of lard.  It was hard.  I looked on line, I asked around – nothing.  In the end I gave up and decided that perhaps the only way was to make it myself.   I asked my butcher if he could supply me with 2lbs of leaf lard, he was non committal on whether he could get any.  The reason given is that pigs today are farmed as leaner animals and the fact that there is no call for it.  Eventually I managed to obtain just under 2lbs of leaf lard but not without a severe dent to my purse. What would have cost pennies a couple of decades ago cost me £5 and I still have to process it myself.

Leaf Lard

Leaf Lard

Lard

A quantity of leaf lard.

(I started with 812gms/1lb 12.6oz)

Half a cup of water

Heavy bottomed pan

Piece of muslin

Sieve

Glass jam jars

Method

IMG_5155

Cut up the leaf lard into small cubes and place in a heavy bottom pan.  Add 1/2 cup of water. The water helps to stop the lard from catching and burning. Put onto the slowest heat possible and leave uncovered.

After a couple of hours the water will have evaporated and the small white cubes will have turned translucent.

When there is a reasonable amount of liquid in the pan, remove from heat and carefully pour into a jar using a sieve lined with a piece of muslin (I used a small jug to decant the hot liquid). To get to this stage took about 3 1/2 hours.

Pour this liquid which, has a pale golden colour, into a sterilised jar and allow to cool.  As it cools it will turn solid and white.

Return the remaining cubes and some of the liquid back to the hob and continue to gently heat.

When the small cubes change into golden brown crackling the rendering has come to an end.  Again pass through the muslin and pour into a new sterilised jar. This stage was reached five hours after starting the whole process.

Once cool and solid place in the fridge.  They should last three months or more.

The 812gms produced 2 jars of lard.

The first jar of 324ml produced the best pure white lard whilst the second jar produced 380ml of slightly coloured lard.  This was caused by getting a little impatient and allowing the pan to have a hot spot and heating the fat a little too quickly.

I shall use the first jar for pastry and the second slightly coloured lard for roasting and frying.

_MG_5308

Crackling from the lard


The kitchen did have an aroma not just whilst cooking but afterwards.  I burnt a candle and it soon disappeared.  It is a long a slow process but I think the results far surpassed any expectations and I have already sourced an old heritage pig farm in Suffolk who have agreed to supply me with leaf lard.  I think that like everything else once you have made it yourself there is no going back.

Sterlising Jars

To sterilise the jars wash them in hot soapy water and rinse. Place on a baking tray and put into a warm oven Gas mark 3/325F/160C and leave for 10/15 minutes. Carefully take out and use.

Crème Brûlée

creme2 (1)

In my previous recipe post of chocolate mousse there was no cream used.  Yet in this post its all about the cream.  Totally unintentional.  I have recently been doing nearly all of my shopping on line and I am rather cavalier when clicking items into my basket.  On this occasion I thought I had ordered two vanilla yogurts.  What I got was two cartons of luxury Jersey cream.  I double checked my order – the error was all mine.  I hate waste. so my problem was what to do with the extra cream that entailed as little work as possible?  I had two choices;  butter or crème brûlée.  I know that crème brûlée is an indulgence which the cholesterol propaganda police have slightly ruined for me in recent years, but neither could I bring myself to pour the cream down the drain.  Even though my brain was screaming ‘make butter’ I wasn’t listening. My heart said loudly ‘crème brûlée’.

Crème brûlée is a classic pudding, consisting of an egg custard with a burnt caramelised topping.  Custard comes in many forms but crème brûlée has to be the king of custards.  It has a smooth, rich, creamy vanilla taste which is then complimented by a sweet brittle toffee like flavour that comes from the caramelised sugar topping.

It’s true pedigree is unknown but I do like the story of an undergraduate at Trinity College, Cambridge who had suggested the recipe of burnt cream to the cook who promptly refused to make it, saying it wasn’t for Trinity.  Fast forward a few years and that same said student went on to graduate and become a fellow of Trinity whereupon the cook was obliged to make it and the rest is history!

There are two methods of making crème brûlée.  The first is to beat the egg yolks with the sugar and put them over a bain-marie on top of the hob, adding the hot cream and stirring until thickened.  The second method is to heat the cream to boiling point, add to the sugar and egg yolks and then pour into ramekins which are placed in a bain-marie in the oven.  The big difference with the oven version is that you don’t need to stand over it and stir and, more importantly, by going the oven route you are lessening the chances of the eggs splitting or curdling.

Crème brûlée is easy to make and can be made the day before.  The only thing that needs to be done just before serving is to caramelise the sugar – if you do this too far in advance the brittle topping will start to soften.  This is caused by the humidity in the air.   Caramelising can be done with a blow torch or under a hot grill.  I prefer the grill method mainly because I am a coward when it comes to handling a blow torch.  I allow the grill to get very hot as it helps to caramelise the sugar quicker and stops the custard underneath from warming up too much.

Getting the thickness of caramelised sugar on the top just right can be difficult.  Put too much sugar on and it will burn and not caramelise properly.  The way around this is to put two thin layers on.  As soon as the first layer has melted sprinkle a second layer of sugar and replace under the grill.

When it comes to which sugar to sprinkle on top I have found that demerara sugar is the best.  Caster sugar tends to go a little grainy.

This recipe is very straight forward and the formula is;  to each 100 ml of double cream add one large egg yolk with 5 grams of caster sugar.  The amount of sugar used is up to you.  I think 5 gms per 100 ml of double cream is about right, but you might prefer to use a little less.  The only thing that changes is the length of time in the oven which depends on the size of your ramekins.

creme2 (2)

Once all the hot cream has been added you should have a custard thick enough to coat the back of a spoon.

Crème Brûlée

makes 4 large ramekins or 8 small

Ingredients

600ml double cream

6 large egg yolks

vanilla pod or 1 tbs vanilla extract

30 gm caster sugar

1 tsp approx demerara sugar per ramekin

Method

Heat oven to Gas 2/150C

In a bowl mix together the caster sugar and egg yolks.

Put double cream and vanilla into a pan until it reaches boiling point.  Remove from heat and if using vanilla pod remove the pod.

Pour the double cream slowly into the egg and sugar mixture stirring all the time until all the cream has been mixed in.

Pour into ramekins and place these into a baking tray.  Fill the baking tray or oven proof dish with hot water until it reaches just over half way up the ramekins.

cremebrulee1

600ml cream mixture split into 4 ramekins


Place in the oven.

8 small ramekins take about 25mins and 4 large ramekins take around 45 minutes.  Open the oven and check – the custard needs to have set around the outside yet still have some wobble in the centre.

When done, remove and allow to cool.  Remove from the bain-marie and place in the fridge for at least 4 hours.

creme3 (2)

Just before serving heat up the grill so it is hot and sprinkle sugar on the tops distributing evenly. Place under grill and as soon as the sugar has dissolved remove.  DO NOT STICK YOUR FINGER IN to test if the sugar has caramelised and hard.  Hot melted sugar causes pain! It took a while for me to learn this little lesson.  Leave for a few minutes for the sugar to cool and harden. Then test. If a thicker caramel is wanted repeat the process.

Serve


Chocolate Mousse

ChocMousse (1)I am not ashamed to say I love my desserts but at the same time I am quite picky.  So when I watched this chocolate mousse being made in my honour, I didn’t have high hopes for it. especially when I saw the ingredients – how wrong I was.  If velvet could be described as a food then it would be this chocolate mousse.  Not only is it smooth tasting but it has a deep intense chocolate taste that dissolves in the mouth.  It is without a shadow of a doubt a grown up dessert.

Since commandeering this recipe for myself I have now made it over and over again.  As with all much-loved recipes I have made a change, which was to remove the orange zest which I feel distracts from the main ingredient – the chocolate. I know that there are so many flavours such as chilli and others that would compliment the chocolate but this recipes calls for top quality chocolate, so why ruin what is a luxury and delicious ingredient by masking it with another?  There are other reasons I love this recipe and why I continually make it and that is its simplicity and the four ingredients that are always in stock in my larder.  Eggs, butter, sugar and chocolate.

It has a decadence about it and it’s not a dessert that you want to rush. It’s quick to make and a little goes a long way.   Not even I, who doesn’t have an off switch when it comes to eating chocolate, can manage two helpings.

So thank you Sophia (whose recipe it is) this recipe is now set firmly in my repertoire of tried, tested and much loved desserts.

Chocolate Mousse

Ingredients

makes 6 small pots

100g dark chocolate at least 70% cocoa such as Green & Blacks or Montezumas
65g unsalted butter
3 eggs
90g caster sugar
Chocolate covered coffee beans for decoration.
(and an orange for zest IF you want it)
  1. Break the chocolate up and with the butter put into a Bain Marie or into the Microwave.  Heat until melted.  Stir to combine.
  2. Separate the eggs and beat the egg yolks with the caster sugar until very pale.  Add the melted chocolate (and orange zest if required).
  3. Whisk the egg whisk until the white peak stage and then fold into the chocolate mixture.
  4. Pour into little pots or glasses and chill in a fridge for at least three hours.
Serve on their own or with a little clotted cream.


%d bloggers like this: