Feeds:
Posts
Comments

pancakesMD

Pancakes – eaten on Shrove Tuesday were a way of using up any eggs, milk and sugar before the start of Lent.

The ingredients are basic and simple yet it is a recipe that involves the whole family.  Each one getting their pancake fresh from the frying pan and then waiting their turn after everyone else has had theirs dished up, this continues until the batter is used up.  Even the dog gets a look in, as the first pancake for some reason is always less than perfect – it is the tester and instead of going into the bin it goes to the dog.  He has now come to think of it as part of his job description.

As a family we tend to like ours simple with a sprinkling of sugar and some of us like a squeeze of lemon juice but not all of us.

There is something comforting and filling about pancakes.  Best eaten hot and with a filling of your choice.

Pancake Batter

Ingredients

100g/4 oz plain flour

1 egg

300 ml/1/2 pint milk

pinch of salt

Put the flour and pinch of salt into a bowl and make a well in the centre, crack the egg into the centre and using a wooden spoon start to beat – gradually bringing in the flour.  Add a little milk to ease the mixture.  Do not add all of the milk as it will be nearly impossible to stir out all the lumps.  Add the milk a little at a time until it’s all used up.

Now pour this mixture into a measuring jug and put a plate on top and leave to sit for 30mins plus.  The mixture needs to rest.

Copy of 4pancakes

Take a frying pan and wipe with melted butter or put a drop of sunflower oil on the bottom and then wipe off with a piece of kitchen paper.

Stir the mixture after it has stood and pour a little of the pancake mixture into the pan tilting the pan so that the mixture spreads over the bottom of the pan.  The aim is to give the bottom of the pan a light coating.  Very soon the pancake will start to form large bubbles of air under the batter and the edge of the pancake will darken and come away from the pan.  At this point lift the pancake a little and see if the underside is golden brown, if it is you can either stand back and toss the pancake over or use the less exciting spatula method.  Cook for a minute or two and when the underside has spots of brown, turn out onto a plate.

For some reason the first pancake is never perfect and is usually thrown away.  I find it is the tester for pan oiliness and heat.

Traditionally lemon juice is squeezed over with a sprinkling of caster sugar and then the pancake is rolled and eaten.

It has been known for me to make a butterscotch sauce with some sliced bananas as a filling.

pancakeTS

Butterscotch Sauce

Ingredients

60 g/2 oz butter

60 g/2 oz golden syrup

60 g/2 oz dark brown sugar

75 ml /2 floz double cream

Put the butter, syrup and sugar into a pan and gently heat.   Stir, and when it has all dissolved leave on the heat until it starts to bubble acting like molten lava.   At this point remove from heat, add the cream and stir.   Within seconds it will calm down and become a beautiful silky sauce.   May be served warm or cold.

2pancakes

To make up

1 Banana

Chop banana on to pancake and add butterscotch sauce, fold and sprinkle with caster sugar and serve.

Rizogalo

RizogaloMD

A Greek rice pudding, which is eaten cold from the fridge.  It has a creamy light texture and is delicious sprinkled with cinnamon.  In fact I think the cinnamon has to be compulsory if you really want to enjoy this jewel of a pudding.

I say pudding but I have always eaten it for breakfast.  As a child I was told that I would have to eat something at breakfast and the choices were not great.  I didn’t fancy what was on offer – so every morning started off with a battle of wills.  The grown ups tried coaxing, then shouting and just when they were at the hair pulling out stage someone made the suggestion of rizogalo.  It had milk in it so it had to be good for small children.  A pot was fetched, delivered and eaten.  Calm had been resumed.  Everyone happy.

So from then on, every morning someone in the kitchen would be sent out to buy a single pot for my breakfast (I imagined they hated me!)  It would arrive on the breakfast tray each morning and without a murmur from me it would be devoured.  It was the highlight of the day.   Over the years it must have become a real chore because abruptly one morning no one would go out for it, they all were too busy.  So even though I was older the same old stressful morning routine started up again. The solution was easy, I would take matters into my own hands and get up a little earlier and take myself off to the shop to buy it myself.  This was the first task I was ever allowed to do on my own and I loved the freedom and importance of making a purchase all by myself.

The shop that sold the rizogalo was further down the road and it was slightly different from the other shops, it had a tree right outside which created shadow over the interior.  It was run by an elderly couple who were happy with their lot, they had no intention of expanding their empire, they had their regulars who would spend hours discussing the woes or joys of the day and time seemed to have stood still for them.

I think it amused them that I came in person to collect my morning order, no doubt they knew all about me before I had even entered their shop.  The large fridge sat to the side of the shop and it would be packed full of opaque pots filled with creamy rizogola.  I would wait by the fridge for one of the couple to come over, open it, and take out the little pot of rizogalo.  They would ask if I would like cinnamon on top and before I could answer, a large steel sifter would deliver a heavy coating of cinnamon.  This was then tightly wrapped in a small piece of printed paper and exchanged for the money held in my hot little hand.

Rizogalo was the start of my liberation!

This is a good recipe to use up the last of the aboria rice.  The beauty of this recipe is that you can alter it to your own taste, either with more rice or less sugar but do not change the milk to a lower fat milk or you will lose the richness.

Rizogalo

Ingredients

2 pints/1.13 Litres Gold top/Jersey milk (full fat) If I can’t find a high content milk I add a little double cream.

3 oz/85 g caster sugar

3 oz/85 g  aboria rice washed

1 tbs cornflour

a little cold water to mix cornflour

Method

Put the milk into a pan and bring slowly up to a gentle simmer add the washed rice and sugar stirring all the time.  If left, it will catch and burn on the bottom of the pan.  Once the sugar has dissolved turn down the heat and let it gently cook for 45 minutes.   Returning to the pan often to stir.

Taste, if the rice is soft then mix the cornflour with a little cold water until smooth and add this to the milk pan.  Continue to simmer whilst stirring.  When you have the thickness you want remove from the heat allow to cool and put into glasses or dishes and put in the fridge for a couple of hours or until chilled throughout, overnight is fine.

It is best eaten chilled with a liberal sprinkling of cinnamon over the top.

Burns Night Supper

haggis

Burns Night is a celebration of Robbie Burns, a famous Scottish poet who was born on the 25 January in Ayr, Scotland.  Not only is it a very popular evening in Scotland it is also celebrated throughout the world.

In the far and distant days when I wanted to impress my now husband I was invited to a Burns Night supper by his very Scottish parents.  I had a little dread that haggis might be on the menu but stupidly thought there would be other options.  Burns night really is all about the haggis and there are no other options.  The haggis was piped in and then addressed before being stabbed with a dagger.  So I sat at a very long dining room table and in front of me was a large plate with just the haggis, the neeps and the tatties.  There was little escape.  I thought of weakly saying I didn’t like it – and decided that would not go down well, I could try and hide it under the vegetables but that wasn’t really an option.  The one and only option was to eat it, and I have never looked back – it is really delicious.  It has a spicy, meaty taste to it.  Haggis is made from the heart, lungs and liver of a sheep mixed with oats and spices and encased in a sheep’s stomach, not a description that has you reaching for your knife and fork.

Every year we have celebrated Burns Night with a haggis, neeps and tatties.  There have been a few disasters over the years, such as the time I absentmindly left the haggis unattended on the kitchen table and the dog ate the whole thing, metal clips and all (a trip to the vet and a nerve racking couple of days followed) and the year I had guests who I wanted to impress only to find when lifting the lid to the pan that the haggis had exploded while simmering, and the poor wee haggis had to be drained and served without an address or glimpse of the dagger.

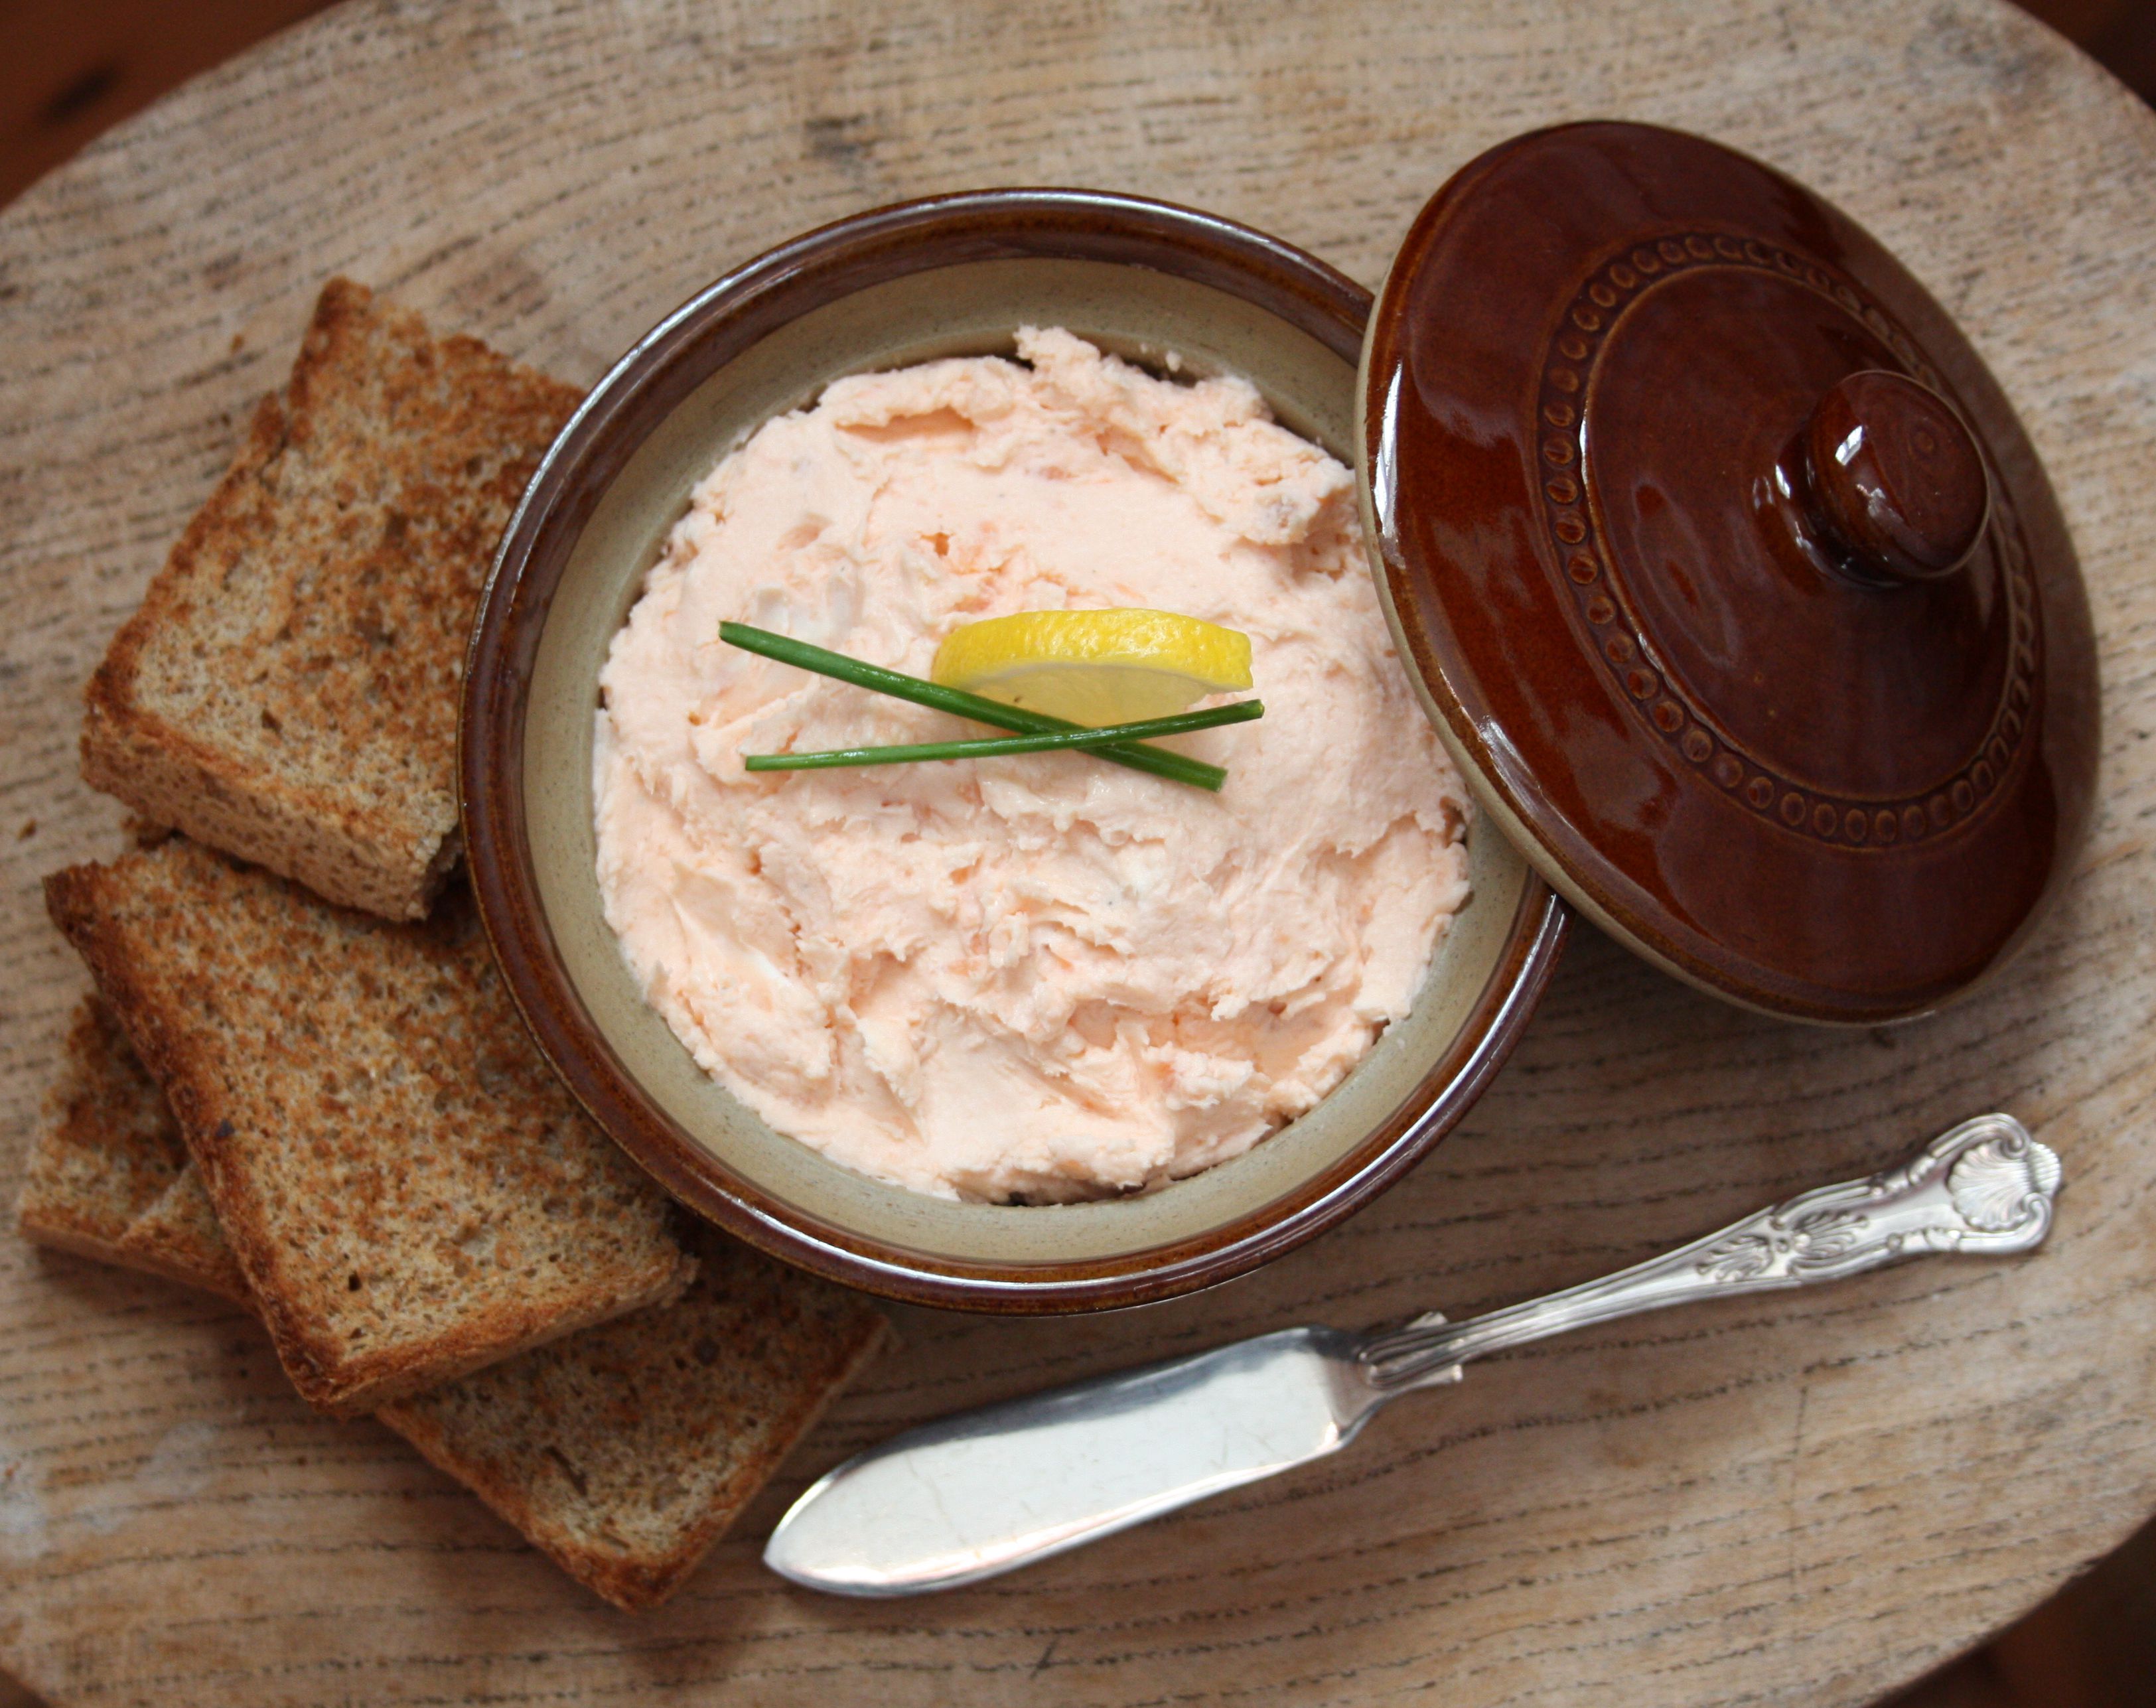
The haggis is quite a filling dish so salmon pâté makes for a good starter.  It is incredibly easy to make and takes five minutes.  If could be used as a filling for Gougères or served with toasted wholemeal bread.  This recipe is not set in stone, you can put less smoked salmon in or more cream cheese.  Smoked salmon has quite a delicate flavour and can be easily overpowered.

IMG_2787

Smoked Salmon Pâté

Ingredients

150g/5 oz smoked salmon

100g/3 oz cream cheese

1 tablespoon double cream

½ lemon juice of

Salt and white pepper

Method

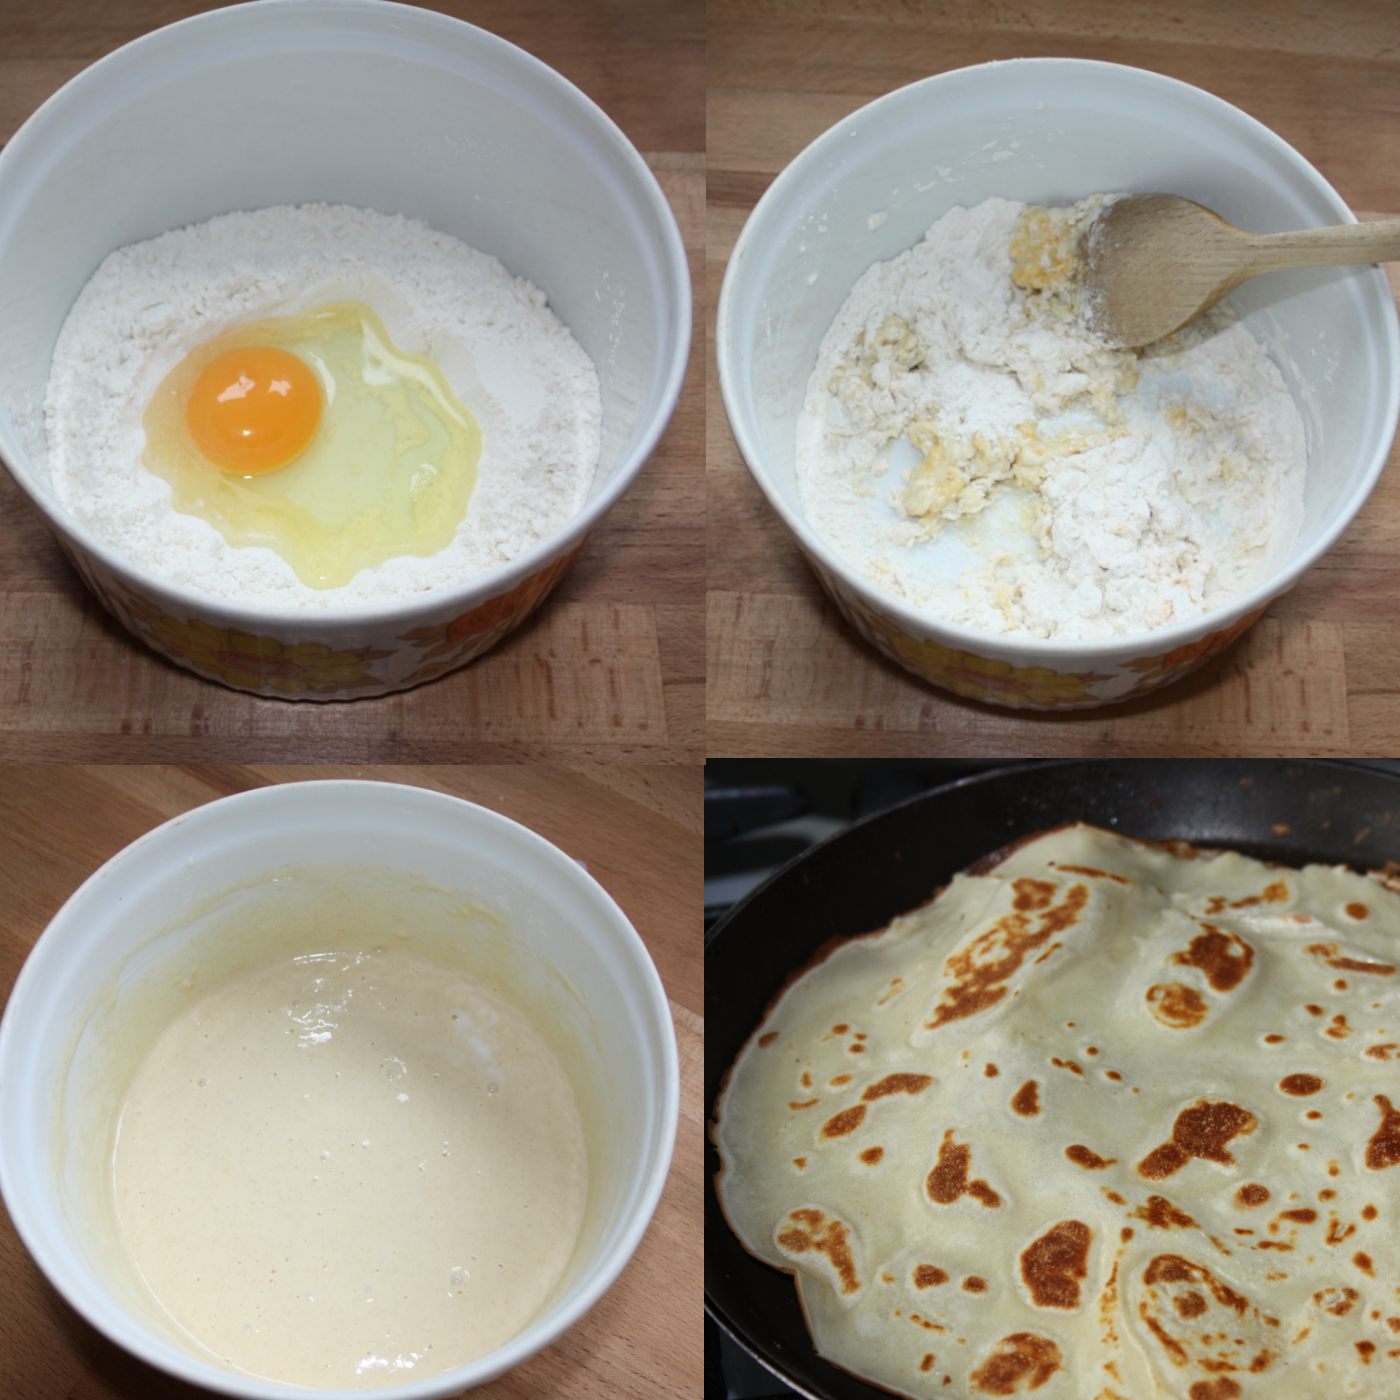
Put the smoked salmon and cream cheese into a food processor and blitz for a minute, keep blitzing and checking until you have the consistency you want.

Add a tablespoon of double cream, the juice of half a lemon and salt and pepper.  Taste.  If the pate is too thick loosen it with an extra spoon of double cream, or add more lemon juice.

Place in a bowl cover with Clingfilm and put in the fridge.  Serve with wholemeal toast and lemon quarters for those who like a little extra lemon.

Cranachan

IMG_2804

One of the traditions of the recipe of Cranachan is the adding of charms, very much like the Christmas pudding.  The charms are mixed into the cream and served in a large bowl.  Like Christmas pudding the enjoyment is finding one of the charms.  Each of them has its own significance:  a charm in the form of a ring signifies marriage;  a coin – wealth;  a wishbone – heart desire;  and a horseshoe – good luck.  The recipe below is really down to taste.  The honey is there to sweeten the cream and it needs to be used with some care because it can be quite a strong taste.  I have written 2 tablespoons of whisky but if you love whisky then put more in.

Ingredients

Serves 2 (generous portions)

½ pt/285ml double cream

1 heaped spoon of cream cheese

2 tbs whisky

1 rounded tablespoon honey

5 oz/150g raspberries

3 tbs oats.

Method

Whip the double cream and cream cheese until soft peaks then add 1 tablespoon of whisky and 1 rounded tablespoon of honey, fold into the cream.  At this point taste.  Adding another tablespoon of whisky or even more if desired.  Remember you can add but not take away!

Place a non-stick frying pan on medium heat and add the oats, turning and tossing them so that they don’t catch.  They are ready when they turn a golden brown, they can catch and burn very quickly so they need careful watching.  Once golden brown set aside to cool.

To make up the Cranachan put some of the raspberries into a bowl and cover with the whisky cream, sprinkle the toasted oats over this and repeat the process.  Topping off with a couple of raspberries.

Serve with Shortbread.

Shortbread

IMG_2812

Ingredients

115 g butter

55 g caster sugar

pinch of salt

120 g plain flour

50 g ground rice flour

Gas mark 2/150C/300F

Method

Mix butter and caster sugar together with a mixer.

Add both flours and salt.

Draw together to form a dough.

Turn out onto a floured worktop and roll out to about 1 cm thickness and cut into circles using a scone cutter or cut around a small saucer depending on what size you want.  Place onto a baking tray lined with greaseproof paper.  With a fork, make holes over the shortbread.  This will enable the caster sugar to cling to them once baked.

Put into the fridge and let rest for 15/30 minutes.

Bake in the oven for 1 hour checking for the last ten minutes that the shortbread doesn’t catch or brown too much.  They need to be a pale golden brown.  Smaller biscuits will take less time.

Carefully transfer to a wire rack being very careful, as while they are hot they are very fragile – they will brittle up as they cool.

Once cooled sprinkle with caster sugar.

Store in an airtight container.

Haggis

1 x 500g MacSween Haggis

There are three ways to cook the haggis:

Microwave – which means cutting the lining and put the contents into a bowl.  The downside of this method is that you cannot bring the haggis to the table and ceremonially cut it open which is really all part of the dish.  Cooks in 6 mins.

Oven – Wrap the haggis in foil and place in a pan with an inch of water and place in the oven, 180C/Gas 4/350F for 1 hour.  Remove the foil and serve.

Boil – This is the method I prefer.  I wrap the haggis in silver foil and tightly twist the ends and place into boiling water, the minute that it is placed in the water turn down and simmer for one hour, remove the foil and serve.

Neeps

500g/1 lb swede

28g/1 oz butter

salt and pepper

1 tablespoon sugar (optional)

Neeps are Swedes, peeled, diced and boiled in salted water for about 20/25 mins until soft. Drain and mash, adding a level spoon of sugar a little butter and some seasoning.  Serve.

Tatties

500g/1 lbs Maris Piper Potatoes

50g/2 oz Butter

A little milk

Salt and pepper

Boil required about of peeled potatoes in a pan with salted water. Boil for 20/25 mins until soft.  Drain and leave in the sieve for a minute or two for the steam to evaporate.  Using a potato ricer mash the potatoes.  Add to this a generous piece of butter and stir, the potatoes should still be quite firm – to loosen them add a little milk.  Season and serve.

cheeseandwalnutloaf

I used to make this tea bread without thinking, well, maybe a little bit of thinking was involved but it was a really easy recipe to make, we had it so often it became ordinary and unexciting so I stopped making it and the recipe was forgotten in a drawer and left to gather dust.

When I was going through the kitchen drawer this week I found my little paperback notebook – it is scribbled on and worn but inside is a world of lost recipes carefully handwritten some twenty five years ago. Some of the recipes are just scraps of paper with recipes written on which have been glued in and others are tinted with stains of food long eaten. I can remember a time when I was lost without this little book, it held my culinary world in its grasp.  All the recipes in that little note-book were collected from friends and family, their mothers and grandmothers – some of them were not that easy to obtain and one or two of them I suspect are not complete, they are missing that little extra ingredient,  having the reputation of making the best lemon cake in the village was something to aspire to – you weren’t going to throw that away lightly. When I was a small child, I often overheard many times ‘she makes the most marvelous sausage rolls, but she won’t give the recipe away’ to a gaggle of disapproval and an intake of breaths. How times have changed; a computer and access to the internet reveals all.

Cheese & Walnut Tea Bread

Ingredients

225g/8 oz Wholemeal Flour

2 tsp baking powder

1 tsp celery salt

1/2 tsp mustard powder

50g/2 oz butter diced

110g/4 oz cheddar cheese grated

25g/1 oz shelled walnuts chopped

142ml/1/4 pint milk

1 egg beaten

1 lb loaf tin – lined with greaseproof paper

Turn oven to gas mark 4/180C/350F.

Method

Mix flour, baking powder, salt and mustard in a large bowl.  Add butter and rub it in between your fingers until it resembles fine breadcrumbs (being lazy I put it in the food processor and whizzed for about a minute).

Stir in cheese and walnuts and then mix in milk and egg to make a soft dough.

Turn the dough into the loaf tin, level the surface and make a slight hollow in the centre.

Bake for 40-45 mins till golden brown. (I baked mine for 50 mins which I believe is down to my oven).

Take out and cool. When cool slice.  My preferred way of eating this is to spread a thick slice liberally with butter. This isn’t a moist tea bread.  It has a more wholemeal texture, but the smell and taste  is lovely and morish.

Gâteau Breton

Gâteau Breton

Having an exceptional cook as a friend, who is also generous with her recipes is a rare thing.  I did have an Italian friend whose mother produced the most wonderful food but getting a particular recipe however hard I tried came to nothing.  Even my own mother in law was furious when once at a Burns evening, I complimented her on her swedes and asked what she had put in them, my father in law, quick as a flash replied a spoonful of sugar, ignoring her cry of protest.  An icy presence over the meal followed, but I didn’t care – I had the secret ingredient!   Recipes are tricky things, so many times I have come home and made ‘the recipe’ only to find it didn’t quite turn out as it should.  The mock surprise look at the recipe owner usually tells me what I need to know – their ingredient ‘x’ is missing from the recipe.

Still, it hasn’t put me off – I still ask.  Luckily for me I met someone several years ago who came from Brittany, France.  She was very proud of her heritage and the food of Brittany and very generous in passing on her recipes, her attitude was that by passing them on they continue to live.   I have several of her recipes, which have turned out just as she had made them and how I had remembered enjoying them.

Gâteau Breton is difficult to describe, as it is a cake and not a cake.  It is a cross between buttery shortbread and Madeira cake.  One of the joys of baking this gâteau is that it fills the house with the most wonderful buttery smell whilst it is in the oven.

Gâteau Breton

Ingredients

225g/8 oz plain flour  (I use 00 flour)

225g/8 oz caster sugar

225g/8 oz unsalted butter softened

6 egg yolks

Oven 350/180/Gas 4

IGâteau Breton mixture

Add the softened butter and caster sugar together in a bowl and mix until light and fluffy.

Add the 5 egg yolks, a yolk at the time (I break the sixth egg yolk and put half in the gâteau at this stage and save half for the glazing as a whole yolk is far too much)  Mixing until combined.

Add the flour but not all at once. Keep adding flour until all have been combined. The mixture at this stage will be quite stiff.

Put the mixture into a loose 8” bottom cake tin or spring form tin.  With a knife evenly distribute the mixture and put into the fridge for 30 minutes.  This will allow the mixture to stiffen further.

After 30 minutes remove from the fridge and again with a palate knife smooth the top of the gâteau and coat with the remaining egg yolk.  Taking a fork, drag across the gâteau to create the criss cross lines decoration.

Bake in the oven and carefully check after 30 minutes that the top has not browned too much, if it is browning too quickly, cover for the rest of the cooking time.  To check that the gâteau is cooked press your finger gently in the centre, it should be firm with a slight bounce.

Leave the gâteau in the tin until it is cool.

Once cool it should be kept in a airtight container.

It is perfect cut up into triangles and served with coffee.

gateau breton 2

walnut and coffee spong cake

In my house we tend to go through cooking phases of loving a particular recipe, be it cake, a pasta dish or a way I cook the vegetables.  Then all of a sudden I will not want to eat it again.  This can last for months if not years.  The poor coffee and walnut sponge cake has been victim to one of these phases.  It was when I was trying to build up some inspiration by looking at my larder shelves of what to bake when I saw a packet of walnuts.  I realised I haven’t baked a coffee and walnut cake for ages.

When I was a child and taken out for afternoon tea the coffee and walnut cake was an indulgence, the height of sophistication and the only way I was ever going to get a taste of coffee.  There were some very strict and strange rules when I was growing up and one of them was that I was not allowed to drink coffee, not until I reached the age of 18.  I don’t know the reason, and I never asked but the thought of having the forbidden coffee and walnut cake every now and then was enough to keep me quiet.

Coffee & Walnut Sponge Cake with Coffee Butter Icing

Ingredients

150g/ 6 oz butter softened

150g/ 6 oz caster sugar

3 eggs beaten

150g/ 6 oz self raising flour

40g/ 1 ½ oz walnuts finely chopped

  1. Turn oven to 350F/180C or Gas Mark 4.
  2. Whisk the butter and sugar until pale in colour.  Add the eggs a little at a time.  If the mixture begins to curdle add a tablespoon of the weighed flour.
  3. Fold the chopped walnuts into the mixture.
  4. Gently fold in the remaining flour.
  5. Transfer into three cake tins (or two tins if you want just a two layer sponge cake) and bake in the centre of the oven for 25/30 mins until risen and sponge has just left the sides of the cake tin.  A final test would be to gently push your finger into the middle of the cake, if it springs back it’s done.  Leave in the tin for a few minutes and then turn out onto a wire rack to cool with the top of the cake facing upwards.  Otherwise as the cake cools the wire rack will leave an impression on the sponges.

Coffee Butter Icing

Ingredients

100g/ 4 oz butter softened

225g/ 8 oz icing sugar

3 tbsp cold milk

4 tsp coffee granules

  1. Mix the coffee with the milk and stir until it has dissolved.
  2. In a bowl add all the ingredients and blend with a food mixer on the slowest speed to begin with otherwise there will be icing sugar everywhere.  As the mixture starts to blend turn the speed up and continue mixing until you have a smooth thick cream.

To make up the cake

Make a decision as to which sponge has the best looking top, save this for the top layer.   If one of the cakes has broken, don’t worry use it for the bottom layer.  Divide the butter cream in half, spreading the bottom sponge layer with one half and then placing second sponge on top.  Spread the remaining buttercream and top with last layer and dust with icing sugar and store in an airtight tin.

Celery Soup - Copy

Soup to me never looks appealing – it’s all in the taste.  Celery and Stilton are not two ingredients I would rush to eat on their own but together they go very well.  This is often a soup I make after Christmas as there is always a piece of Stilton left in the back of the fridge which I am not going to eat on a cracker and I am too mean to throw out.

My father was a huge fan of Stilton.  Whenever he came to stay he would ask if there were any moldy bits of cake or Stilton lurking anywhere?  If so he would be only too happy to finish them off for me as a favour – no gain whatsoever for him.  He also had the same selfless attitude to any open bottles of spirits.

I always did have both, something we both knew I would have and neither of which were ever moldy.  His favourite way of dispatching the Stilton would be to toast a French Stick sliced in half and then covered with slices of Stilton which were then placed under the grill until bubbly.  This soup made a near perfect lunch for him as long as there was a generous slice of fruit cake to follow.

Stilton Cheese

The piece of 85g/3oz Stilton cheese I used

Celery &  Stilton Soup with Stilton Croutons

Ingredients

60 g butter

1 head of celery (whole celery trimmed, I don’t use the leaves)

2 medium onions

850 ml/1 ½ pts vegetable stock

salt and pepper

85g/3 oz Stilton

double cream (optional)

For the Croutons

French bread cut into thin slices

extra Stilton

Method

Trim, wash celery and chop finely.

Chop onions finely.

Melt butter in a saucepan.  Add celery and onion and leave to sweat with the lid on for ten minutes.  Stir a couple of times just to check that nothing sticks to the bottom of the pan.

Once vegetables have softened add 850ml/1 ½ pt vegetable stock, stir and replace lid and simmer gently for 30 minutes.   Check that the vegetables have cooked. To test, push a piece of celery against the side of the pan and it should crumble.  At this point you could add salt and pepper but I prefer to season after I have added the Stilton.

Liquidise while still hot.  At this point you have a choice, either to leave it as a celery and onion soup which tastes good or to add the Stilton which will change the flavour totally.

If adding the Stilton there is no fixed measure to add, just the left over bits in the fridge will transform the soup.  About 85g/3oz is just about enough for me.  Crumble the Stilton as you add it to the hot soup and stir, it will melt with the heat.  Taste and season if required.

If re-heating do not boil but bring slowly to a gentle simmer.

It is ready to serve.  Cream for decoration can be added at this point.

Stilton Croutons

Slice the French bread into 1 cm slices.  Any thicker and you lose the toasted crispness.

Toast the French bread on both sides.  Slice some Stilton and place on top of the slices and put back under the grill, it will only take a few minutes for the Stilton to melt.

Place on top of the soup and serve.

Flapjacks

Flapjacks

New Year is here and I am glad.  By now even I have had my fill of rich food, mince pies, Christmas cake, plum pudding and endless little snacks.  Not to mention the chocolates!

Today I feel I can say no more rich food.  There again I might say that in my mind but my somewhere else can’t quite go to the other extreme.

I need to cook a treat that is somewhat guilt free and perhaps something I feel that is not all bad.  Enter the Flapjack.  The butter, sugar and syrup might not be all good but the oats are, and that is the guilt free ingredient I am hanging on to.

When I started cooking I would look through my mothers cookery books for inspiration of what I might like to make.  Something that would be simple and that had a very small window for failure but tasted wonderful.  After I had persuaded my mother to let me use the kitchen, instead of going for simple I opted for complicated and the result was a complete failure.  This put back my biscuit making by quite a few months and I was barred from using the kitchen again.  I had to wait until my mother had gone out for the afternoon before embarking on my next choice, the Flapjack.

They didn’t disappoint me then and they still don’t disappoint now.  They are no oil painting of a biscuit but as the saying goes ‘don’t judge a book by its cover’.

Flapjacks

Ingredients

4 oz/125g Butter

3 oz/80g Golden syrup (leave a metal spoon in boiling water for a few minutes then measure out the golden syrup, this will help the syrup to slide off the spoon)

3 oz/80g Soft brown sugar

8 oz/250g Rolled oats

Oven:  Gas Mark 4/350F/180C

Swiss roll tin 8” x 12” /20cm x 30cm (the tin size isn’t vital, there is a small amount of give and take)

Method

Put the butter, golden syrup and sugar into a pan and gently melt.  Once melted remove from heat and add the oats and stir well.

Spread the mixture onto a non-stick buttered tin roughly 8” x 12” using a fork, press the mixture down and spread-out evenly across the tin.

Bake for approximately 30 minutes.  Watching that the edges do not burn.

Leave in the tin for a few minutes, then with a sharp knife divide into fingers.

Straight out of the oven the mixture will be too soft to divide up so it’s best to leave it a few minutes.  The mixture cools very quickly and if left too long will not cut easily as it will become too brittle.

After dividing, leave it to cool before turning over the tin and tapping them out.  My method is to prise them out individually using the excuse of eating any broken ones.

Store in an airtight tin or container and they will keep a couple of days, the longer you keep them the softer they become.

How to make Butter

butterpat21

I think the one and only time of year double cream seems to take up room in my fridge is Christmas.  I always worry I am going to run out and tend to overbuy.  Usually by Boxing day I realise that I have too much left and start to feel guilty that unless I use it I will have to throw it out.  It has been known for double cream to be poured over the breakfast cereal as a way of using it up but I have been brain washed that too much double cream is bad for you.   Then I realised that I could turn it into butter and freeze it.  End of guilt.

Many moons ago, I shared a house with a know it all cousin who was never fazed by anything or anyone.  He always had buttered toast for breakfast.  One morning he came down for breakfast to discover the butter dish was bare and that was the day I smugly sat and wondered what he would do?  Unfazed he disappeared into the kitchen only to re-appear at the door with a glass jar and the top of the milk (milk used to come delivered to the door with a thick amount of cream at the top);  this he proceeded to shake.  I scoffed and ate my not so nice dry toast.  Half an hour later he was spreading his toast with the newly made butter, admittedly there was a tiny amount, but butter it was.  The word choke and toast did come to mind.

Home made Butter

Ingredients

Double Cream

Salt or herbs (optional)

Equipment

Whisk or Kenwood mixer using the K beater, food processor or glass jar and a strong wrist.  Wooden spoon or Hands (Wooden Pats).

Cream turning into butter with the buttermilk at the bottom

Pour any amount of double cream into a clean bowl – there are no specific quantities – the more double cream you have the more butter you will end up with.

Whisk, keep on whisking until it starts to become thick and forming soft peaks.  At this stage slow the whisk to a minimum or you will be wiping the walls clean of buttermilk and specks of butter for many hours. Whisk on very low for a minute and stop.  The cream will have separated, producing a large lump of butter and a pool of buttermilk.

Sieve the buttermilk into a bowl and save, this can be used for scones etc. The butter clump now needs to be rinsed in cold water – the colder the better.  Rinse the butter until the water becomes clear – this can be up to seven times or even more.  The reason is to get rid of as much of the remaining buttermilk, as this is what will make the butter turn rancid too quickly.

Once the butter has been rinsed it will need to be beaten.  This can be a very relaxing and stress relieving stage.  Use the back of a wooden spoon or invest in some hands and slap the butter about, this encourages the last drops of buttermilk to drain out.

Separated buttermilk and butter

Finally, either add salt or herbs to taste, and with the hands form into pats, logs or bricks and wrap in greaseproof paper.  The butter will last about a week in the fridge and three months in the freezer.

I bought three pots of 600 ml of double cream out of which I made 940g of butter.  Buying double cream to make butter is quite a luxury so I tend to look out for when it’s massively reduced at the supermarket.  I also find whisking up any left over double cream to make butter is a good way of not wasting food.

I bought my butter Hands from http://www.ascott-dairy.co.uk or you could try ebay.

Tiramisu

Tiramisu – I think everyone has heard of Tiramisu, it can be found in nearly every supermarket and corner shop in small plastic containers.

I don’t know if it has been done to death but I have to admit that I really love the homemade version.   It’s light to eat, with a boozy creamy texture and easy to make.

Tiramisu means ‘pick me up’ in Italian.  What is surprising is that is not an old recipe.   It was first made and eaten in a restaurant called ‘Le Beccherie’ in a town called Treviso in Italy.  I wonder back in the 1970’s did they ever imagine how popular that dessert would become?

I don’t know what the original Tiramisu recipe was but I hope that this one doesn’t disgrace itself.  There are no real short cuts; neither do I feel I would want to substitute any of the ingredients for cheaper ones. I have put down the make of sponge fingers as Savoiardi because I have made the recipes with supermarket brands and the results are not as good. There are so many versions of this recipe but, this is the one I really like.

This is definitely a pudding worth making yourself.

Tiramisu – Pick me up

Ingredients

20 Savoiardi biscuits (these are worth looking out for)

180 ml/6 fl oz strong black espresso coffee

5 tbs Marsala

250 g/9 oz Mascarpone

2 eggs separated

2 tbs castor sugar

4 drops vanilla extract

cocoa powder to decorate

Method

Make the coffee – I use a Bialetti Brikka stove top two cup coffee maker, I fill the filter with illy coffee to the top not pushing it down and fill the base up to the top with water. This is my version on how strong I like my coffee you can adjust this part of the recipe if you like. When its ready I pour the coffee into a dish and add the Marsala and stir. Leave it to cool a little.

Separate the eggs into two bowls. Beat the egg yolks with the sugar and vanilla until pale and then add the Mascarpone and mix gently – don’t over beat but make sure it is mixed in well. In the other bowl beat the egg whites until stiff and sitting up in peaks now fold them into the Mascarpone bowl.

One packet of Savoiardi biscuits usually comes in two sections – this recipe will use one section of biscuits leaving the other section for another day. Take each biscuit and dip it into the coffee and Marsala and place in a shallow dish (I have found a dish which is just wide enough for a row of biscuits and one biscuit on its side) don’t leave too long in the dip as the biscuit sucks up the liquid and will break. After I have dipped all the biscuits and covered the bottom of my dish with them I pour over any left over liquid.

Pour the Mascarpone mixture over the biscuits and level with a knife – put in the fridge and leave. If I am making this for the following day I cover with cling film.

Before serving dust with cocoa powder.