Feeds:
Posts
Comments

Maids of Honour

maidsMD

After a meal I like something sweet.  Usually there is a cake sitting in a tin or a packet of biscuits in the cupboard to fill the gap when I haven’t made a pudding.  It is rather a dire day when the cupboard is bereft of anything to satisfy my sweet addiction.  Today, to my despair, that dire day had reared its ugly head.  I checked all the usual places and some of the more unusual (I sometimes like to hide things from myself) for something to satisfy my sweet fix.  Nothing.  Every last crumb, square of chocolate and biscuit had been eaten.

As I stood in front of my pantry shelves looking for inspiration I realised I did have quite a collection of jams made the previous summer. So I started to wrack my brains for something jam based.  The idea of maids of honor came to mind, then dashed because of the puff pastry element – I didn’t have the inclination or more importantly the time to make any.  Then I thought of a recipe from Clarissa Dickson Wright where she had used shortcrust pastry instead.  A little bit of digging amongst the cookery books and the recipe was found.

These little maids of honour date back to Tudor times and get their name from Henry VIII – like the recipe there are many versions of their true history.  One such story is that Henry VIII saw Anne Boleyn, then a maid of honour to Catherine of Aragon (Henry’s first and present wife), eating these with a group of other maids of honour. Not only did Anne Boleyn catch his eye so did the desire for these little tarts.  Unfortunately for Anne Boleyn, Henry’s desire for the tarts lasted a little longer, but neither having a happy ending!

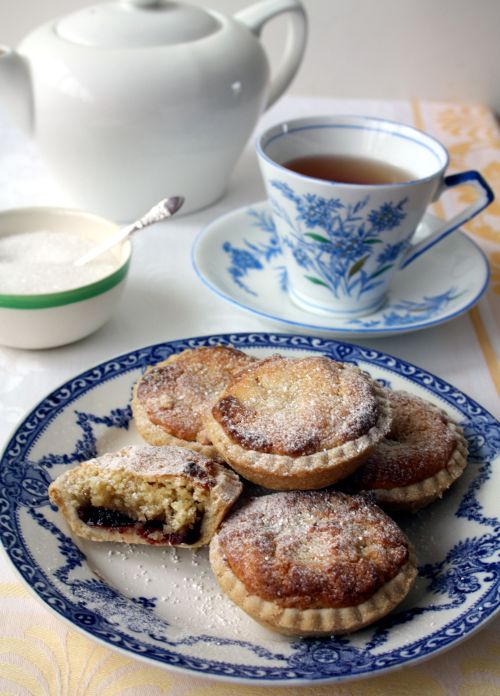
This recipe with its shortcrust pastry makes for a very buttery melt in the mouth treat.  The jam and almond filling give a slightly chewy almondy taste.

Maids of Honour

makes 12

Pastry

Ingredients

225g plain flour

135g butter

2 tsp icing sugar

1 egg yolk beaten with 1 tsp cold water

Filling

Ingredients

50g unsalted butter

75g caster sugar

1 heaped teaspoon self raising flour

2 egg yolks beaten

100g ground almonds

shredded rind of 1 lemon

1 tbs cream (I used milk)

6 tsp damson jam (or one of your choice even lemon curd)

Icing sugar for dusting

A tartlet/bun tin.

Method

Put all the pastry ingredients in a food processor and pulse until a dough is formed.  Wrap in cling film and set aside for 30 mins.

Turn oven onto Gas Mark 6/200C/400F.

Roll out pastry and cut 12 circles with a pastry cutter.  Place a circle of pastry into the tin and gently press them down to fill the space.

For the filling, cream the butter and sugar together thoroughly.  Stir into this the flour and beaten egg yolks. Stir and then add the almonds, lemon rind and finally the cream.

Add a teaspoon of jam into each little tart and then a spoonful of filling.  Divide any leftover filling between the tarts.  With the back of a teaspoon gently smooth over the filling so that no jam is showing.

Put into the oven for 20 minutes.  Remove from the oven and leave in the tart tin to cool.

If you try and remove them when they are still hot the pastry, which is very fragile, will start to crumble and break.  As they cool the pastry firms up.

Dust with icing sugar and serve.

Store in an airtight tin.

I kept to Clarissa’s recipe but found there was quite a bit of excess pastry left.

IMG_4354

Scotch eggs are made for the perfect picnic but Scotch quail eggs lift any outdoor eating to a feast!  Unlike the Scotch eggs made with hens eggs these are much much smaller hence it is a lot easier to eat more than one, and even though quails eggs are a lot easier to come by now they still add that bit of luxury.

Gone are the days when a group of us would to go to three day equestrian events at Burleigh and Badminton.  They came round once a year and I would plan and look forward to them a good few months beforehand. The whole day was spent in the fresh air walking the course, usually trying not to fall over in the mud from the carpark to the course.  Then we would stand at the jumps watching and giving misguided calls on how the jump should be approached and then finally spending hours in the gift tents musing on items we didn’t need but felt we had to have.

In those days entry was paid per car so we would all meet up a mile or so away and then we would all cram into one car with the picnic packed into the boot and often on laps.  All the fresh air and exercise would work up an appetite and I would be the one to supply the picnic.  I would see this as an opportunity to have the best picnic basket in the car park and would go to town on the contents.    It never fitted into just one basket, it was always an array of boxes and baskets.  On top of all this, Oscar our black Labrador would also be squeezed in, usually between our feet and away from the food.

Early afternoon would see us back in the car park hungry from the fresh air and exercise and ready for our feast.  On  tartan rugs we would sit gorging on a wide selection of food that I had been planning for months, each year trying to outdo the previous year’s menu.  Two days in the kitchen was demolished in fifteen minutes.  Any crumbs or leftovers went to an eager awaiting Labrador.  As the last crumb was savoured we would glance around to see the other picnickers dotted around the car park, some with huge wicker hampers with the famous F & M on the side, others had come with the full set up of table and chairs.  As nice as it would have been to eat off a table that would of course that would have meant an extra car and we were all far too mean to shell out for another car fee!

In later years when my three day eventing days were over I continued to make these for my Christmas eve party.  They have now become a favourite and I continue to make them and love them.  They are small enough to slice in half and serve as a canapé.

Quail eggs take very little time to cook.  I prefer my egg to be hard boiled rather than soft for this recipe as I like to eat these cold.  The easier way to get a quality sausage meat is to buy your favourite sausage and slit them open. It is also a very labour saving way.

IMG_4315

The beautiful blue on the inside of the quail eggs always amazes me, I always think it a shame to throw them away. They have to be the prettiest of eggs.

IMG_4321

Scotch Quail Eggs

makes 6

Ingredients

6 quail eggs

1 hen egg beaten

plain flour for dusting

white bread crumbs

4-5 sausages

sunflower oil for frying

Method

Boil the quail eggs in a pan for 2-3 minutes.  Run under cold water to stop them cooking further and making them easier to handle.

Peel.  Tap the bottom of the widest part of the egg on the counter and use the handle of a teaspoon to get under the shell for leverage.  This method makes the peeling a little easier.

Skin the sausages – at this point you can add extra herbs if you wish.

Take 3/4 of the sausage meat from one of the sausages and roll into a ball, flatten out with your hand.  Roll the egg in some flour before placing in the middle of the sausage meat and then fold meat around the egg, giving it a couple of rolls in the hand to make sure it is sealed.  Repeat until all the eggs are used up.

At this point you can put the eggs in the fridge to rest and chill.

In three separate bowls put flour, beaten egg and bread crumbs.  Take  a sausage wrapped egg and dunk into the flour bowl covering well, then into the beaten egg and finally into the bread crumbs.

Heat some sunflower oil in a saucepan.  The oil tends to get clogged up so perhaps best not to fill a large pan unless you are making a lot as afterwards the oil is not worth keeping.

Drop a small piece of bread into the oil to check for temperature, when it comes to the surface sizzling, the oil is ready. Drop 2 Scotch eggs into the oil at a time and turn them as they cook to achieve an all over golden brown colour.

Drain on kitchen paper.

Serve.  Can be eaten hot, warm or cold.  Preferably with a little Dijon Mayonnaise

IMG_4240

Dawoud Pash are small meatballs with a pine nut in the centre cooked in a tomato sauce with the addition of cumin which gives this dish a middle eastern flavour.  Named after Dawoud Pasha, ruler of Iraq during the Ottoman empire who apparently, loved to eat them.  This is an Iraqi recipe that I have taken from Lamees Ibrahim’s book.   I had been to Books for Cooks just before Christmas to look for any new Greek cookery books and The Iraqi cookbook caught my eye as I was leaving.   It was sitting strategically on the table by the door, the beautiful food photography on the cover enticed me to pick up the book and have a look through.  As I can no longer justify buying any more books I did say with some conviction that this was a book I would love to receive as a Christmas present.  I might have gone on to repeat myself somewhat later on.  I have learnt pester power works!

The addition of the cumin to the sauce is what makes this dish middle eastern.  Although a delicate dish, there is a curry element to the flavour but without any of the heat.  The flavour of the lamb is still there and every now and then you find yourself biting into a pine nut which is quite satisfying, a bit like winning at the lucky dip or finding the coin in the Christmas pudding.  Even though I had carefully placed a pine nut in each ball I did notice when cooking a few of them escaped.

The Iraqi Cookbook has been traveling around with me since Christmas allowing me to dip into it and muse at which recipe I will try first.   As with a lot of things in life I didn’t plan on making Dawoud Pasha.  It was Sunday morning and as I looked into the fridge all that was there as any real basis for a meal was one pound of lamb mince.   The usual thoughts of Keftedes, or Italian meatballs crossed my mind but I desired something different, something new.  Then I remembered a recipe I had glanced at in The Iraqi Cookbook –  Dawoud Pasha.  I had all the ingredients in the cupboard and the recipe seemed straight forward and easy to follow.

The first unusual thing about making these meatballs is that an egg isn’t used to bind the mixture just a little water.  The second being that flour was kneaded into the meat, usually I dust the meatballs in the flour not mix it in.  The one thing I did learn was that by kneading the meat with a little water, it begins to change texture, it becomes more fluid and manageable.  There are no instructions about the adding of the water except to add as and when needed.  I added a large tablespoon of warm water instead of cold because I felt cold would tighten up any fat in the meat and would not help in the binding.

I didn’t have any fresh tomatoes so instead used a tin and strengthened the taste with a couple of tablespoons of tomato paste.

This is a very easy recipe to make and follow and I enjoyed sitting at the kitchen table making the little meatballs the size of walnuts, remembering to place a little pine nut in the centre.   Like a squirrel burying its nuts for winter!

IMG_4224

Dawoud Pasha

Makes 23 meatballs

Ingredients

500g/1lb lamb mince meat

1 clove garlic crushed

2 tbs plain flour

1 onion chopped

1 tablespoon oil

1 tin of tomatoes

2 tbs tomato paste

water

pine nuts

salt and pepper

1 tsp ground cumin

Method

In a frying pan over a low heat dry roast the pine nuts until light brown in colour.  As the pan gets hot take it off the heat and tip the pan, rolling the pine nuts back and forth allows them to still colour just from the heat of the pan. Place on a plate to cool.

In a bowl mix the lamb mince with the crushed garlic and the 2 tbs of flour.  Season.  Using your hands start to knead the meat adding a little warm water, a large tablespoon at a time.  The meat will become more pliable.

To make the meatballs take an amount the size of a walnut and roll in your hands to create a ball.  With your thumb push down and add a single pine nut.  Roll again into a ball and set aside onto a plate.  Continue until all the meat is used up.

Place some oil in a pan and fry the meatballs in small batches until all are browned. Place on some kitchen paper when cooked.

In a saucepan add a little oil and fry the chopped onions until softened.  Add the tin of tomatoes filling the tin with water and adding this too, tomato paste and cumin.  Season and bring to the boil and then turn down the heat and simmer for 10 minutes.  As the tinned tomatoes do not break down as easily as fresh I used a hand held blender to break them up.  Add the meatballs and simmer for another 20 minutes.

Serve with simple white rice.

IMG_4072

Perfect yogurt produced using the EasiYo

Like a lot of things in life once you have made your own yogurt there is no going back.  Unlike most shop bought yogurt, home made is far superior in texture and more importantly taste.  It has a fresh tangy flavour that is not overpowering on the palate and with no after taste.

For years I have shunned the flavoured yogurts.  I don’t like the taste nor in some cases their alarming colour.  When I do come across a natural live yogurt the price has me moving on.  I cannot justify in my head the cost that some of these little glass pots demand.  I am certain that the pretty terracotta or glass packaging plays a large part in the pricing.

Making yogurt has been around for centuries and made with very little equipment. For many it was second nature to having a rolling stock of yogurt that is used for drinks, in cooking and eating.  Yogurt can be made from not just cows, goats, sheep’s milk but the milk of buffalo, camel or even horse.  Nay I kid you not!

Many moons ago an electric yogurt maker with its eight little pots had been passed onto me.  At the time I couldn’t believe my luck, why would anyone not want it?!  I soon found out.  I hated the idea of having to find a space in my tiny kitchen for it.  Like a spoilt child it demanded to be put near a plug because it had a short lead and insisted that it was not to be disturbed for a whole 8-10 hours.  This thing would take up to a third of my working counter.    I also detested washing out those eight little plastic pots with their equally annoying lids, that time hadn’t been kind to.  The plastic had become rigid so getting them to fit on properly was a struggle, ending most times with a milky mess across the counter.  It wasn’t long before we parted ways and the yogurt machine was passed along to another grateful person unaware of it’s drawbacks.

So when I returned to making yogurt I had strong views about what I wanted.  No cables or plugs.  It had to have the benefit of being able to be left anywhere to do it’s stuff, it had to be easy to clean and, finally, have no little pots, just one big pot.  I hunted around – nothing suited. Then out of the blue I saw an offer for an EasiYo yogurt maker.  It ticked all  the boxes and it was half price.  I have to admit anything half price has me sitting up and paying attention.  It was a done deal. I was reeled in.

IMG_4031

Basic EasiYo Yogurt kit. The red baffle sits inside the thermos and acts as a stand for the yogurt pot to sit on.

I opened the box with high hopes, I read the instructions – they were based on using EasiYo powders and flavourings. Hmmm,  this did not appeal, and it wasn’t what I thought I had bought.   I went ahead anyway.  I used live yogurt and fresh milk, nothing else.  I followed the instructions of putting the yogurt into the canister  which was then placed into a giant thermos whereby  boiling water was poured in.  The lid screwed on and then left.  Next morning I excitedly opened the lid to discover – a liquid mess which was promptly poured down the plug hole.  Back to the drawing board.

With a little thought and a lot of research I realised that to make yogurt in the EasiYo all I needed to do was to make sure the water in the thermos was the same temperature as the yogurt in the pot.

My second attempt worked not just satisfactory but gloriously!  As I unscrewed the lid the yogurt inside was set to perfection.  I placed it in the fridge and we ate the lot at lunch time, marveling at our genius!

The Yogurt Club rules.

The one golden rule is once the yogurt  has been left to form in the EasiYo container  LEAVE IT ALONE FOR EIGHT HOURS – do not move it, open it or vibrate it, or unscrew it.  This is VERY important.

Owning a thermometer is not vital but very very useful.  I have a cheap electronic one which I find very easy and invaluable to use.

When you make your first batch make sure the starter yogurt is a live one.  After that you can save two tablespoons from each batch to start off the next.  I use St Helen’s Farm yogurt’s.

After eight hours, open the lid, remove the pot and place into the fridge for the yogurt to set further.  Chilling it will firm and thicken it further.  Three hours minimum.

I have experimented with semi skimmed milk, full fat and Jersey.  The choice is yours.  Each will produce a slightly different thickness and taste.  All make beautiful yogurt.

IMG_4080

IMG_4147

To make Greek yogurt the simple method is after it has come out of the EasiYo empty it into a sieve lined with muslin and leave in the fridge for two to three hours.  You will be surprised about how much whey will be released.  The longer you leave it the thicker the yogurt but be careful not to leave it too long or it will turn cheese like. Greek yogurt is made usually from either sheep and goats milk and is then strained to create the beautiful thick creamy texture.

Yogurt with EasiYo System.

Ingredients

1 litre of milk

2 generous tablespoons of live yogurt

Method

Heat milk in a pan or the microwave until it reaches 180F/82C.

Allow to cool to 116F/46C

When the milk has cooled to 116F/46C mix a little of it with the live yogurt then slowly add the rest.

Place into the pot.

Fill the EasiYo Thermos just above the line of the red baffle with warm water to the temperature of 116F/46C and place the pot inside.

Screw lid and leave alone for 8-10 hours.

Unscrew and remove the pot and place in the fridge.  After 3 hours it is ready to eat.

The yogurt will keep in the fridge for 4 days.

I love this EasiYo method the only drawback is that I wish the pot inside was made of glass instead of plastic.  Then this system would be perfect.

dol

Lahanodolmades is a Greek dish of stuffed cabbage leaves filled with meat and rice and served with an avgolemono sauce.   The meat and rice stuffing is flavoured with oregano and mint.  The avgolemono sauce adds a lemony kick and takes away any thought that cabbage is a fundamental part of this recipe.

This may not be the most attractive dish but what it lacks in appearance it makes up in flavour and has to be the ultimate in comfort food.  My mother only made this for my brothers and me, never for anyone else.  I don’t think she ever thought it was showy enough.  Perhaps that is why she always accompanied it with chips!  I have eaten it many times when I have cooked it myself without the chips but for me the chips are the icing on the cake.  My ritual is to eat the Lahanodolmades and then use the chips to mop up the avgolemono sauce.  Heaven. Well, for me that is.

Many Greek recipes call for Arborio rice, in this recipe it has been replaced by long grain as per my mother’s recipe.  No doubt she used this when she moved to England because she would have found it difficult if not impossible to find Arborio and like a lot of her Greek recipes she had to improvise.  Even though as the years passed and Arborio has become available my mother stuck with her long grain improvisation.

It took me a long time to make Lahanodolmades for myself, I just didn’t have a need.  When I was at home I would watch my mother on numerous occasions make this whilst sat on the kitchen chair chatting about nothing,  never thinking to note anything down.   When I left home I was busy trying all the things I didn’t get to eat at home to worry about any recipes.  It wasn’t until quite a few years later that I began to hanker after my childhood food.  I think my mother knew that she had a slight power over us.  If we visited her she would make our favourite foods.  It was a way of luring us in.

When we did visit it turned into a game, what dish my mother served up indicated who was the favourite.  If we planned a visit to my mother’s she would always ask what we would like her to cook for us.  My reply was either Lahanodolmades or Paella.  When I sat down to eat it usually wasn’t either.  There would always be a long list of rotating excuses why not, usually because they were a lot of work.  This all stopped when I realised what went on when my elder brother visited, he too requested my mother’s Lahanodolmades and that’s exactly what he got.  I can remember turning up unexpectedly one evening to find him happily eating a huge plate of them with the accompanying chips.  When I exclaimed my outrage my brother sat and laughed and said in a very smug way that if I wanted to eat them in future I should check when he was visiting!

This recipe sounds complicated but it isn’t and neither does it have a long list of ingredients.  The ratio of rice to mince is up to you. As with a lot of recipes the meat can be padded out with more rice.   I use oregano and mint but these can be replaced with parsley and dill, it’s just a matter of what you have in the cupboard or garden at the time.  Another joy of this recipe is that it can be made the day before and reheated gently so as not to break the Lahanodolmades.  The avgolemono sauce does though need to be made fresh just before serving and cannot be reheated.

Lahanodolmades

Ingredients

1  whole white cabbage

1 lb/500g lamb mince  (beef, pork, veal or a combination is fine)

1 small onion grated

1 tablespoon olive oil

1 small egg lightly beaten

2 oz/60g long gain rice (washed)

2 tbs oregano dried

1 tbs mint dried

Salt and pepper

Vegetable stock

Avgolemono sauce

3 egg yolks

Juice of 2 lemons

2 tbs cornflour

Stock from the cooked Lahanodolmades

Method

1

Take the whole white cabbage turn it over and cut out the heart.

Place a large fork or as you can see I have used a serving fork into the middle of the cabbage.

Put a large pan of salted water onto boil.  The pan needs to be big enough to incorporate the whole cabbage.

Place the cabbage into the water when boiling and leave it in for a few minutes.  Remove.  Gently pull away the outer leaves as they loosen.  Place the whole cabbage back into the pan and repeat until all the leaves are removed.

Set aside the leaves until they are cool enough to handle.

2

Any of the small leaves or pieces of cabbage not used can be placed in the bottom of the pan.  This will act as a vegetable trivet and will stop the Lahanodolmades from burning or catching whilst cooking.

In a pan put the tablespoon of oil and heat gently.  Add the onions and cook until transparent.  Remove and cool.

Put into a bowl the mince, washed rice, onion, herbs, egg, salt and pepper.  Mix well with your hands.

Take one cabbage leaf and with a sharp knife cut any large tough veins out.  Place a walnut sized piece of mince and rice mixture into the middle.  Bring up the sides and roll.

Place the rolled cabbage parcel on top of the cabbage lined pan and start to fill the pan up creating layers of parcels. The aim is to pack them in tightly.

6

When all the leaves have been wrapped and packed into the pan place an upturned saucer on top to anchor them down.

7

Dissolve a stock cube in some boiling water in a jug and gently pour this into the pan until it just covers the Lahanodolmades.  Put a lid on the pan and gently bring to the boil after which turn down to a slow simmer.  Leave them to simmer for about 60 to 80 minutes.

To make the Avgolemono sauce

Beat the egg yolks to a creamy constituency in a pan.

Add the lemon juice slowly whilst continuing to beat

Add the cornflour and stir well until smooth

Now gently add a cup of stock from the pan of cooked Lahanodolmades which has been allowed to cool until tepid and stir well.

If you add the stock too hot it will curdle the eggs.

Place the pan on a low heat and stir until the sauce thickens.  Do not over cook.  Depending on how thick you like your sauce you can either add more or less stock.

As I usually make enough for two meals I do not add the sauce to the pan of Lahanodolmades.  I serve them onto a plate and pour the Avgolomeno sauce over them.

Serve as they are with the sauce and if you wish a large helping of chips!

Seville Gin

IMG_4000

White frost is coated all around outside this morning and the sun is hidden behind a thick blanket of grey cloud.  As I stand waiting for the kettle to boil for my first coffee of the morning, I can feel the chill of the frost seep into my toes working its way up to my bones.  Spring seems a long way off.  The day may look a little bleak and cold but sitting just a yard away on my kitchen counter is a bowl of beautiful Seville oranges, thick wrinkled orange globes.  These pithy, pippy globes of sunshine will, when cut open and placed into a preserving pan, fill the whole house with a sweet citrus perfume reminding me of summers past.  Sadly their beautiful colour and perfume disguises their bitter tasting fruit and their abundance of pips lend themselves to making wonderful pectin.

Marmalade making has begun to enjoy a come back and the World’s Original Marmalade Awards & Festival is helping.  Each year the numbers of entries grow.  I have already posted my gold winning recipe here.

Marmalade is not the only use of the Seville orange.  They can also be used to make a unusual and beautiful liqueur.  The method is very similar to that used for sloe gin but with a much longer infuse –  in fact a three year infuse.

Three years ago I used two different gins to see if there was a difference in the colour and taste.  When I have made sloe gin I have noticed that different brands of gin do alter the finished taste.  With the Sevilles I made two jars, one with Gordon’s gin and one with Beefeater s gin. Even after one year I could see there is a difference in the colour.

P1040544

Colour after 3 years and with peel removed.

The first year I didn’t touch the Seville gin and left it to infuse uninterrupted, the second year I needed to see what was happening so I sampled a little.  I found that it gave off a beautiful citrus perfume, the taste was certainly infused with the Seville orange flavour but it still had that bitter taste that the oranges have so I added another 60gms of sugar. Again shaking daily until the sugar had dissolved and then left undisturbed.

As with making sloe gin I have found over the years that the recipe is so simple and yet the smallest of changes can make a big difference.  I always put a label on the jar with the date, type of gin used and anything else that is useful such as any additions.  I also keep a notebook (some say I have too much time on my hands, but they also like to drink the finished product!).

As this is solely for my own consumption I can add as much sugar during the process to suit my own tastes.  Remember you can add but you can’t take away so if you do add any more sugar better to add a little at a time and test.  Once made and bottled you will find if you can keep it over a year the taste does change into a more mellow finish.

Seville Orange Gin

Ingredients

4/5 Seville oranges

1 litre gin

250g granulated sugar – I added a further 60gms after the first year.

A couple of cloves

Method

Peel the oranges.  I find using a potato peeler works for me best as you don’t want the pith.

Place the orange peel, gin, sugar and cloves if using into a clean screw top jar, Kilner jars are good for this.  Secure the jar tightly and shake.  Place into a dry, dark cupboard, shaking daily until the sugar has dissolved.  Leave for three years.

N.B.  For me I much prefer a sweeter taste and would add even more sugar than listed above.  As also noted above the brand of gin makes a big difference to the finished taste.

burntcustardToday I saw a little symbol in the top right hand side of the page from WordPress.  A symbol of a little cup which when clicked on told me that today was Maria Dernikos’s second anniversary.  Instead of a glittering post I have decided to post what is actually happening in my kitchen and why.  The picture above was taken on my mobile phone with the most abysmal lighting.

Two years of erratic posts.  I am very lucky to still have readers.  How I wish I could post and share all the recipes that I cook.  My main problem is photography.  As with my food I like to present my posts and my recipes to the best of my ability.  The only problem being my photographic ability.  It is very much like a cyclist who has been given the keys to a Ferrari – I have no idea of what I am doing. When I started this website I moaned that the lack of quality photographs was the fault of my inadequate camera.  So as a very generous birthday gift I was given a Cannon EOS digital SLR (embarrassingly, I don’t even know the exact model).  I thought I could just point and click and the result would be a sharp professional photograph.  How wrong I was.  I started to watch Youtube tutorials, buy books on the subject but very little has sunk in.

A friend casually asked if I took more than one photograph of the food on my posts.  One photograph!! – more like 50!  My technique has been to point, click and repeat as many times as I can and then pick a picture.  It still remains a mystery to me why when I am standing in the same position and my subject has not moved an inch that 50 pictures can be so different.

One big lesson I have learnt is how important natural light is.  Another woe to add to my endless list – living in England in winter has its problems.  I need say no more.

I have searched the Internet for advice and thanks to a post from Flora’s Table and others I have picked up some very good tips but progress is slow and I seem to be photographically challenged on a gigantic scale.

So today I am going to post a picture and a recipe that would normally be left on the reject pile (which after two years resembles more of a mountain than a pile).  Mainly because the weather here is overcast, damp and windy which makes any photograph in natural light a disaster.  Secondly, because if a picture can paint a thousand words I am afraid mine isn’t painting the right words.  The custards tasted wonderful and the burnt sugar topping tasted of toffee.

I don’t think I need to tell anyone that Crème Brûlée – or as it was known in England originally as Burnt Custard – tastes divine.  Underneath the hard toffee sugar discs sit the richest of egg custards that have been generously flavoured with vanilla seeds.

The reason I have posted this simple recipe is for those of you who have any double cream sitting in their fridge left over from Christmas and were wondering how to use it up.  Of course the other recipe would be to make butter as I have posted here.

This recipe can be halved very easily.

I only had small eggs so I weighed them in their shells to roughly get the weight of 6 large eggs.  Each large egg should weigh with shell 63-73gms so to get the weight of 6 large eggs I needed roughly 210gms of whole shelled eggs.  This is also quite a good method to use if you have different sized eggs.

Crème Brûlée or Burnt Custard

(4 generous ramekins worth)

Ingredients

600 ml double cream

2 vanilla pods (1 would suffice) split lengthwise

6 egg yolks

60g caster sugar

1-2 tsp of demerara sugar per ramekin.

Method

Turn the oven to Gas mark 2/150C/300F

In a heavy bottomed pan put in the double cream and the  split vanilla pods.  Bring to a boil gently.

Meanwhile, put the egg yolks and the caster sugar into a bowl and beat until silky smooth and pale.  When the cream has boiled remove the vanilla pods and pour onto the egg mixture.  Mix thoroughly.

Strain the mixture into a jug.

Place four ramekins into an oven proof dish.  Fill the dish with cold water to half way up the ramekins. Thus making a water bath for the custards.   Carefully pour the egg mixture into the four ramekins filling to the top.  Place carefully into the oven and leave there for 45 minutes.

To check when they are done gently shake the ramekins.  There should be a slight wobble no more.  If not leave them for another five to ten minutes.

When done remove from the oven and their water bath and leave to cool.  When cool place in the fridge.  These can be made the day before.  Shortly before serving sprinkle the top of the custards with demerara sugar, making sure that there is an even coating over the entire area.  Place under the grill and when the sugar has dissolved, remove.  Leave to one side for the sugar to set.  Serve.

N.B.  Wash the discarded vanilla pods in warm water and allow to dry.  When dry place into caster sugar.  Over time this will flavour the sugar.

keftedes

Keftedes (pronounced keftethes) are Greek meatballs eaten hot or cold.  There is something special about them, they are incredibly moreish and I think every Greek household must have their own version of the recipe.  I use lamb mince but there is nothing to say you cannot use pork, beef, veal or a combination.   In summer I eat them cold with tzatziki and a salad and in winter I eat them warm with fava.  The recipe is versatile in that you add more bread to increase volume, or add different herbs.

The summer I learnt to make Keftethes was the summer I travelled to Athens by  Magic Bus.  My friend Karen and I had talked for weeks about going to Greece overland and spending the summer lying in the sun. We scoured the back of Time-Out for cheap tickets.  One advert caught our attention ‘The Magic Bus’ – return ticket London/Athens/London £55. Tickets were only issued on a cash basis and in person, the offices of The Magic Bus were above a shop in Shaftesbury Ave and pretty shabby.  We were both nervous in handing over our hard earned cash for a non-refundable coach ticket but the thought of a summer of love was greater.  Our fate was sealed.  Hello summer of expectation.

My parents drove us up to Victoria bus station where we boarded the packed coach.  My protective father interviewed the two Greek drivers who had little to no English, the cross examination went well until they asked him if he knew the way out of London.  I could feel the chill of an ill wind whistle pass my seat.

The promised three and a half day trip turned into ten days of hell.  The coach was old, and tatty.  It was packed to the brim with people and luggage. There was very little legroom and had we known that we would have to sleep sitting up in our seats for the next ten days we would have got off at Victoria. We were lucky in that the nasty infection which spread through the coach was limited to the foot, which was so nasty the chap sitting behind us ended up in a Greek hospital.

Our drivers were hell bent on driving at break neck speed with as few stops as possible, they had a mission and the rest of us were not in on it.   As we approached Mont Blanc the driver’s behaviour became very excited and as we weaved up the mountain we could see what was an earlier Magic Bus.  To celebrate their reunion, they took it in turns to over take each other, whilst opening and closing the door shouting and waving.  As the coach climbed higher the stunts became more dangerous with the other coach’s spare driver managing to hang out of the door whilst trying to drink a glass of white wine. I think if I hadn’t been so tired, hungry and bashed about I would have been frighten senseless.  I sat there rooted to my seat glancing out of the window at the massive drop and wishing I was somewhere else.  I had gone off the idea of love.

Shortly after this we had several long delays, which pushed our drivers to the brink of meltdown.  One of their ideas was to cut the length of time for our food and toilet stops to a minimum.  We as a group tried to revolt and refused to be rushed in returning to the coach.  Two of us passengers learnt a hard lesson that we were not in that strong a position, because the coach left without them.  No amount of shouting and abuse at the drivers by us stopped the coach.  We never saw them again.

From then on in the journey was just pure hell.  Two days stuck at the Yugoslavian borders and a lot of backtracking due to the drivers being completely lost.  When we did finally arrive in Athens all I can remember is that I was tired and filthy and longed for home.

It took about 24 hours before we bounced back.  I spent the rest of the  summer staying with Patroklos in Athens.  Kyria Cisci, Patroklos’ mother lived in the flat below and was keen to take me under her wing.   During the day when Patroklos was at work Kyria Cisci would  show me how to iron a man’s shirt and how to cook.   One of the recipes she showed me and has stayed with me is keftedes.  I think it was because she told me her secret ingredient, which was a little bit of Ouzo added to the mince mixture.  I felt very honored to have been let into her secret.   I would sit in her kitchen early in the morning (to avoid the mid day heat) and take notes as she went about creating her recipes.  I might not have found love that summer but I certainly was prepared if I did!

Keftedes

Ingredients

500g lamb mince

1 egg

1 onion chopped very finely and cooked to transparent stage in a pan with a little butter.

2 slices day old white bread with the crusts cut off.  You can use more if you want the meatballs to go further

A little milk for the bread.

Mint – fresh or dried

Oregano – fresh or dried

Salt and pepper

A little Ouzo (optional)

Oil for frying – I use olive but use the oil you like the taste of.

Flour for dusting the meatballs.

Method

  1. Chop the onion finely and put into a pan with a little butter and leave on a low heat until they are transparent and soft.
  2. Take the crusts off the bread and submerge the crustless bread in milk and then gently squeeze, you don’t want to make the bread into a pulpy ball but something that will break up easily – if you prefer you can use water instead of the milk.
  3. Put the bread, egg, meat, herbs, softened onion, salt and pepper into a food processor and give it a good whizz.  Lift the lid and make sure it is all well mixed.  You can also do this process by hand – the difference is the mince is not as fine.  For the best results I put the mixture in the fridge for half an hour for it to rest and for the ingredients to cool down and firm up which will make rolling them into balls much easier.
  4. Remove from fridge. Take about a tablespoon and a bit of the meat mixture and roll between your hands to create a ball the size of a walnut, drop this ball into the flour and coat.  Set aside.  Carry on until all the meat has been turned into floured balls.  Heat your oil until its hot enough, if you drop a small crumb of bread in and it starts to sizzle its ready.  Start placing the balls into the oil, flattening them a little with the back of a spoon.  Cook on both sides.  The aim is that the meat is cooked throughout not pink.

The size of the keftedes is up to you.  They can be made the size of walnuts, or smaller if you want to use them as an appetiser or much larger if you are in a hurry but you need to watch that they are cooked through.

Simply Gnocchi

GnoochiMDLiving in Central London is a privilege, but it also comes with a few drawbacks. One of them is sourcing fresh ingredients.  Taking the car anywhere during the day for me is a fraught affair, and even if I actually manage to get to my destination, finding a parking space is like trying to find a hen’s teeth.  So I resort to either catching a bus or walking.

My quest for ingredients takes me all over London. The Athenian in Moscow Road for Greek, Green Valley in Upper Berkeley Street for Lebanese, Church Street Market off Edgware Road for fruit and vegetables, not to mention an array of little shops dotted all over the metropolis.

Today I wanted Italian, so I took the twenty-minute walk up to Little Italy in Clerkenwell, cutting through the busy Leather Lane market – giving the sole surviving vegetable stall a quick glance as I strolled past.   The market mainly caters for lunch time office workers who want fast food and cheap clothes.    Right at the end of the market on the opposite side of the road stands Terroni & Son – the oldest deli in London that has been going since 1878.  I have been visiting them now for nearly twenty years.  As the years have gone by the shop has changed beyond recognition.  I know change is good but I hanker after the old days. When the deli was packed to the rafters with produce and there was always a noisy background of Sicilian banter.

The shop has been opened up, allowing the light to flood in.  The islands of shelves that were once tightly packed with every imaginable Italian produce now gone, replaced with long sleek modern tables and chairs.  Terroni’s now serves coffee, lunches and snacks and very good ones at that.

There is still a trace of the old shop in the two large glass counters that sit at the back of the shop showcasing an array of charcuterie, cheeses, Italian sausages and a fine selection of Italian sweets and cakes.  I tend to stand at the charcuterie side to give my order so as not to be tempted by the cakes.  I can resist as long as I don’t catch sight of the sfogliatelle – then all is lost.

Today I had a bigger problem to deal with – they no longer appear to sell pasta flour.  I haven’t visited them all summer and so it came as a bit of a shock to find the eating area has expanded and as a result their selection of dry goods has decreased.  This is not good.  It throws out of the window my carefully planned meal of ravioli.  I am not good with change and cannot think what to do.  I buy my cheese and bread and leave.  Succumbing only to the smallest box of sweet delicacies – I need to ponder on this new problem of where to get pasta flour.

As I walk back through Hatton Garden I try and think what I am going to cook for supper.  To add to my misery it starts to rain.  I rack my brains of what is in the cupboard that will make a meal and save me from trekking elsewhere.  All there is in the fridge of any note is a large bag of potatoes. Then it comes to me – Gnocchi!!!  Necessity is the mother of invention.

It’s straight back home, feet up and maybe a small reward from inside the cake box before I put my potatoes on to cook.

Gnocchi is the simplest and most heavenly of recipes.  A few potatoes can be turned into light soft potato dumplings that melt in the mouth.   As my ingredients were limited I went for the simple accompaniment of sage and butter with a generous heap of Pecorino.Gnoochi2MD

Gnocchi

2 –3 servings

Ingredients

500g  floury potatoes (Maris piper, King Edwards or Desiree are good).

Salt

50-75 gm 00 pasta flour

1 egg yolk

Extra flour for rolling out

Method

Put unpeeled potatoes in a pan filled with cold water and bring to the boil.  Cook until tender.  Drain.  Allow to cool slightly and then remove the skins.  Push the potatoes through a ricer.  The potatoes should be cool before adding the egg yolk and some of the flour.  Knead lightly.  If you feel the mixture is too wet add more of the flour.  I start off with 50 gms and add more if needed.

Flatten the dough into a rough flat square and cut into roughly 2cm wide strips.  Take a strip and lightly roll into a sausage shape.  Cut into 2/3 cms pieces.

Take each gnocchi piece and with your thumb gently push it against the tines of an upturned fork which we give you a groove to one side and roll back.  This will make an indentation to the gnocchi.  Place the gnocchi onto a floured tray and repeat.

To cook – bring a large pan of salted water to the boil and then carefully drop them in – be careful as they can splash back which can be a little painful on the hand.  Give the pan a gentle stir and wait for them to start to rise to the surface.  This will take about a minute.  Once they have risen wait ten to twenty seconds and then remove them with a slotted spoon.

Butter and Sage Sauce

Ingredients

2/3 oz butter

6 sage leaves fresh

Salt and pepper

Method

Put the butter in a pan and heat.  Add the sage leaves and seasoning and tilt the pan to turn the sage leaves.  The butter will turn a caramel colour.  Take off the heat and toss the gnocchi in coating them well.

Serve with a generous helping of Pecorino

N.B:

I didn’t have even shaped potatoes so I put in the pan what I had, checking the smaller ones first, and as soon as they were tender taking them out.

Instead of a fork I used a gnocchi ridger which also doubles up to make garganelli pasta (which is similar to penne).

IMG_3855

Potted Shrimps

potted shrimp

I first ate potted shrimp when I used to visit a boyfriend who was studing in Morecambe.  We ate them served on toast sat by an open fire and they were delicious.  Buttery and sweet with a hint of spicy aftertaste.  They always remind me of winter and Morecambe.   Like the boyfriend, potted shrimps seem to be a dim and distant memory!  The recipe has gone out of fashion which is a shame if not a scandal.

Years ago I lived in Norwich and each lunchtime I would visit  Norwich market which had a wonderful shellfish stall.  The shellfish would be stacked into huge piles separated by wooden dividers.  There was always a long queue. The shellfish were sold by the pint or ½ pint and usually by a team of women who would use a pewter tankard to measure the amounts out before emptying them onto a sheet of paper, which would be wrapped and handed over to the customer before turning to the next person in the queue – all at greased lightening speed. There was no time to ask any questions.   I was always tempted by the sweetness of the 2 inch browny pink shrimp but opted for the prawns – I was too impatient to sit and peel the shrimps.  Maybe the massive decline in their sales over the decades is because we just don’t want to sit and do fiddly little jobs like peeling shrimps anymore?  It’s all about fast food.

What I didn’t know then was the skill and hard work that went into catching them.  The two main sources of shrimp come from  Morecambe Bay and Kings Lynn off the Norfolk coast.

In Morecambe the brown shrimp in years gone by were fished by horse and cart, in bitter conditions of winds and freezing temperatures.  The horses would go out as far as 2 miles, with the water coming right up to their necks.  The last of the horse and cart was seen around the 1950s, along with the Nobbies.  A Nobby is a small wooden 32ft fishing boat which dates back to the 1840s, they were fast and designed for the shallow waters of Morecambe.  Sadly now these too have nearly died out. Today the shrimps are caught with nets attached to a rope on a trailer behind tractors. These scrape along the sand disturbing the shrimp who then jump up and are swept up into the mesh bag.  It is a dangerous job as the tractors can sink in the sand and there are the tides to contend with.

Morecambe Bay is the most beautiful sight – when the tide is out it leaves a vast area of golden sand broken up by  little channels of seawater.  These sands are treacherous and have taken many lives over the years because when the tide turns it is said to come in faster than a galloping horse. The fishermen who do this job need expert knowledge of the shifting quicksand and tidal patterns.  There is a fantastic short film which shows the men going out with the horses, taken around the 1950’s.   It really does give a glimpse of how hard the work was for a Morecambe Bay shrimper.

Sadly, only three companies shrimp in Morecambe Bay now whereas there used to be thirty.

The most popular way to eat brown shrimps is Potted Shrimp.  A traditional British recipe and much loved but hardly ever eaten now.  Tossed in spiced butter and potted, and then covered with clarified butter to preserve it.  Potting with clarified butter is a method that has been used for centuries, dating back to Tudor times.  Very simple but effective.

Potted Shrimps

Serves Two

Ingredients

90gms peeled brown shrimps

1 oz butter

pinch of cayenne pepper

pinch of mace

pinch of white pepper

Worcestershire sauce a few drops

Clarified butter (see below)

Method

In a pan melt 1 oz of  butter do not allow to brown.   Take the pan off the head and add the spices.  Taste and adjust.  Put back onto a low heat for a minute so that the spices have a chance to infuse the butter.  Remove from the heat and stir in the prawns making sure they are well coated with the spiced butter.

Divide the shrimp mixture into two small ramekins pressing down with the back of a spoon to compact the shrimps.  Now gently pour over with clarified butter, covering the shrimps with an extra 1/4 inch layer.  This is the preservative factor.  Put into the fridge and allow to set.

Clarified Butter

Ingredients

2 oz unsalted butter

Muslin for straining

Method

Put 2 oz of unsalted butter into a pan and slowly heat.  Allow it to come to a gentle bubble making sure not to burn it.  Patches of white clouds will appear.  Carefully spoon this off.  You don’t need to be too precise as the next step is to pour the melted butter through a sieve lined with a couple of layers of muslin into a jug.

The clarified butter will keep in the fridge for a couple of months and can be used for other dishes.

Clarified butter